|
With its temperature range from 100°C to 450°C, you can use the 858D for heat shrink tubing as well as for (dis)soldering SMD parts on your PCBs. We dismantled a specimen and discovered the positive and negative features of this device. |
Introduction to the 858D
Manufacturer, type number and price
The 858D is another typical Chinese product that is offered under many different manufacturer names. We found, after a short search on the internet:
- BEST 858D
- Baku BK-858D
- JCD 858D
- Youyue 858D
- Atten 858D+
- Zeny 858D
Prices vary considerably. At Banggood you buy a model for € 32.21, but for the Baku BK-858D you have to pay € 59.95. At AlieExpress you see offers for € 12.84, but then you do have to pay € 24.64 shipping, so that is not cheaper.
However, it should be noted that there are a few small differences between the various models. For example, the more expensive models have a round eight-pole connector on the cable of the handle and an IEC connector with a built-in fuse for connecting the power cord. On the cheaper models, both cables go into the device via a simple cable entry.
We bought the tested model from Banggood. That unbranded model comes with a mains cord with a Chinese mains plug with three flat pins. Fortunately, an adapter to a European earthed mains plug is included. With this device, both cables come out of the device without connectors.
 |
| The price difference: the cables with or without connectors. (© 2020 Jos Verstraten) |
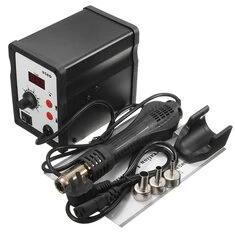
What is delivered
The 858D is delivered well packaged in a sturdy cardboard box. Inside the box:
- The 858D hot air station.
- A holder for the handle.
- A Euro adapter for the mains plug.
- Three nozzles with various diameters.
- A Chinese/English manual.
The station is housed in a sturdy metal case measuring 13.5 cm by 10.0 cm (front panel) and 15.0 cm (depth). With its weight of 1.55 kg and its rubber feet, the station stands sturdy on the table. You can attach the holder for the handle to the left or right of the case using two screws.
 |
| The complete contents of the cardboard box. (© 2020 Jos Verstraten) |
Technical data
The manufacturer provides the specifications below:
- Voltage: 230 Vac
- Power output: 700 W max.
- Air temperature range: 100 °C ~ 450 °C
- Air Capacity: 120 litres/minute max.
- Fan noise: less than 45 dB
- Display: three-digit LED
- Resolution temperature indicator: 1 °C
- Air pump: brushless centrifugal fan
- Temperature control: thermocouple and microcontroller
The hot air station
On the front panel you will see the three-digit display which first shows the set temperature and then the current temperature in the outflow opening of the handle. With the two red push buttons you set the desired temperature between 100 °C and 450 °C. A short push of a button increases or decreases the temperature by one degree. After a longer press, the display quickly increases or decreases and you can quickly set the desired temperature. One second after this setting, the display starts showing the current temperature in the outflow opening.
Above the two push buttons there is a small hole in the front panel called 'CAL'. Behind this hole is a trimming potentiometer with which you can calibrate the display, if you have the measuring equipment for this. With the black rotating knob you can adjust the amount of air that is blown out of the handle. At the bottom left is the power switch.
On the back you can see the mains power cable and a fuse holder for a standard glass fuse. The high-quality mains cable has a length of 95 cm.
 |
| Front and rear of the 858D. (© 2020 Jos Verstraten) |
The handle
The handle where the hot air comes out is 22.5 cm long and weighs only 172 grams. It is connected to the station with a very flexible 70 cm long cable. In the round back there is a small centrifugal fan that takes care of the airflow. The front of the handle is made of metal. It contains the heating element and a thermocouple that measures the temperature of the outgoing air. This metal part has a diameter of 25 mm and has a primitive bayonet mount on which you can attach the nozzles.
In addition to the heating element, the fan and the thermocouple, the handle also contains a reed switch, which gives a signal when you place the handle in the holder, read on.
 |
| The 22.5 cm long handle with fan. (© AliExpress) |
The nozzles
The Banggood bundle includes three nozzles with outflow diameters of 5 mm, 7 mm and 10 mm. They can be mounted on the outflow opening of the handle with one movement. Some more expensive vendors deliver up to seven nozzles with the 858D. However, such sets can also be purchased separately for a few euros.
 |
| The three nozzles supplied by Banggood. (© Banggood) |
The operation of the device
Working with the 858D
The operation of the device is extremely simple. Always start with the handle placed in the holder. In the holder there is a small magnet that closes the reed switch in the handle. The microcontroller then knows that the handle is in the holder and it is not the intention to activate the heating element. Switch on the 858D. The display shows the set temperature for one second. Afterwards, three dashes '---' will appear in the display, indicating a current temperature below 100 °C. Then press the push buttons. The indication changes by one degree, by pressing the push buttons longer you can set the temperature to the desired value. Set the rotary knob that regulates the amount of air to the maximum setting. The display now reads '---' again.
Now take the handle in your hand, the fan will immediately turn and the heating element in the handle will be activated. The display shows the current temperature in the outflow opening of the handle. You will see that this temperature rises rapidly to the set value.
When your work is finished, place the handle back in the holder. The reed contact closes, the microcontroller stops activating the heating element. However, the fan continues to run until the temperature in the outflow opening has dropped to 100 °C. At this point, the fan also shuts down and '---' appears in the display again.
The microcontroller stores the last set temperature in a non-volatile memory.
The strange indication of temperature
With the indication of the temperature in the LED display something strange is going on. If you take the handle in your hand, the display will show the current temperature in the outflow opening. However, once this temperature has reached the set value, the display freezes at this value. Our experiments show that for some reason the system no longer shows the current temperature, but the set temperature. It is logical that if you block the air flow, the temperature in the outflow opening rises for a moment. After all, no control system can immediately compensate for such an action by reducing the power to the heating element. If the current temperature were to be displayed, it would in any case have to rise for a moment and then fall again due to the action of the control system. However, this does not happen; the display continues to claim that the temperature in the outflow opening is equal to the set value.
A strange decision on the part of the designers, the logic of which we do not understand.
The electronics in the 858D
The electronics in the handle
In the handle are present:
- A thermocouple.
- A heating element.
- A centrifugal fan.
- A reed switch.
The metal part of the handle is also earthed. So it is not so strange that an eight-core cable is needed to measure and control these elements. After unscrewing the front part of the handle and removing two small screws, you can open the handle, see the picture below.
To our astonishment it appears that all the wiring is made with very thin cores, even the 230 V wiring to the heating element. According to the specifications, this element delivers a maximum of 700 W, which corresponds to a current of 3 A. Hopefully that will continue to go well in the long term! The grounding of the metal cylinder is also made with such a thin strand wire.
At the bottom left of the picture you can see the heating element. This element is located in the metal cylinder which you can see on the top right. This element not only contains the heating spiral, but also the thermocouple which is in the top and measures the outflow temperature. At the bottom right is the small centrifugal fan whose outlet opening is locked airtight in the housing by means of a rubber collar. The fan operates on 24 Vdc voltage.
The small PCB is only used to connect the eight-core cable to the various elements in the handle. This is done with solderings that are not all neatly carried out by hand. Between the two solder pads that connect the 230 V to the wires to the heating element is only a very thin layer of insulation.
 |
| The wiring in the handle. (© 2020 Jos Verstraten) |
The electronics in the station
After unscrewing the housing, a true spider's web of wiring unfolds before our eyes, see photo below. The first impression is: sloppy! The connections on the PCB that are directly connected to the mains voltage are made with a PCB header terminal. The other wires are soldered directly into the PCB. A few points that stand out to us:
- The power switch is only single-pole.
- All soldering points carrying the mains voltage are neatly finished with heatshrink tubing.
- The central grounding point is located on the front panel. The earthing wire from the mains cable and the earthing wire from the eight-core cable are directly connected to this point. It wouldn't have cost much extra to insert a solder tab under one of the screws of the transformer and connect the housing directly to the earthing point via an extra wire.
- The transformer is too close to the soldering lugs of the fuse holder. One of the wires insulated with heat shrink tubing that are soldered to this holder now rubs against the transformer.
- The transformer has two secondary windings, one of 11 V and one of 24 V. The 11 V one is used to generate the +5 V supply voltage for the control electronics, the 24 V one to generate the supply voltage for the 24 V fan in the handle.
- No SMD components are used.
- The power of the 230 V heating element is controlled by a triac type BTA41600 and an optical coupler type MOC3041M which controls the gate. The mains voltage is thus galvanically isolated from the control electronics and the elements on the front panel. The triac is mounted on a large heatsink.
- A S3F94C4 (originally designed by Zilog) is used as microcontroller. The firmware and storage of the last set temperature is in a 24C02 EEPROM.
- To amplify the very small signal of the thermocouple, an op-amp of type OP07CP and two transistors are used.
- The fan is controlled by a darlington type TIP122. As this semiconductor is not cooled, it is likely that the speed of the motor is controlled by pulse-width modulation (PWM) of the 24 V supply voltage.
 |
| The assembly of the electronics in the station. (© 2020 Jos Verstraten) |
The PCB of the 858D
The PCB shown in the photo below is single-sided and soldered by hand. Not all solder connections have been carried out with great care. Much more shocking, however, is the observation that the designer of this PCB has not taken any measures to properly insulate the 230 V part from the low voltage part. We have framed the part directly connected to the 230 V mains voltage in red. In some places, there is less than 1 mm of insulation between the 230 V pads and the adjacent low voltage tracks! This should have been much better!
 |
The copper side of the PCB. (© 2020 Jos Verstraten) |
What is the real 858D?
It happens more often that one and the same Chinese device is sold under different brand names. Internally it then turns out that all devices are completely identical and clearly come from the same production line. This is not the case with the 858D. We already mentioned the differences in the way the two cables are connected to the device. But there are also major differences between the PCBs of various devices. A short search for '858D teardown' on Google resulted in four different PCB layouts. Only the location of the display, the potentiometer, the two push buttons and the calibration trimmer are identical. Our criticism on the poor insulation between the 230 V circuit and the low voltage circuit, for example, clearly does not apply to the right-hand PCB. There you can see, right above, a large insulation area between both circuits.
That doesn't make the work of a tester any easier: are you buying the same model we tested? No one can say!
How is the temperature regulated?
It is obvious to assume that the power supplied to the heating element is controlled by means of a simple and inexpensive phase cut control. However, this is not possible if the MOC3041M is used to control the gate of the triac. This opto-coupler works according to the 'zero crossing' principle. This means that this component only drives the connected triac shortly after the zero crossing of the mains voltage. With this principle, of course, no phase cutting is possible.
So how does it work? The oscilloscope, switched over the heating element, provides the answer. It works with the principle of half cycle control (burst fire), in which the power is regulated by not switching all half periods of the mains voltage to the heating element. If little power is needed, only a few half periods are switched. If more power is needed, more half periods are switched.
This is an excellent way of regulating the power of heating elements because this principle causes absolutely no interference to the mains voltage. After all, when the triac is switched on, the current through the load is zero. The current increases just as gradually as the voltage and higher harmonics are completely absent. This principle should be applied to all electronically controlled soldering irons and hot air stations!
Strangely enough, no regularity can be detected in the switching on and off of the half periods, even when the air is at final temperature. It even seems as if the control is completely chaotic. The image below on the screen of the oscilloscope is therefore a single trace recording because no stable triggering is possible. This is confirmed by the result on an analogue AC-voltage meter that is switched over the heating element. The needle does not stand still for a moment and even goes quite a bit up and down.
Earthing resistance of the handle
The metal part of the handle is earthed, so it is important to measure the earthing resistance. We are very surprised when it turns out that an infinitely high resistance is measured between this part and the earthing of the euro plug. Somewhere an interrupted wire? No, because a resistance of 0.427 Ω is measured to the earth pin of the Chinese mains plug. So the interruption is in the adaptor that turns the Chinese mains plug into a European one.
A good advice: consider your safety, cut the Chinese mains plug off the mains cable and install a European earthed plug!
That doesn't make the work of a tester any easier: are you buying the same model we tested? No one can say!
 |
We found four different PCB versions of the 858D. (© 2020 Jos Verstraten) |
How is the temperature regulated?
It is obvious to assume that the power supplied to the heating element is controlled by means of a simple and inexpensive phase cut control. However, this is not possible if the MOC3041M is used to control the gate of the triac. This opto-coupler works according to the 'zero crossing' principle. This means that this component only drives the connected triac shortly after the zero crossing of the mains voltage. With this principle, of course, no phase cutting is possible.
So how does it work? The oscilloscope, switched over the heating element, provides the answer. It works with the principle of half cycle control (burst fire), in which the power is regulated by not switching all half periods of the mains voltage to the heating element. If little power is needed, only a few half periods are switched. If more power is needed, more half periods are switched.
This is an excellent way of regulating the power of heating elements because this principle causes absolutely no interference to the mains voltage. After all, when the triac is switched on, the current through the load is zero. The current increases just as gradually as the voltage and higher harmonics are completely absent. This principle should be applied to all electronically controlled soldering irons and hot air stations!
Strangely enough, no regularity can be detected in the switching on and off of the half periods, even when the air is at final temperature. It even seems as if the control is completely chaotic. The image below on the screen of the oscilloscope is therefore a single trace recording because no stable triggering is possible. This is confirmed by the result on an analogue AC-voltage meter that is switched over the heating element. The needle does not stand still for a moment and even goes quite a bit up and down.
 |
The half cycle control of the heating element. (© 2020 Jos Verstraten) |
Testing the 858D hot air station
Earthing resistance of the handle
The metal part of the handle is earthed, so it is important to measure the earthing resistance. We are very surprised when it turns out that an infinitely high resistance is measured between this part and the earthing of the euro plug. Somewhere an interrupted wire? No, because a resistance of 0.427 Ω is measured to the earth pin of the Chinese mains plug. So the interruption is in the adaptor that turns the Chinese mains plug into a European one.
A good advice: consider your safety, cut the Chinese mains plug off the mains cable and install a European earthed plug!

Power consumption
Because the half period control of the heating element is so chaotic, it is difficult to measure the power consumption of the device. We have used an old analogue AVO meter to measure the current consumption from the mains voltage. At all set temperatures, the needle will fluctuate considerably. The current measurements shown in the table below are therefore estimates by visual averaging of the movements of the needle.
 |
| The average power consumption at various settings. (© 2020 Jos Verstraten) |
A long-term operation test at full power
After viewing the interior of the handle we had our thoughts about the construction and the stable long-term operation of the 858D. That is why we let the station operate at maximum temperature and maximum air flow for an hour. To our great surprise, the plastic parts of the handle turned out to have barely warmed up after this period. Also the eight-core cable, where about 2.5 amps is pushed through two extremely thin wires, was not noticeably warmed up. Very neat!
Measuring the temperature of the air flow
Nothing seems simpler than that. Hold a thermocouple in the outflow opening of the handle and record the measured temperature at various temperature and air flow settings. However, this does not seem to work well because even a small movement of the thermocouple gives tens of degrees of difference on our temperature meter.
In addition, the question must be answered where the temperature is best measured. If you use the hot air station for unsoldering SMD chips or for heat shrink tubing, you keep the outflow opening of the handle about two centimetres from the PCB or tubing (our estimation). So we have made the measurement setup below in which the thermocouple is mounted in a stable way two centimetres in front of the outflow opening. The handle of the station is clamped in a small vice. We measured with the nozzle with an outflow diameter of 7 mm. The nozzle with the smallest opening was mounted over the lead of the thermocouple to protect it from the high temperatures.
 |
| The measurement setup for measuring the outflow temperature. (© 2020 Jos Verstraten) |
The results of the measurements are summarised in the table below. Each temperature was measured at minimum and maximum air flow. It is also clear from these measurement results that the temperature control of the system is not working properly. First of all, the measured temperatures are far too high. To illustrate: at a setting of 450 °C, a temperature of no less than 547 °C was measured in the outflow opening of the nozzle! Fortunately, the temperature drops quickly and at a distance of 2 cm we measure the 485 °C in the table. Secondly, there are differences between the temperature at minimum and maximum air flow. At the lowest temperature of 100 °C there is a difference of 7.8 % between the two temperatures. Because of the thermocouple built into the heating element, a well-functioning control system should compensate for such differences.
 |
| The measured temperatures at two centimetres from the nozzle. (© 2020 Jos Verstraten) |
Setting time
An important factor when working with a hot air station is how quickly the temperature reaches the set value. We have measured this for a setting at minimum and a setting at maximum temperature. Measurements were taken at maximum air flow, at 2 cm from the outflow opening, with the nozzle of 7 mm and the measurements were started at room temperature. The two graphs below show the impressive results. At a setting of 100 °C, the final temperature was reached after only five seconds!
 |
| Setting time at 100 °C. (© 2020 Jos Verstraten) |
At 450 °C, the setting time is of course much longer, but with a measured value of 35 seconds, we are still very satisfied.
 |
Setting time at 450 °C. (© 2020 Jos Verstraten) |
Our opinion about the 858D hot air station
A professional hot air station like the WAD101 of the famous Weller costs about € 850.00, the 858D we bought at Banggood costs € 32.21. Comparing such products is therefore meaningless.
The 858D would be an interesting product at any electronics engineering training to be improved by the students. Especially the layout of the PCB could use such an improvement. Also the way the connections are made in the handle could be much safer and more reliable. In addition, the firmware that controls the temperature can be designed much better.
Is the 858D then completely unusable? Certainly not.
We cannot recommend this product for hours of daily use. But if you, as a hobbyist, occasionally need to apply a heat shrink tube or solder a chip out of a PCB, this hot air station is a cheap and usable solution. But do remove the Chinese mains plug from the cable!

858D Hot Air Soldering Station