Introduction to the Aneng A3008 pen multimeter
Brands, type numbers and prices
Once again, we are confronted with a Chinese device that comes onto the market under various names and brands. We find this pen multimeter on the internet as:
- Aneng A3008
- Mustool MT007 Pro
- WinApex ET8908
The price at the countless sellers varies from € 13.13 to € 27.99, so it pays to google! However, we do have to warn you that some models with a monochrome display are offered with slightly fewer functions. This has to do with the impossibility of determining the phase sequence in three-phase systems, so not such an important function for most hobbyists.
We bought our Aneng A3008 at Banggood, that's why we keep using this brand name in the rest of this article.
Delivery of the device
The pen multimeter is delivered in a sturdy cardboard box and contains, besides the meter itself, a 95 cm long measuring lead with a crocodile clip and a banana plug that you must connect to the back of the pen and is the 'Common'. In addition, the box contains a miniature manual of 18 pages in Chinese and English. However, the text is so small that it is almost illegible. We have scanned the English pages with high resolution and combined them into a PDF booklet. You can download this ten-page long and easy-to-read manual from our Google Drive account:
Clickable link ➡ Aneng A3008 manual in English
 |
| The scope of delivery of the Aneng A3008. (© AliExpress) |
The device itself
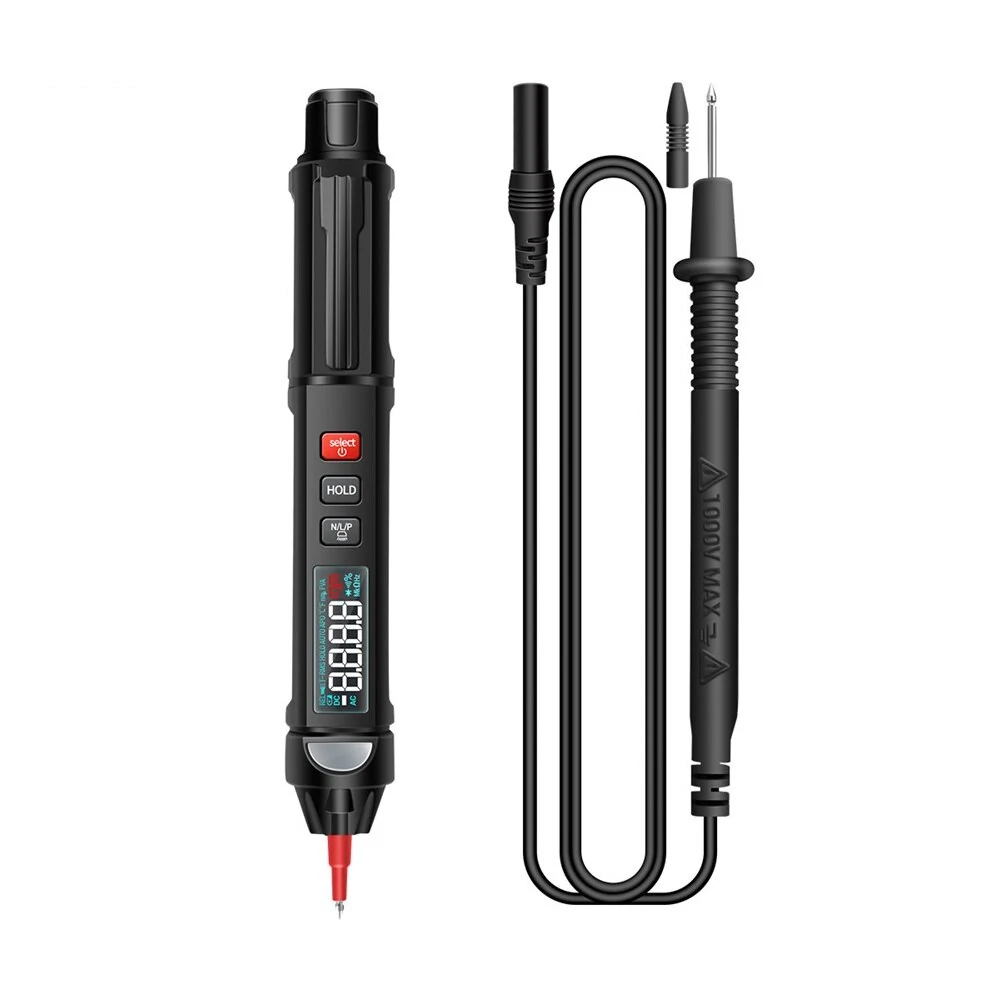
The figure below shows what this pen multimeter looks like. The device is 17.0 cm long and has a diameter of 2.4 cm to 2.1 cm. The weight with battery is only 46 grams. That battery is a standard 1.5 V AAA-battery behind a lid in the back of the meter.
Above the 18 mm long measuring pen, there is a small white LED that allows you to light up the measuring spot a little. However, this is not very impressive! To the left of the display, there is a little window which hides a two-colour LED. This red or green LED comes in handy when you use this multimeter as an ordinary AC voltage detector.
 |
The appearance of the Aneng A3008. (© Banggood) |
The display
The display, shown in the figure below, is only 30 mm by 11 mm. The background colour is black and the digits light up light blue. These numbers are, thanks to the background lighting, easy to read. The additional information, such as the measuring function and the units of measurement, is different. These symbols are very small and are also shown in a dark green colour. This colour combination means that although they are easy to read in the dark, they are hardly noticeable in daylight and you have to shield the display from daylight with your other hand to read the units. A different colour choice could have prevented this!
 |
| The small 30 x 11 mm² colour display. (© 2021 Jos Verstraten) |
Operating the A3008 pen multimeter
The meter has three push buttons. The red one is the most important. After pressing this button for two seconds, the device is switched on. The display shows 'Auto' as an indication that the fully automatic measuring function is switched on. In this mode, the meter should decide by itself which measuring mode you want to choose. This works perfectly if you connect a DC or AC voltage or a resistor to the meter. However, if you want to measure the frequency of the signal at the input, the meter obviously does not know this and you have to deactivate the automatic function and set the measuring mode manually. Also when measuring capacitors, you usually have to set the measuring function by hand. This is done by pressing the red button briefly several times. You then go through the measuring functions in the order shown below:
- DC voltage
- AC voltage
- Capacitance
- Diode and continuity test
- Celsius degrees
- Fahrenheit degrees
- Frequencies
- Automatic
With the second button 'HOLD' you can of course freeze the measured value on the display.
With the third button, you switch to the AC voltage detector function. This gives you three options, which can be called up again by briefly pressing the button several times:
- EF: Indication of electric fields
- LIvE: Live (red) or neutral (green) indication
- PA: Searching for the phase sequence in a high-voltage connection
If this button is pressed for more than two seconds, the LED above the measuring pin turns on or off.
Automatic Power Off
To save battery life, the meter automatically switches off after five minutes of inactivity. However, this feature cannot be turned off, which may be irritating for some measurements.

The specifications of the A3008
According to the manufacturer, this multimeter has the following specifications:
- Sampling speed: 3 Sa/s
- Measuring method: double integrator ADC
- DC voltage ranges: 5.999 V ~ 59.99 V ~ 599.9 V
- DC voltage accuracy: ±(0.5 % + 4 digits)
- DC voltage input resistance: 1 MΩ
- AC voltage ranges: 5.999 V ~ 59.99 V ~ 599.9 V
- AC voltage accuracy: ±(0.5 % + 4 digits)
- AC voltage frequency range: 50 Hz ~ 800 Hz
- Resistance ranges: 599.9 Ω ~ 5.999 kΩ ~ 59.99 kΩ ~ 599.9 kΩ
- Resistance ranges: 5.999 MΩ ~ 59.99 MΩ
- Resistance accuracy: ±(0.8 % + 5 digits) to ±(2.5 % + 3 digits)
- Capacitor ranges: 10.00 nF ~ 100.0 nF ~ 1.000 μF ~ 10.00 μF ~ 100.0 μF
- Capacitor ranges: 1.000 mF ~ 10.00 mF ~ 60.00 mF
- Capacitor accuracy: ±(3.5 % + 20 digits) to ±(5.0 % + 3 digits)
- Temperature °C range: -20 °C to +50 °C
- Temperature °C accuracy: ±(1.0 % + 5 digits)
- Temperature °F range: 0 °F to +122 °F
- Temperature °F accuracy: ±(0.75 % + 5 digits)
- Frequency measurement range: 9.999 Hz ~ 99.99 Hz ~ 999.9 Hz ~ 9.999 kHz
- Frequency measurement range: 99.99 kHz ~ 999.9 kHz ~ 9.999 MHz ~ 99.99 MHz
The electronics in the A3008
The two parts of the housing can be separated by unscrewing three screws and removing four self-adhesive stickers. On the one circuit board, see the figure below, there is surprisingly little electronics. On the right you can see the two large pads that connect the circuit to the battery compartment in the removed part of the housing.
On the left, you can see a small relay that you can hear switching during some measurements. It is clear that no measures have been taken to protect the device against too high voltages at the input. The device has therefore not been given a CAT rating by the manufacturer. This is an exceptional situation for Chinese equipment, as CAT ratings are usually completely fantasy and meaningless. This means that this device has the lowest CAT rating, CAT I. This is not a disaster for measuring in PCBs that are powered by low DC voltages. In principle, you should not use this device with its EF, LIvE and PA functions, because there is a direct link to the mains voltage. But then again...does an old-fashioned voltage detector with a resistor and a neon bulb have a CAT rating? Yet, without thinking about it, we stick it in a wall socket.
It is also worth noting that there is room on the PCB for two electrolytic capacitors of 220 μF and 470 μF respectively, but these are not present.
Testing the Aneng A3008 pen multimeter
Measuring DC voltages
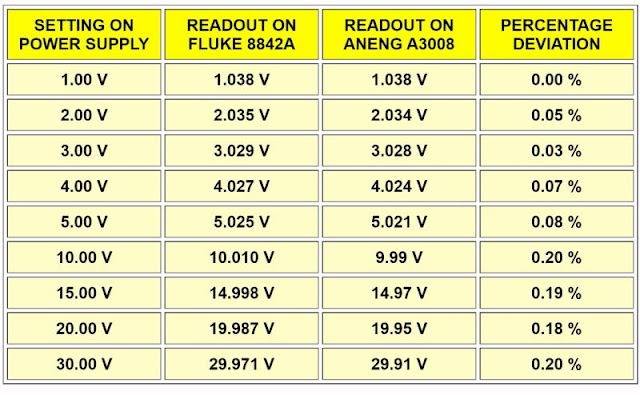
We connected the A3008, together with our reference meter Fluke 8842A, to our digitally adjustable power supply and set the power supply to voltages from 1.00 Vdc to 30.00 Vdc. The results are shown in the table below. For the calculation of the percentage error, we took the Fluke as 100 % reference.
Conclusion: the accuracy of the tested sample is much better than the specifications promise.
The input resistance when measuring DC voltage is 10.73 MΩ.
 |
The test results when measuring DC voltages. (© 2021 Jos Verstraten) |
Measuring AC voltages
Because our Fluke only measures DC voltages, we have to use our second multimeter, the VC650BT from Voltcraft. However, for AC voltages it has an accuracy and a resolution comparable to those of the A3008. So there is no point in calculating the percentage error. You should therefore only look at the results in the table below as a check whether the measuring results of both meters are comparable. They are, and since we trust our VC650BT we believe that the A3008 also measures within its specifications.
The measurements are done at 50 Hz, we measured both small and large voltages. The voltages up to 1 V are set on our digital function generator UTG9005C/II from UNI-T. The voltages from 10 V are regulated with a variac.
It is a pity that the firmware is not written in such a way that the built-in buzzer is activated at voltages of more than 50 V!
 |
The test results when measuring AC voltages. (© 2021 Jos Verstraten) |
Testing the true RMS operation
Nowadays, all multimeters can measure the true RMS value of an AC voltage. That is the value of the AC voltage that, in a pure ohmic resistance, generates the same thermal power as a DC voltage of the same value. We have checked this for sine-, triangle- and square-wave voltages of 1 Vrms at 50 Hz. The results are more than excellent, see the table below.
 |
| Testing the true RMS calculations of the A3008. (© 2021 Jos Verstraten) |
The frequency range for AC voltage measurements
The manual states that AC voltages are measured in the frequency range from 50 Hz to 800 Hz. However, it does not specify the percentage error at which these limits are set. We tested this by applying an AC voltage of 1 Vrms, accurately kept constant with our Philips PM2454 at its 1 V measuring range, to the A3008 and varying the frequency of the signal. The results are summarised in the table below. The measurement result at 50 Hz was taken as 100 % reference.
If you are satisfied with an error of approximately 5 %, you can therefore measure AC voltages between 10 Hz and 2 kHz.
 |
| Testing the frequency range in AC voltage measurements. (© 2021 Jos Verstraten) |
Measuring resistances
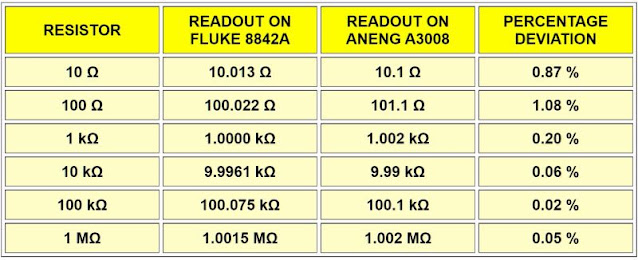
Here we can use our expensive Fluke again! Six 1 % resistors are measured, first with the Fluke and then with the Aneng. The results are given in the table below, with the reading on the Fluke again taken as 100 % reference.
The specs give an accuracy of ±(0.8 % + 5 digits), so the sample we tested performs much better.
 |
| Measuring resistances with Fluke and Aneng. (© 2021 Jos Verstraten) |
Measuring capacitors
As with all multimeters we tested, measuring especially large capacitors such as electrolytic capacitors is very slow. To give an example: it takes 47 seconds before the measurement of a 1.000 μF capacitor gives a stable reading! We tested some polyester capacitors and some electrolytic capacitors from our stock. As a reference meter we use the ET4401 from East Tester. This meter is with its ±0.2 % accurate enough to be used as a 100 % reference in this context.
As was to be expected, large errors occur when measuring electrolytic capacitors. This is due to the fact that when measuring capacitors with multimeters, a constant current is passed through the capacitor. The time it takes for the capacitor to charge to a certain voltage is measured. That charging time is directly proportional to the capacitance of the component. However, this method does not take into account the leakage current of an electrolytic capacitor, which takes up a portion of the charging current. This causes the charging of the component to take longer and the meter to measure a larger capacity than intended. Some electrolytic capacitors have a large leakage current and the capacity of such an electrolytic capacitor is measured with an error that can reach tens of percents.
A real RLC meter, like the ET4401 from East Tester, measures the capacitance of the electrolytic capacitor by inserting a small 120 Hz sine wave on a DC voltage across the capacitor and measuring the alternating current through the component. With this measurement method, the leakage current plays no role.
 |
| Measuring capacitors with the East Tester and the Aneng. (© 2021 Jos Verstraten) |
Measuring frequencies
For this test, we apply sine waves signals of different frequencies to the A3008 and examine how large the voltage must be to obtain a stable and accurate frequency measurement. The results are summarised in the table below. We have not included the measured value of the frequency in this table, because it is accurate to the last digit with what our function generator claims.
 |
| The sensitivity in measuring frequencies. (© 2021 Jos Verstraten) |
Measuring temperatures
This is a completely useless function on this device. The sensor in question is somewhere in the device on the PCB and the only thing you measure is the room temperature. It would have been handy if the sensor was somehow connected to the metal probe, so that by holding the probe on a transistor you could measure the temperature of the component after some time. But this is clearly not the case!

Continuity test
In this mode, you can test low-impedance connections. The open terminal voltage is 3.946 V (so there is a voltage multiplier somewhere in that bit of electronics!) and the short-circuit current is 170.3 μA. The threshold between beeping and not beeping is about 47 Ω.
With this function, you can measure very low resistances quite accurately. We measured a handful of 10 W wire-wound resistors with our Fluke 8842A (in four-wire mode) and with the Aneng A3008. The results are summarised in the table below.
 |
| Measuring very low resistances. (© 2021 Jos Verstraten) |
The EF, LIvE and PA features
The EF function
With the EF function, you should bring the measuring pin of the A3008 near a point on which the mains voltage is present. The red LED should then light up, the buzzer should beep, and the display should show a number of dashes indicating the strength of the 50 Hz field. This function is far too sensitive for the tested sample. If we touch all shields of the BNC connectors of our grounded measuring equipment with the pin, the tester beeps like mad and the display shows maximum field. Only if we ground the 'Common' connector on the back of the meter, things go well.
The LIvE function
The LIvE function allows you to distinguish between live and neutral. If you touch a live wire, 'OL' appears on the display and the red LED and the buzzer are activated. Otherwise, the green LED lights up.
The PA function
The PA function is only useful if you have a 3-phase connection. As you probably know, there is a phase shift of 120° between the three voltages on the three live wires of such a connection. With this function you can look up the correct order of those three phases. Put the A3008 in PA mode and touch one of the phase connections with the pin. The meter beeps briefly, the display shows 'PA'. Then touch one of the other two phase connections with the measuring tip. If you now have the one that has been shifted 120° in phase from the first, the display will show 'PAB' and the meter will beep. Finally, touch the third phase, the meter beeps again and the display shows 'PABC'.
But in addition you will see one of the red icons light up in the display, see the picture at the very beginning of this article. From this you can see whether the field of the detected phase sequence is turning left or right. This is important if you need to connect a three-phase motor.
Our opinion about the Aneng A3008
It will be clear that we are very pleased with this small, cheap meter. The one we tested performs better on most measuring functions than the specifications promise. The plastic housing is very robust and will not break or crack easily. But we only work at our lab table with two benchtop multimeters and do not need such a pen meter. However, we can imagine that this multimeter is a handy gadget for every service technician.
However, due to the lack of a CAT rating, it is only allowed to be used in low-voltage installations according to the regulations. This is not to say that we are not confident that the device can be used safely in 230 V environments. But if something ever goes wrong, an insurance company can cause trouble about working with a CAT I device in a mains environment.


