|
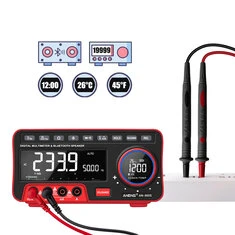
It looks strange, this desktop multimeter with 19999 counts and with a Bluetooth MP3 player, thermometer and clock as extras. Strange combination, but its specifications are excellent and that for a nice price. So this unique device is worth an extensive test. |
Introduction to the Aneng AN888S desktop multimeter
Alternative brands, names and prices
This multimeter is also offered under other brand names:
- Zoyimet, type number ZT-5566.
- Richmeters, type number AN888S.
- KKmoon, type number AN888S.
- BSIDE, type number ZT-5566.
The price you pay for it depends on the brand, € 55,82 is the lowest price we found on AliExpress. However, rechargeable batteries are not included for this price, but you don't need them if you use the device exclusively as a desktop multimeter. You can then power from a 5 V USB adapter. We have bought a device with the brand 'Aneng' on it, hence the name of this article.
What is the AN888S?
The AN888S is a huge desktop multimeter with a resolution of 19999 digits. That in itself is of course not spectacular. Such multimeters are widely available. What is remarkable is that this device also contains a clock, a timer, a thermometer and a Bluetooth MP3 player. This rather strange combination has led to some rather mocking remarks appearing on various forums such as 'eevblog', like 'a 1 April joke' or 'they forgot to put a toaster in it'.
These are rather silly remarks, because if you are looking for a good and affordable desktop multimeter, this device is an excellent choice. We have not found any other desktop multimeter with similar specifications that comes close to the price you have to pay for the AN888S.
The scope of delivery
The AN888S comes in a sturdy box. The device is well protected in the box between two solid foam pads. On the bottom are two measuring leads, a USB cable and optionally two rechargeable batteries. A very well maintained manual of 24 pages in English is included. The measuring cables have a length of 120 cm, are very flexible and equipped with a measuring probe with a sharp tip. The banana plugs on the other side of the cables are fully insulated. The USB cable has a length of 100 cm and is intended to power the multimeter from a 5 V USB adapter.
 |
| The scope of delivery of this multimeter. (© 2020 Jos Verstraten) |
You can power the AN888S in two ways. The first way is via the supplied USB cable from a 5 V adapter. If you intend to play music via the AN888S as well, this adapter must be able to supply 2 A. The second way is from two 18650 li-ion batteries of 3.7 V, which you first need to charge via the USB cable. However, these batteries are quite expensive, at Bol.com for example, you pay about 10.00 € for two pieces.
USB cable isolated
The USB cable is apparently completely isolated from the measuring circuit. A resistance measurement between the ground of the USB connector and the four measuring input connectors results in four times an immeasurably high resistance. So you can power the meter from a USB port of your PC without the risk of putting this device at a dangerous voltage.
The front panel of the AN888S
The picture below shows the front panel of this multimeter. As already written the device is quite large, the front panel measures 20.0 cm by 10.5 cm and the device is 13.5 cm deep. The device weighs almost one kilogram, a weight that can be explained by the two built-in speakers in a heavy housing. You can fold out the two front legs so that the meter is at an easily readable angle on your desktop.
The digits of the main display have a height of 25 mm. To the right of this display is a secondary display, which shows the frequency of AC signals or the duty-cycle. You can adjust the intensity of the display via two buttons on the back of the device. Also note the presence of an analogue scale under the main display!
On the top of the front panel you will see nine push buttons to select the measuring function. You can push these buttons with one finger without the device moving.
On the underside you will find the four standard 4 mm connectors. The left one should be used for all functions except measuring currents. The two right connectors are available for this purpose. Next to the display you will see a large round button. You can use it to adjust the volume of the built-in stereo amplifier or to adjust the measuring range when you are not using the automatic range switching. Switching between the two functions is done by pressing the 'VOL/RANGE' button. In the middle of the large round button there is a third display showing the current time, temperature, battery conditions and the volume of the amplifier.
 |
| The front panel of the Aneng AN888S. (© Banggood) |
On the back panel you can see the compartment in which you can mount the two type 18650 batteries. On the right under a small cover is the USB connector for the power or charging cable. The large push button on the left is the ON/OFF switch. In addition there are four push buttons for setting the clock, the intensity of the display and switching from °C to °F.
 |
| The back panel of the Aneng AN888S. (© Banggood) |
The left and right sides of the housing are mostly made of cloth, behind which the two 2 x 4 W speakers are arranged. The digital amplifiers have a frequency range of 100 Hz to 18 kHz, a distortion of less than 1% and a signal-to-noise ratio of 76 dB.
 |
| The side of the Aneng AN888S. (© 2020 Jos Verstraten) |
The manufacturer gives the specifications below for this multimeter:
- Display: 19999 counts
- Range switching: automatic or manual
- Standby: automatically after 15 minutes
- Measurement principle AC voltage: true RMS via digital algorithm
- Sampling speed: three measurements per second
- DC voltage (mV): 19.999 mV ~ 199.99 mV [±(0.05%+3)].
- DC voltage (V): 1.9999 V ~ 19.999 V ~ 1000.0 V [±(0.05%+3)].
- AC voltage (mV): 19.999 mV ~ 199.99 mV [±(0.3%+3])
- AC voltage (V): 1.9999 V ~ 19.999 V ~ 1000.0 V [±(0.3%+3)].
- DC current (mA): 19.999 mA ~ 199.99 mA [±(0.5%+3)].
- DC current (A): 1.9999 A ~ 19.999 A [±(0.5%+3)].
- AC current (mA): 19.999 mA ~ 199.99 mA [±(0.8%+3)].
- AC current (A): 1.9999 A ~ 19.999 A [±(0.8%+3)].
- Resistance (Ω): 199.99 Ω [±(0.5%+3)].
- Resistance (kΩ): 1.9999 kΩ ~ 19.999 kΩ ~ 199.99 kΩ [±(0.2%+3)].
- Resistance (MΩ): 1.9999 MΩ ~ 19.999 MΩ [±(1.0%+3)].
- Capacitance (nF): 9,999 nF [±(5.0%+20)].
- Capacitance (nF): 99.99 nF ~ 999.9 nF [±(2.0%+5)].
- Capacitance (μF): 9.999 μF ~ 99.99 μF ~ 999.9 μF [±(2.0%+5)].
- Capacitance (mF): 9.999 mF [±(5.0%+5)].
- Frequency (Hz): 99.99 Hz ~ 999.9 Hz [±(0.1%+2)].
- Frequency (kHz): 9.999 Hz ~ 99.99 Hz ~ 999.9 kHz [±(0.1%+2)].
- Frequency (MHz): 6.000 MHz [±(0.1%+2)]
The electronics in the Aneng AN888S
The main PCB
The front panel and the housing are connected with only four screws, but these screws are deeply recessed in the housing and can only be reached with a long, thin screwdriver. After the housing is screwed open you will see the main PCB filling the full width and height of the front panel, see the picture below. This PCB is connected with two connectors to the loudspeaker box and with a small PCB on the back of the housing. You can see these connectors in the lower left corner of the picture. The cable that sticks out is connected to the NTC that measures the temperature.
The two input connectors for measuring current are connected directly to two fuses that are mounted in sturdy PCB fuse holders. One has a value of 200 mA, the other 20 A. A solid metal wire bridge provides the sensor resistance for the 20 A measuring range.
Most of the chips on the PCB are made unrecognizable. We however do recognize a DTM0660 from Dream Tech International Ltd. This is a multimeter chip that is used in many multimeters. A feature of this chip is that all calibration parameters are stored in memory. An EEPROM of the type 24C02A is used for this purpose. The strange thing is that the datasheet of the DTM0660 mentions a maximum resolution of 6600 counts, while this multimeter goes up to 19999 counts. A 14 bit wide ADC according to the delta principle is used. The chip has a built-in true RMS digital processor with a bandwidth up to 1 kHz.
On this PCB we also discover an isolated 5 Vdc to 5 Vdc converter of the type F0505S. This probably takes care of the galvanic separation between the input connectors of the meter and the USB connector on the back.
The part of the PCB on which the Bluetooth MP3 player, thermometer and clock are located is shown in the lower left corner of the PCB and is separated from the electronics of the multimeter by a number of milled slots. As main chip we recognize an AC19APIP893 from Jieli. The audio power is provided by a HT8697 two-channel class D audio power amplifier IC from Heroic Technology. The maximum power this chip can deliver is 2 x 9.5 W in 4 Ω at a distortion of 10%.
 |
| The large main PCB behind the front panel of the multimeter. (© 2020 Jos Verstraten) |
The two loudspeakers are housed in their own very sturdy housing that fills most of the space in the multimeter. This box is fixed in the multimeter with four screws and the two parts of this box are mounted on top of each other with four identical screws. This box is completely airtight. On the picture below you see a grey rubber ring around the four wires which ensures that even the opening through which the wires are led outside is completely airtight. On the bottom of this loudspeaker box a passive membrane is mounted that reacts to the air pressure differences in the box and contributes to the reproduction of the bass tones. Unfortunately the back of the multimeter housing has no air gaps, so the usefulness of this system is doubtful.
 |
| The box containing the two loudspeakers is screwed open. (© 2020 Jos Verstraten) |
On the backside is a second PCB, on which of course the push buttons are located. The main components here are four 8205A chips and two HY2213-BB3A chips, which take care of the management of the batteries. A CS5080E is responsible for charging the batteries from the 5 V USB connection.
 |
| The PCB on the back of the multimeter. (© 2020 Jos Verstraten) |
Operating the Aneng AN888S
Setting the clock
After turning on the meter with the 'ON/OFF' button on the back, the DC voltage measuring function is automatically set with the automatic range function. To set the clock, briefly press the 'MODE' button. The hour display will blink, using the two arrow buttons you can set the hours. A second press on the 'MODE' button will blink the minute display and you can set it. A long press on the 'MODE' button stores these settings in the memory of the unit.
Setting the alarm clock
Press and hold the 'MODE' button until an alarm symbol appears in the round display. You can now set the time at which the alarm will sound in the manner already described. However, we have not been able to activate this alarm, not to mention turn it off again. An error in the perhaps old firmware of our device?
Note on measuring the duty-cycle
According to the manual, the two left function buttons have three functions:
- Measuring DC voltages.
- Measuring AC voltages with the frequency in the secondary display.
- Measuring frequencies with the duty-cycle in the secondary display.
On the specimen delivered to us, the third function is only present under the mV button.
Automatic standby
If you leave the device unused for about 15 minutes, you will hear a beep. Moments later, the AN888S automatically switches to standby. The measurement result disappears from the display and is replaced by the current time. The temperature appears in the display on the rotary knob.
The Bluetooth MP3 Player
Although we didn't buy the AN888S because of the presence of such a music player, we have of course switched this function on and tested it. This is very simple. Activate the scan option of the Bluetooth function of your tablet, smart-phone or laptop and turn on the AN888S with the button on the back of the device. Moments later, both devices are paired fully automatically. The AN888S is registered as 'Bluetooth DMM'. The audio player does not deliver phenomenal quality, but as background music while working, this MP3 player is excellent. In any case, the sound quality is much better than that of tablets or laptops. With the large red knob you can adjust the volume.
The accuracy of the AN88S tested
How we perform tests
We compare the reading of the tested meter with our laboratory multimeter VC650BT from Voltcraft. It has an accuracy of ±0.03% when measuring DC voltages and a resolution of 39999 counts. The specified accuracy of the AN888S is in the same range as that of the reference meter. Our test does not give an absolute measurement of the accuracies of the various measuring functions, but rather a check whether the manufacturer's specifications are in line with what we measure.
Adjusting voltages with an accuracy of up to 1 mV
In the following tables you will see that we have connected voltages up to 1 mV accurate to the AN888S and the VC650BT. Do we have expensive voltage sources that can do that? No, but there is a simple means to set a voltage very accurately, see the diagram below. Suppose you want to generate a DC voltage of exactly 2.000 V. Then set your lab power supply to an output voltage of e.g. 2.5 V. Connect two potentiometers R1 and R2 of 10 kΩ over the outputs of your power supply. Connect a potentiometer R3 of 100 kΩ between the sliders of the other two potentiometers. Put the R3 slider in the left position and adjust R1 to an output voltage of 1.95 V. Put the R3 slider in the right position and adjust R2 to an output voltage of 2.05 V. Over the potentiometer R3 is now only 100 mV and it is no problem to adjust the output voltage to exactly 2.000 V by turning the slider of R3. This method does require that your lab power supply is very stable.
 |
| Generating a very accurate voltage. (© 2020 Jos Verstraten) |
This is not specified, but is of course an important parameter. We measured this attribute by first connecting a DC voltage directly to the meter and then via the series connection of an accurate resistance of 10 MΩ. From both measurement results, the internal resistance of the meter can quickly be calculated as 10 MΩ.
Measuring our reference voltage source
We have a reference voltage source with an AD584LH, which generates DC voltages of 2.500 V ~ 5.000 V ~ 7.500 V ~ 10.00 V with an accuracy of ±0.05%. This is an excellent first test to quickly evaluate the performance of a multimeter. The results are summarised in the table below. The deviations lie between 0.04% and 0.08% and are therefore in the same order of magnitude as the deviation on the AD584LH. In short: even an AD584LH is not able to reveal the inaccuracies of this meter. Excellent results!
 |
| Measuring the four reference voltages. (© 2020 Jos Verstraten) |
In the table below we have summarized the results of our measurements up to 30 Vdc. Nothing to complain about!
 |
| Accuracy with DC voltage measurements [V]. (© 2020 Jos Verstraten) |
The AN888S has two mV ranges with full scale measurements of 19.999 mV and 199.99 mV. For such an inexpensive multimeter this is quite unique and we were very curious about the performance of the device in these modes.
We were not capable of testing the 19.999 mV range because we were not able to generate such small voltages with sufficient stability. Moreover, our reference meter does not have a comparable measuring range.

The results of the 199.99 mV range are shown in the table below. At an input voltage of 10.00 mV, the AN888S did not provide a stable reading, the two right digits shifted completely randomly from measurement to measurement. According to a reader of this blog who also has an AN888S, this problem does not occur if you power the meter from batteries instead of a 5 V USB adapter.
From 20.00 mV, the meter is doing well and delivers stable results. However, the percentage error is much larger than stated in the specifications. At 100 mV, this error is 0.37%, which is much more than the specified ±(0.05%+3). The permissible readout is then between 99.92 mV and 100.08 mV.
 |
| Accuracy in the 199.99 mV range. (© 2020 Jos Verstraten) |
We have built a series circuit of the Aneng AN888S, our reference meter and a digitally adjustable current sink. This circuit is connected to a power supply that can supply 2 A. The results are summarized in the table below and are excellent.
 |
| Accuracy with direct current measurements. (© 2020 Jos Verstraten) |
Thanks to our variac purchased with your donations we can now also test the alternating voltage range of multimeters. In the table below you can see the results. The deviation at 100.00 V is +0.13% and is therefore better than the specified ±(0.3%+3).
 |
| Accuracy at 50 Hz AC voltages. (© 2020 Jos Verstraten) |
The frequency range when measuring AC voltages is not specified by the manufacturer or in the manual. To make this test clear, we assumed an AC voltage of exactly 5.000 V with a frequency of 50 Hz. After the measurement we used the 'REL' button to set this reading as a new zero reference. Afterwards, of course, we varied the frequency of the signal while maintaining the same amplitude of the signal. The results are summarized in the table below. So the AN888S measures accurately up to 1.5 kHz, above this frequency the inaccuracy increases rapidly.
 |
| The frequency range of the AN888S. (© 2020 Jos Verstraten) |
Like all modern meters, the AN888S claims to be able to measure the true RMS value of AC voltages and currents, regardless of the signal shape. As a test we offered four different signals of which the RMS value was equal to 5.00 V and the frequency 1 kHz. The results of this test are shown in the table below and are not convincing. This could have been better!
 |
| Calculating the real RMS value of four signals. (© 2020 Jos Verstraten) |
For testing the accuracy of multimeters when measuring resistors, we use a set of six ±0.1% resistors in the range of 10 Ω to 1 MΩ. The measurement results of the AN888S have been summarized in a clear table. The results are excellent. However, when measuring our 1 MΩ resistor, the AN888S again appeared to suffer from two unstable digits.
According to the previously mentioned reader, the reading remains stable when using battery power.
 |
| Accuracy in resistance measurements. (© 2020 Jos Verstraten) |
Thanks to a set of eight accurate capacitors with a tolerance of ±1%, we can test the performance of the AN888S when measuring capacitors. The results are shown in the table below. You will agree with us that the AN888S also performs excellently in this area. What is striking is that this meter reacts very quickly and displays the capacitance value steadily after just a few seconds.
 |
| Accuracy in capacitor measurements. (© 2020 Jos Verstraten) |
The problem with this type of test is that it makes quite a difference whether you offer a signal with an amplitude of 100 mV or one with an amplitude of 10 V to the meter. In our test we assume a standard TTL signal between 0.0 V and +5.0 V. With such an input signal, the frequency is accurately displayed up to 2.9 MHz. The specified range up to 6.0 MHz is therefore not achieved.
To test the accuracy of the duty-cycle measurement, we took a signal with frequencies of 1 kHz and 1 MHz as a basis. The results of this measurement are shown in the table below.
 |
| Accuracy with duty-cycle measurements at 1 kHz and 1 MHz. (© 2020 Jos Verstraten) |
Our opinion of Aneng AN888S
This multimeter reaches most specifications with ease. Only when measuring the true RMS value of non-sinusoidal AC voltages, major errors are made. However, this is a measurement function that you will not use very much in practice. Moreover, it is a pity that the specified frequency measurement range is absolutely not reached when offering TTL signals.
For measuring the quantities you use most in daily practice, i.e. DC voltages and currents, resistors and capacitors, Aneng offers you with its AN888S a very accurate and reliable measuring instrument.
Moreover, the price you pay for the AN888S is much lower than the price of any desktop multimeter with comparable specifications. The MP3 player, the thermometer and the clock are all included for free!

ANENG AN888S True RMS Multimeter