Introduction to the D2-4
The end result
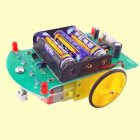
The picture below shows the end result of an hour of tinkering. A battery-powered little car measuring 10.5 cm by 7.5 cm by 4.8 cm. The two rear wheels are each driven by their own motor. The front rests on a rounded metal locking nut that slides across the table. An infrared receiver, which receives codes from the remote control, is soldered on the back of the PCB. A microcontroller decodes the infrared bursts and controls the two motors via two simple transistor output stages.
 |
The remote-controled car. (© ICStation) |
The D2-4 in action
We let our specimen do some rounds on our dining table. The remote control allows you to give eight commands:
- Key +: Accelerate
- Key -: Slow down
- Key 2: Drive forward
- Key 5: Stop
- Key 3: Move to the left
- Key 1: Move to the right
- Key 6: Turn to the left about own axis
- Key 4: Turn to the right around own axis
In practice, you should always focus the remote control on the back of the PCB. Apparently, the sensitivity of the system is too low to operate the car via IR light reflected from the walls. This takes some time to get used to at first, but after a while you know exactly where to point the front of the remote control to make the car respond properly.
Where to buy and what does it cost?
The kit can be bought from various providers on AliExpress, but also from ICStation. At this Chinese mail-order company, the car costs $ 6.49 plus $ 5.00 shipping. At AliExpress, it costs € 5.39 plus € 6.40 shipping. ICStation has taken the effort to write an excellent PDF manual (available via download), so we thought this initiative should be rewarded by ordering the package there. We ordered it on 25 November, it was delivered by DHL on 9 December.
Delivery of the kit
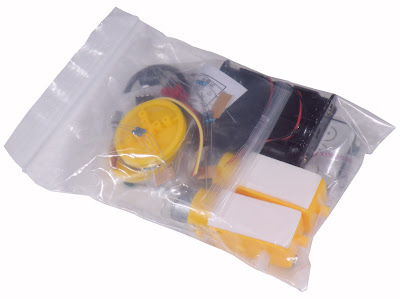
As usual with Chinese shipments, not much attention is paid to safe and durable packaging. All parts are squeezed together in a small plastic bag.
 |
| The delivery of the kit. (© 2024 Jos Verstraten) |
The parts delivered
For the picture below, we have neatly laid out all the parts included in the plastic bag. The two curious yellow parts, to the right of the PCB, are the two motors that drive the two rear wheels. The black case is the battery holder, which holds three 1.5 V AA type batteries. On the far right, but not easily recognisable in the photo, is a seven centimeter piece of four-core flatcable, which you need to splice and use to connect the two motors to the PCB.
 |
| The supplied parts. (© 2024 Jos Verstraten) |
The manual
The package comes with an A6-sized sheet of paper with the schematic on one side and the parts list in Chinese on the other. So that's not much use to you. However, the Chinese mail order company ICStation cannot be praised enough! As already mentioned, they have taken the trouble to produce an excellent English-language manual for most of the kits they sell. Moreover, those manuals are publicly available on their internet site. They have also put together such a construction manual for the D2-4:
The PCB for this infrared controlled car
A single-sided PCB was designed for this very simple circuit, whose component and track sides are shown in the picture below.
 |
| The two sides of the PCB. (© 2024 Jos Verstraten) |
The schematic of the D2-4
That the electronics in the D2-4 are very little is already apparent from the PCB. The ICStation manual reveals the complete schematic. It is remarkable how little electronics are needed to drive such a little car! On the top left is the circuit around a VS1838B. That is a very popular (and cheap) Chinese 'Infrared Receiver Module'. It contains a lot of electronics, including a band-pass filter, an amplifier with automatic gain control, a demodulator and a totem-pole output stage. The output goes 'L' when the component detects infrared light at a frequency of 37.9 kHz. The bandwidth is 8 kHz.

The microcontroller is a pre-programmed 8-pin STC15W104 that receives the signal from the VS1838B on its eighth pin and controls the two extremely simple motor circuits via its outputs on pins 1 and 3. Via pin 7, LED3 is controlled, which lights up the moment the circuit receives an infrared burst.
The motors are controlled via the two transistors Q1 and Q2 from the microcontroller's outputs. The two LEDs LED1 and LED2 light up when the motors start running.
 |
| The full schematic of the D2-4 car. (© ICStation, edit 2024 Jos Verstraten) |
Building the D2-4 Infrared Remote Control Car
Success guaranteed!
With the help of ICStation's excellent building instructions, which explain with no less than 22 photos really every necessary action, the construction can be successfully completed by anyone who can work with a bit of precision. Ideal as a first soldering job in a youth hobby club? So here we suffice with a top and bottom view of the completely assembled model.
 |
| The completely assembled car. (© 2024 Jos Verstraten) |
The remote control
OKISTAR model OKY0263-1
The remote control included in the kit is an OKY0263-1 from Oky Newstar Technology Co., Ltd. It measures 85 mm by 40 mm by 5 mm and weighs only 14 grams. The OKY0263-1 comes with a CR2025 cell, which you need to activate by pulling out a plastic sheet from the remote. This remote control is extremely cheap, even in the Netherlands it is offered for just € 1.73.
 |
| The included remote control. (© 2024 Jos Verstraten) |
NEC UPD6122 protocol
The OKY0263-1 operates at 38 kHz and is said to have a range of eight meters, but ours does not achieve that. The encoding of the twenty commands to be broadcast follows the NEC UPD6122 protocol.

Smart DIY robot car kits

