|
These miniature measuring tweezers from e-Design are offered at a price of around € 60.00. The device looks nice and it has a few unique features, but is it worth the rather high price? We tested a sample in our lab. |
Introduction to the DT71 from e-Design
The manufacturer and suppliers of this device
The DT71 was developed by the Chinese company Guangzhou e-Design Intelligent Technology Co. Ltd and is marketed under the brand names Miniware, NewHail and Daniu. Most Chinese mail order companies sell the DT71 for around € 60.00 including VAT and shipping. However, the tweezers are also available from various European suppliers. For example, you can get the DT71 from the Elektor-shop for € 79.95 or from Amazon for € 88.99. Despite the new EU VAT and import guidelines, ordering directly from China is still cheaper! We purchased our sample from Banggood, which delivers it under the brand name Miniware.
The scope of delivery
The measuring tweezers are delivered in a sturdy plastic box measuring 17.5 cm by 7.5 cm by 12.5 cm. The box also contains a special lead for charging the battery and for adjusting an INI-file to your own preferences. You will also need this cable to install the latest version of the firmware. An extra set of gold-plated contacts is included. The box only contains a piece of paper that explains how to charge the battery, nothing else. The extensive, excellent English manual must be downloaded from the internet. To make it easy for you, we have saved this manual in our own 'cloud' in Google Drive for you to download:
➡ DT71_Mini_Digital_Tweezers_Manual.pdf
 |
| The scope of delivery of the DT71 mini tweezers. (© Toolsaving.com) |
The most remarkable features of the DT71
These mini digital tweezers are, without a doubt, a masterpiece of high-tech ingenuity:
- The whole instrument is only 14 cm long and weighs 22 grams.
- Somehow, they have managed to integrate a battery into this small device which, after a two-hour charge, allows you to measure for ten hours.
- The DT71 has a built-in vibration sensor that brings the device out of its sleep mode when you shake it. The active time is adjustable between 30 and 999 seconds via the INI-file.
- The two grips of the tweezers do not work with a spring, but with four magnets that are built into the grips and which provide a very smooth spring action. Two of the magnets create a repelling effect, the other two an attracting effect.
- The device consists of two parts that are connected by means of a four-pole 3.5 mm connector. The display part is thus rotatable with respect to the tweezers part.
- A built-in inclination sensor detects whether you are holding the tweezers in your left or right hand and adjusts the position of the digits in the display.
- Operation is via a touch sensor on the back of the display unit.
- The tweezer has a fully automatic measuring mode that switches between measuring DC voltages, resistors, diodes, capacitors, frequencies and coils. However, as this does not always work properly, you can also switch the measuring mode by 'clicking' the touch sensor a few times.
- The tweezer also provides sines, noise, pulses and a user-defined signals. The frequency and shape of these signals can be set by editing an INI-file that can be loaded into the software.
The four parts of the DT71
The photo below shows the four parts of the measuring tweezers. The left part contains the actual measuring circuitry and is only 35 mm long. The right part contains two small batteries in the grips of the tweezers that have a capacity of 50 mAh and deliver a voltage of 3.7 V. This part is 105 mm long, in the opened position the two gold-plated contacts are 19 mm apart. These contacts can be fixed to the grips with two miniature bolts. The contacts are polarised, so there is a clear negative and a clear positive contact. This is important because the DT71 only measures unipolar. If you connect a DC voltage incorrectly, for example, the display will show the message 'Vx:Negativ'.
 |
| The four components of the DT71 tweezers. (© Miniware) |
The display
The disadvantage of the small dimensions of these tweezers is of course that the display is also extremely small. The OLED display measures only 18 mm by 5 mm! The brightness can be adjusted via the INI-file mentioned above.
 |
| The miniature display of the DT71 tweezers. (© Adafruit.com, edited by Jos Verstraten) |
The resolution of the display
The picture above shows one major disadvantage of the DT71, which puts this innovative device at a serious disadvantage to the competition. The display has only three digits for most measurements, which means that you can only read a 1 kΩ resistor to an accuracy of 10 Ω, for example. In most cases that will be more than sufficient, but most digital tweezers nowadays have a display with four digits.
The specifications of the DT71
According to the manufacturer, the DT71 meets the following specifications:
- DC voltage measurement ranges: 1.00 mV ~ 100 mV and 0.10 V ~ 40.0 V
- DC voltage accuracies: ±(2 % + 5) and ±(1 % + 3)
- Resistance measurement ranges: 0.10 Ω ~ 100 Ω and 1.00 kΩ ~ 2.00 MΩ
- Resistance accuracies: ±(0.5% + 2) and ±(0.5% + 2)
- Capacitor measurement ranges: 0.10 pF ~ 1000 pF and 0.001 μF ~ 400 μF
- Capacitor accuracies: ±(2 % + 3) and ±(2 % + 3)
- Coils measuring ranges: 1.00 μH ~ 1000 μH and 1.00 mH ~ 50.0 mH
- Coils accuracies: ±(5% + 3) and ±(5% + 3)
- Frequency measurement ranges: 10.0 Hz ~ 1000 Hz and 1.00 kHz ~ 20.0 MHz
- Frequency accuracies: ±(0.1% + 3) and ±(0.1% + 3)
- Diode voltage measurement range: 0.10 V ~ 3.00 V
- Diode voltage accuracy: ±(1.0 % + 3)
- Input resistance: 1 MΩ
- Maximum input voltage: -5.0 V ~ 50.0 V
The electronics in the DT71
Completely destroying the device?
Every electronics enthusiast naturally feels the need to open such a device and see how they have managed to fit all those features into such a small space. Of course, we wanted to do the same. The problem is that the DT71 cannot be opened without completely destroying the device. We thought that was a shame, so we didn't do it. Fortunately, there is a video made by someone from EEVblog, who performed a 'destructive teardown' on a DT71. We took two stills from this video and edited them to give you an idea of the electronics of this remarkable device.
The internal of the two grips of the tweezers
The photo below shows how the DT71 is powered. The two grips of the tweezers contain a 3.7 V battery with a capacity of only 50 mAh.
 |
| The battery in the grips of the tweezers. (© 2020 EEVblog, edited by Jos Verstraten) |
The internal of the measuring part
The contents of the small measuring section is a masterpiece of miniaturisation. A total of three extremely small PCBs are united with the display in a complicated sandwich construction to form the working unit. The components are even soldered on both sides of the PCBs!
 |
| The electronics in the measuring part of the tweezers. (© 2020 EEVblog, edited by Jos Verstraten) |
Working with the DT71
Charging the battery
To charge the battery, you require an USB-cable from USB-C to USB-A and a 5 V power supply. You must insert the special charging cable between the two parts of the measuring tweezers. You plug the USB-C connector of the USB-cable into the charging cable. A red LED lights up on the tweezers part of the device. This LED goes out when the battery is full.
 |
| The set-up for charging the batteries. (© 2021 Jos Verstraten) |
Downloading the latest firmware
You can download the latest version of the firmware for the DT71 from:
➡ Material Download For DT71 Mini Digital Tweezers
After clicking on 'download' a ZIP-file will be copied to your hard disk. When you unzip this you will see a HEX-file. Copy this to your hard disk.
 |
| The download page for the firmware. (© 2021 Jos Verstraten) |
Upgrading the firmware
Installing the new firmware is extremely simple. Connect the DT71 to a USB port of your PC via the charging cable and a USB-C to USB-A cable. The device's memory now appears in Windows Explorer as an external hard disk. Copy the HEX-file from your hard disk to the root directory of this external hard disk. The HEX-file will almost immediately turn into a RDY-file. After restarting the DT71, the new version of the firmware is active. We tested our sample with version 1.08 of the firmware.
 |
| Display of the DT71 in Windows Explorer. (© 2021 Jos Verstraten) |
Modifying the CAL.INI-file
This file that appears in the Windows Explorer window is a text file that you can open in Notepad. In this file, see the figure below, there are a number of lines that you can modify:
- SLEEP_TIME:
A number between 30 and 999 that defines the number of seconds the measuring tweezers remain active after waking up from sleep mode. - DISPLY_DIRECTION:
The number 0, 3 or 4 that defines whether you will hold the device exclusively in your right hand, exclusively in your left hand or alternately in both hands. In the latter case, the sensor will be activated so that the processor will reverse the data in the display if you are working with the left hand. - OLED_BRIGHTNESS:
A number between 0 and 10 that allows you to set the brightness of the display. - SINE_FREQ_OPT:
A number from 0 to 5 that allows you to set the frequency of the sine wave generator from 200 Hz (5) to 10 kHz (0). - NOISE_FREQ_OPT:
Defines the frequency of the noise generator. Can in this version of the firmware, be set only to 1, which corresponds to a frequency of 100 kHz. - USER_FREQ_OPT:
A number from 0 to 5 that allows you to set the frequency of the self-defining signal from 200 Hz (5) to 10 kHz (0). - PULSE_FREQ_OPT:
A number from 0 to 8 that allows you to set the frequency of the pulse generator from 100 Hz (8) to 100 kHz (0). - USER_WAVEFORM:
A sequence of hexadecimal numbers that allows you to define the shape of the user defined signal.
 |
| The contents of the CAL.INI-file in Notepad. (© 2021 Jos Verstraten) |
Restarting the DT71
The device does not have a button to turn it off and then on again. So how do you restart it? Simple, by pulling the measuring part out of the tweezers, you interrupt the power supply to the electronics. Plug the measuring part back into the tweezers and the device will restart with the new firmware.

Operating the DT71
After starting up the device in this way, the DT71 automatically enters the mode in which you can measure resistors. The display shows 'Rx:---'. By tapping the back of the device, you can switch between the various modes in the order: resistors, diode voltages, capacitors, coils, frequencies and DC voltages. That works, after some time to get used to it, very well!
Additional functions
Pressing on the back of the DT71 for more than one second brings you to an extra menu with the following functions:
- Identify:
This is the mode in which the DT71 automatically recognises the type of part you are picking up between the electrodes of the tweezers. The letter 'A' appears on the left of the display in place of 'M'. The automatic measuring mode works surprisingly well and the advantage of this option is that the meter also displays the secondary quantity of the part. For example, if you measure a coil, the resistance of this component is also displayed. Only when measuring high resistance values, the software is often wrong and displays a capacitor value instead of a resistance value. - Signal gen:
By tapping briefly on the back, you will go through the four available signal forms sine, noise, user defined and pulse. - Calibration:
Here you are asked to first close the jaws of the tweezers and then open them again. Certain calibration values are then stored in memory. - Measure:
Return to the start menu where you must select the quantity to be measured.
 |
| Displaying two quantities in 'Identify' mode. (© 2021 Jos Verstraten) |
Working with the DT71 in practice
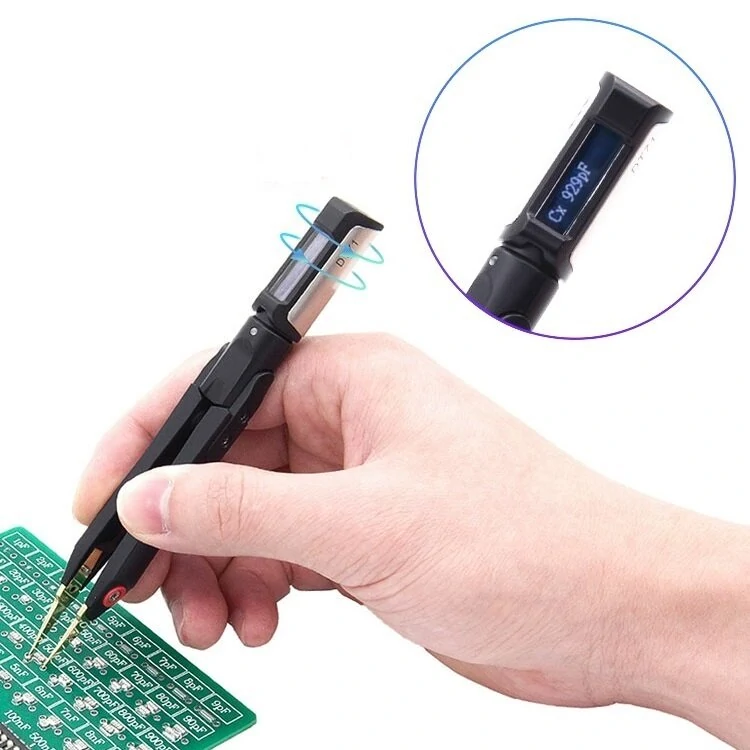
This mini tweezers lie comfortably in the hand and changing the measuring mode quickly by tapping the top with a finger is, after some practice, easy to do. The meter measures all kinds of parts very quickly. Even measuring capacitors, something that goes awfully slow with some multimeters, goes fast with the DT71. The only serious problem is that the two gold-plated contacts are completely smooth and therefore easily slip off the connection wire or path of a component. For example, it is almost impossible to squeeze an SMD lying loose on the table between the jaws of the tweezers. The component flips out of the jaws and often ends up back on the table tens of centimetres away. When measuring in a mounted PCB, this phenomenon is of course not an issue.
 |
| Measuring with the DT71 in an assembled PCB. (© 2020 Miniware) |
The DT71 mini tweezers on the test bench
Measuring DC voltages
We connect our reference meter Fluke 8842A in parallel to the two contact pins of the DT71 and measure small and large DC voltages. The results are shown in the table below. To calculate the percentage error, we set the reading on the Fluke equal to 100 %. It is clear that when measuring at the low range, the DT71 absolutely does not meet the specified accuracy of ±(2 % + 5). At the high range, the measured deviation is below the specified ±(1 % + 3).
 |
| Accuracy in measuring DC voltages. (© 2021 Jos Verstraten) |
Measuring resistors
We first measure eight resistors with the Fluke 8842A in four-wire technique. Then we connect these resistors with two small wires to the contacts of the DT71. The results are shown in the table below. Because the DT71 has no REL option, it is not possible to eliminate the resistance of the test leads and the jaws from the result. This is undoubtedly the cause of the large measurement error when measuring the 1 Ω resistance. For measurements above 1 kΩ the tested specimen complies with the specified accuracy of ±(0.5 % + 2). Although according to the specifications the maximum measuring range is 2.00 MΩ, the tested specimen did give a reading when measuring a resistance of 10 MΩ. However, the reading was not stable and fluctuated between 9.00 MΩ and 11.50 MΩ.
Measuring capacitors
We switch to our EastTester ET4401 RLC meter as a reference meter and measure capacitors from 100 pF to 470 μF with both meters. The results are summarised in the table below. What strikes immediately is that the DT71 very quickly displays the results of its measurements in a stable manner. As was to be expected, the deviations are large with small capacitor values and with electrolytic capacitors. The cause of the error in the first case is the paralleled parasitic capacitance of the jaws and your hand, and in the second case the unpredictable leakage current of electrolytic capacitors. Because of a completely different measuring technique and the four-wire measuring method, a meter like the ET4401 does not suffer from this. The specified accuracy of ±(2 % + 3) is therefore not achieved in the full measuring range.
Measuring coils
You will probably not do this often, but the DT71 can do it and so we have also measured the reliability of this measuring tweezers for these parts. Of course, our ET4401 is again used as a reference. We measure a number of small coils that are supplied with ±10 % tolerance. The data below show that the inaccuracy measured on our specimen is close to the specified ±(5 % + 3).
Sensitivity when measuring frequencies
It's obvious that even the cheapest multimeters nowadays measure the frequency of a signal very accurately. This also appears to be the case with the DT71. More interesting is the sensitivity in this kind of measurement. How large must the signal be to guarantee a stable measurement of the frequency? We measured this by connecting sines waves of different frequencies to the DT71 and then slowly increasing the RMS value until the display shows a stable signal frequency. The results are summarised in the table below and are very satisfactory.
Measuring diodes
The DT71 sends a pulsating current through the diode and measures the forward voltage of the component. If you test LEDs, they will start to blink. You can test all colours of LEDs. In this mode, the DT71 is ideal for quickly finding out the connections of a unknown seven-segment display.
The sine wave output
The oscillogram below shows the output of the DT71 when the sine wave is set to 5 kHz. A RMS voltage of 1.1 V was measured. Not exactly mother's beauty, but good enough for quick testing an amplifier.
The square wave output
We have configured it to the maximum frequency of 100 kHz which gives the picture below. The peak-to-peak voltage of the signal is about 3 V.
Let's make it clear that the DT71 is a very innovative device in which the designers have put a lot of effort into making it the highly miniaturised, good-looking device that it is. But ... is the DT71, with its price of at least 60 euros, competitive? It most certainly is not! You can buy competing measuring tweezers for half the price. In addition, almost all similar digital tweezers have a reading up to 1999 and a larger display that is easier to read.
 |
| Accuracy in measuring resistors. (© 2021 Jos Verstraten) |
Measuring capacitors
We switch to our EastTester ET4401 RLC meter as a reference meter and measure capacitors from 100 pF to 470 μF with both meters. The results are summarised in the table below. What strikes immediately is that the DT71 very quickly displays the results of its measurements in a stable manner. As was to be expected, the deviations are large with small capacitor values and with electrolytic capacitors. The cause of the error in the first case is the paralleled parasitic capacitance of the jaws and your hand, and in the second case the unpredictable leakage current of electrolytic capacitors. Because of a completely different measuring technique and the four-wire measuring method, a meter like the ET4401 does not suffer from this. The specified accuracy of ±(2 % + 3) is therefore not achieved in the full measuring range.
 |
| Accuracy in measuring capacitors. (© 2021 Jos Verstraten) |
Measuring coils
You will probably not do this often, but the DT71 can do it and so we have also measured the reliability of this measuring tweezers for these parts. Of course, our ET4401 is again used as a reference. We measure a number of small coils that are supplied with ±10 % tolerance. The data below show that the inaccuracy measured on our specimen is close to the specified ±(5 % + 3).
 |
| Accuracy in measuring coils. (© 2021 Jos Verstraten) |
Sensitivity when measuring frequencies
It's obvious that even the cheapest multimeters nowadays measure the frequency of a signal very accurately. This also appears to be the case with the DT71. More interesting is the sensitivity in this kind of measurement. How large must the signal be to guarantee a stable measurement of the frequency? We measured this by connecting sines waves of different frequencies to the DT71 and then slowly increasing the RMS value until the display shows a stable signal frequency. The results are summarised in the table below and are very satisfactory.
 |
| Sensitivity when measuring frequencies. (© 2021 Jos Verstraten) |
Measuring diodes
The DT71 sends a pulsating current through the diode and measures the forward voltage of the component. If you test LEDs, they will start to blink. You can test all colours of LEDs. In this mode, the DT71 is ideal for quickly finding out the connections of a unknown seven-segment display.
The output signals on the oscilloscope
The sine wave output
The oscillogram below shows the output of the DT71 when the sine wave is set to 5 kHz. A RMS voltage of 1.1 V was measured. Not exactly mother's beauty, but good enough for quick testing an amplifier.
 |
| The sine wave output at 5 kHz. (© 2021 Jos Verstraten) |
The square wave output
We have configured it to the maximum frequency of 100 kHz which gives the picture below. The peak-to-peak voltage of the signal is about 3 V.
 |
| The square wave output at 100 kHz. (© 2021 Jos Verstraten) |
Our opinion on the DT71 from e-Design
Let's make it clear that the DT71 is a very innovative device in which the designers have put a lot of effort into making it the highly miniaturised, good-looking device that it is. But ... is the DT71, with its price of at least 60 euros, competitive? It most certainly is not! You can buy competing measuring tweezers for half the price. In addition, almost all similar digital tweezers have a reading up to 1999 and a larger display that is easier to read.
But we can imagine that there are many electronic hobbyists who immediately fall in love with this beautifully designed device and are happy to pay the price. What you get is a cute little device that, broadly speaking, does what the manufacturer promises.
DT71 mini digital tweezers