|
Does a drone seem nice, but are you hesitant to buy one because you doubt whether you can drive one? Buy an E012, a quadcopter that costs only thirteen euros and that will allow you to investigate whether you can master the art of driving a drone. |
Introduction to the E012 of Eachine
The appearance of the E012
The E012, with its dimensions of 6.5 cm x 6.5 cm x 2.6 cm, is one of the smallest drones currently available. With its price of just under € 13.00, this drone is a cheap entry-level model and therefore ideal if you want to learn to deal with drones. After all, a drone is a drone and the E012 offers broadly the same control functions as much more expensive models.
 |
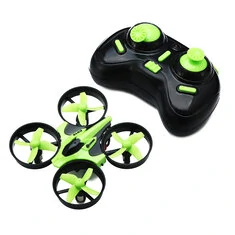
| The E012 quadcopter from Eachine. (© 2018 Jos Verstraten) |
The E012 has a flexible plastic frame, making it impact-resistant. If you're going to drive a drone for the first time in your life, you'll have a lot of collisions with walls and ceilings! The drone is powered by a 3.7 V battery with a capacity of 0.2 Ah. With a fully charged battery, however, the drone can only fly for five minutes. Fully charging the battery takes about forty minutes, it is recommended to order a few extra batteries.
As far as control is concerned, the E012 offers an impressive number of possibilities. At the touch of a button, you can have the drone make a flip that will make a big impression on your family. With the options 'Headless Mode' and 'One Key Automatic Return', this drone is no less than the much more expensive models, although there are some comments to be made. In addition, the remote control allows you to set the quadcopter to three speeds, you can start at a low speed.
The system operates at a frequency of 2.4 GHz and occupies four channels in this band. The range is approximately thirty metres.
The drone is equipped with four LEDs, one blue at the front, one red at the back and two green at the left and right. Looks nice, but unfortunately these LEDs consume quite a bit of the battery power that could have been better spent on a longer flight time. The LEDs will blink when the battery is almost empty.
The contents of the package
The E012 comes in a neat box and contains:
- The E012 quadcopter.
- One battery.
- A charging cable from a USB connector.
- The remote control.
- Four additional propellers.
- A manual in English.
 |
| The parts that are in the box. (© 2018 Jos Verstraten) |
The battery is a miracle of miniaturization. The technology used is lithium-ion polymer, also called LiPo. This voltage source weighs only five grams and is 16.3 mm x 20.8 mm x 8.5 mm small. It delivers 3.7 V and has a capacity of 200 mAh. First you have to charge the battery with the supplied charging cable. You plug this into a USB port of a 5 V charger and into the plug of the battery. A small LED will light up and go out when the battery is charged. The manual states that you should immediately remove the battery from the charger if the LED goes out, otherwise it will become too hot. However, we have not been affected by this phenomenon.
The battery should be mounted on the underside of the drone. First click the sub-miniature plug of the battery in the connector on the drone, then slide the battery into the battery compartment. Additional batteries cost about four euros each. According to the manufacturer's data it takes forty minutes to fully charge the battery, but with the model tested the LED went out after only twenty minutes.
 |
| The miniature LiPo battery, the charging cable and the location where the battery is mounted in the drone. (© 2018 Jos Verstraten) |
Of course we were very interested in the way the manufacturer has managed to accommodate the rather complicated electronics in the drone. Underneath the battery compartment is a 22 mm by 22 mm PCB, which is filled on both sides with SMD sub-miniature parts. The red wire is the antenna, which is rolled up under the black shield with the manufacturer's logo. In the left picture you can see at the bottom the sub-miniature connector for the connector of the battery.
 |
| This PCB under the battery compartment contains all the electronics. (© 2018 Jos Verstraten) |
The controller is located in a handheld device with dimensions 11 cm x 8 cm x 6 cm. This device must be powered by two 1.5 V AA batteries (not included). The function of all controls is summarized in the figure below. The function of the buttons is discussed further in this article.
With the controller you can control the drone in the following directions:
- Ascending.
- Descending.
- Flying forward.
- Flying backwards.
- Turn left around its own axis.
- Turn right around its own axis.
- Fly sideways to the left.
- Fly sideways to the right.
- Rolls over 360°.
 |
| The controller with all controls explained. (© 2018 Jos Verstraten) |
- Type: E012 quadopter
- Manufacturer: Eachine
- Quadopter dimensions: 6.5 cm x 6.5 cm x 2.6 cm
- Quadcopter weight: 10 g (without battery)
- Battery: 3.7 V, 200 mAh, lithium-ion polymer
- Battery dimensions: 16.3 mm x 20.8 mm x 8.5 mm
- Battery weight: 5 g
- Battery charging time: about 40 minutes
- Gyro: 6-axis
- Frequency: 2.4 GHz
- Number of transmission channels: 4
- Dimensions controller: 11 cm x 8 cm x 6 cm
- Controller weight: 104 g (with batteries)
- Power supply controller: 2 x 1.5 V type AA battery
- Flight time: about 5 minutes
- Flight range: 30 m
Testing the E012 quadcopter
System startup
Of course you need to charge the battery and equip the controller with two 1.5 V type AA batteries. If the LED in the charger is no longer lit, remove the battery from the charger and mount it in the drone. Attention: first push the plug into the connector and only then push the battery into the compartment! At that moment the LEDs in the drone will start flashing.
You must now connect the controller to the drone, that is called 'pairing'. This is very simple. Move the left stick all the way down and switch on the controller. The LED starts to flash. Now move the stick all the way up and then down again. You will hear beeps and all LEDs light up continuously. The wireless connection between the controller and the drone has been established and you can start operating the drone.

Adjusting the drone
The drone navigates in six directions in the air by varying the speed of the four motors. If you move the left stick up or down, the drone must ascend or descend completely vertically, without deviating to the left, right, front or rear. This requires a fine-tuning and that is what you should start with. Without this adjustment, the drone is not controllable! Under the right stick you see four buttons with which you can perform this procedure.
Place the drone in a place where it can fly freely in all directions and with the front side, the side of the blue LED, facing forward. Move the left stick, which is still in the bottom position, very slowly with the left thumb up. In a certain position the propellers start to rotate, a little later the drone slowly rises. There is a good chance that this will not happen vertically, but in one of the four directions. Now use your right thumb to press one of the four buttons under the right stick until the deviation from the purely vertical ascent has been compensated. You will probably have to perform this correction in two directions. The result is that the drone remains floating in place and by accelerating more or less you can make the drone ascend or descend.
Calibrating the gyroscope
The next step is to adjust the six-axis gyroscope, or the built-in digital compass. This is absolutely essential if you want to fly in Headless Mode, see later. Place the drone on a flat surface with the nose forward. Place the controller behind the drone and make sure that this unit is in exactly the same direction as the drone. Now quickly push both sticks to the lower right corner and wait until the LEDs on the drone start flashing.
Setting the speed
The E012 can fly at three speeds. When you learn to control the device it is important that you select the lowest speed. This is done by pressing the left stick. You will hear the controller beep once, twice or three times. Press until you hear one beep to set the lowest speed.
A few important remarks
Never fly into your garden without experience with the drone! There is a good chance that you will lose control of the drone and it will end up in your neighbours' garden, on the roof or on the street. Learn to control the drone in your living room. Make sure, however, that the floor is free of dog or cat hair! In our case, the axles of the four engines were wrapped with cat hairs and the drone could no longer fly. Although you can dismantle the propellers from the axles and also free the motors from the housing, everything about this device is so small and seemingly fragile that we prefer not to touch it.
Learning to drive the E012
Learning to fly with a drone is no sinecure. Put the drone with the blue LED forward on a flat surface. With the left stick you can accelerate and turn the nose of the drone to the left or right. With the right stick you can determine the direction in which the drone will fly from its starting position: forward, backward, to the left or to the right. In the beginning, you will move the two sticks too abruptly, causing the drone to crash against the ceiling or walls, ending with a crash on the floor. First, learn to steer the drone up and down by leaving the right stick alone and only moving the left stick up and down very carefully. If you have that under control, you can make the drone fly forward by also gently moving the right stick up. In this way, step by step, you should be able to control all possible directions of movement of the drone.
Headless Mode
This mode is also called CF-mode, which stands for 'Care Free' mode. This mode should make drone control intuitive. If you enable this mode, it does not matter in which direction the nose of the E012 points, but the drone will continue to fly in the same direction it started when you moved the right stick upwards. The rotation of the drone around its axis with the left stick is switched off. You do not have to pay attention to which way the nose is pointing. However, this option did not work very accurately on the tested specimen.
Auto Come Back
A nice advertising slogan on the E012's box, but this cheap drone really doesn't automatically return to the place of take-off! To do this, the drone must be equipped with circuits that are in contact with the satellites of the GPS network. The E012 has of course no GPS-electronics built in, that is impossible for this price. The drone does not know where it is and cannot find its starting location at all. If you fly in the 'Headless Mode', pressing this button will only cause the drone to fly backwards to somewhere near you. The manufacturer would have been more credible if he had removed this useless feature from this cheap entry-level model.
Flip and roll
An option that you should only enable if you have the drone well under control. You can make a big impression on family and friends. This trick can only be done outdoors because the drone must have at least three meters of free space in all directions. Make sure the drone flies stable and press the right stick. You will hear a beep. By then pushing the stick completely in one direction, the drone will automatically make a full 360° turn in the air. Impressive!
Our conclusion
Is the E012 worth its money? Yes, it is a nice toy that is extremely suitable to learn how to fly with drones. After all, the controller works in general completely identical to the controls of much more expensive models. It is better to see a drone of thirteen euros crashing dozens of times when learning to drive than a drone of one hundred euros. Thanks to its low weight and flexible housing, the E012 is virtually indestructible. In a crash, so little energy is released that there is no damage to the drone or that against which it flew. Moreover, your children will fight a battle to play with your electronics gadget.

Eachine E010 Mini Quadcopter