|
The well-known cheap Chinese transistor testers can find out many specifications, but not the breakdown voltage of a semiconductor. The available voltage is too low for that. This small device can do that, even up to 2,700 V. |
Background information: breakdown voltage
What is the breakdown voltage?
If you slowly increase the voltage across an electronic component, the current through this component will increase (component with positive resistance) or decrease (component with negative resistance) just as slowly. However, with some semiconductors such as diodes and transistors, you will notice that at a certain voltage, the current suddenly starts to rise very quickly. At that point, it seems as if something in the component 'breaks', causing the physical laws that control the current to stop working. The voltage at which this phenomenon occurs is called the 'breakdown voltage' and it is an important parameter of the component. The value of the breakdown voltage depends on the type of component and can range from a few tens of volts to more than 2,000 V.
The breakdown voltage of a diode
Every diode conducts current in only one direction. In the forward direction, there is a very low voltage across the part, the value of which depends on the type of material. In the reverse direction, you can increase the voltage up to a certain limit. Above that limit, without appropriate measures, the current increases very quickly to values where the part is destroyed. This physical property is gratefully used in zener diodes. These are connected in series with a resistor to a DC voltage. As this reverse voltage increases to the predetermined breakdown voltage, a current starts flowing through the diode. As long as you limit the current through the semiconductor to a safe value, the junction breakdown is not destructive.
The breakdown voltage of a diode is an important parameter. If you use a diode in a circuit that rectifies the line voltage, the diode must be able to withstand in the reverse direction at least twice the value of the amplitude of this voltage. This is because the anode is then at the negative peak of the sine wave and the cathode at the rectified positive voltage stored in an electrolytic capacitor. Thus, with the necessary reserve, the breakdown voltage of such a diode should be at least 700 V.
 |
| The breakdown voltage of a diode. (© 2023 Jos Verstraten) |
The breakdown voltages of a transistor
Even for a bipolar transistor, there are certain maximum voltages you can connect between the three pins. For example, the graph below shows the voltage between the collector and emitter and the collector current flowing as a result. That current also depends on the base current, which is why there is not one graph drawn, but a bundle. Above a certain voltage, breakdown occurs and the current starts to increase exponentially. This is called the Vceo of the transistor, a typical value for a small-signal transistor like the 2N2222 is 40 V. There are also certain maximum breakdown values for the voltages between emitter and base and between collector and base, which you absolutely must not exceed. The Vcbo for the mentioned transistor is typically 75 V and the Vebo is only 6 V.
 |
| The breakdown in the collector/emitter voltage. (© 2023 Jos Verstraten) |
The breakdown voltages of a MOV
 |
| The breakdown voltage in a MOV. (© 2023 Jos Verstraten) |
The breakdown voltage of a gas discharge tube
Gas discharge tube? Yes, still highly coveted in electronics hobby circles in the form of the famous nixie tube used to design nostalgic clocks. So coveted, in fact, that these days treasures are paid for a set of six nixie tubes. A breakdown phenomenon also occurs in such a tube if you make the voltage across the tube high enough. A red glow then arises around one of the cathodes, as a result of which the digits 0 to 9 light up. The figure below shows the current/voltage characteristic of such a tube.
 |
| The breakdown phenomenon in a nixie tube. (© 2023 Jos Verstraten) |
Conclusion
Every electrician should have something that allows him or her to measure the breakdown voltage of a component. However ... for such a measurement, you must have access to a power supply capable of generating DC voltages from 0 V to as much as 2,000 V. Since tubes have disappeared from an electronic engineer's daily routine, nobody will have such an expensive power supply.
Are there any cheap alternatives?
EMECO breakdown voltage meter
Getting to know the device
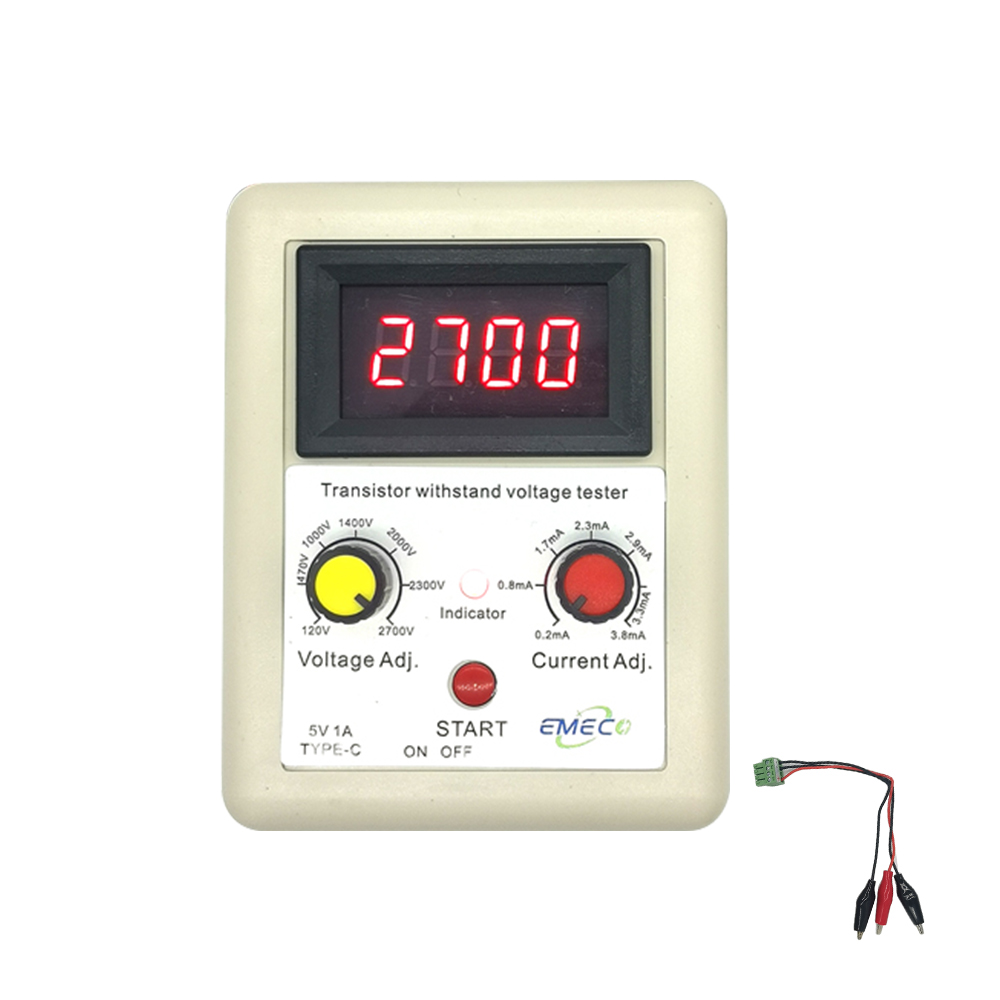
Such an alternative does indeed exists. A small, inexpensive device capable of generating a DC voltage between 110 V and 2,700 V is marketed by the Chinese brand EMECO, which is unknown to us. A second button allows you to set the maximum output current between 0.2 mA and 3.8 mA. With this little device, you can measure the breakdown voltage of all the components you encounter in everyday practice. Moreover, you can use this device to very quickly find the connection coding of a nixie tube, for example.
Transistor withstand voltage tester
The device carries no type number, but presents itself on the front with text describing the purpose of the little meter: 'Transistor withstand voltage tester'. The tester can be bought from all known Chinese mail-order companies and their European dropshipment clones. At Banggood you will pay € 20.97 for it, at AliExpress € 28.37.
As the picture below shows, this breakdown voltage meter is in a small plastic case measuring 90 mm by 70 mm by 30 mm. The little device weighs just 96 grams. Conveniently, this tester is powered from an internal lithium battery that can be charged via a USB-C connector from a 5 V supply. A three-wire connection cable with three crocodile clips is included. This connects the meter to the component under test.
On the left is a rotary potentiometer with which you set the output voltage, on the right an identical part with which you select the current. Both knobs are scaled. Between these buttons is a red LED that lights up when voltage is applied to the outputs. This only happens if you hold down the red pushbutton 'START'. This way, you are not at risk of suddenly getting 2,700 V between your fingers! The finger of one hand must always press the button and is therefore at a safe distance from the wires.
Above is a four-digit red or blue LED display that shows the output voltage with a resolution of 1 V.
 |
| EMECO's breakdown voltage tester. (© Banggood) |
The top and bottom sides of the device
In the picture below, the top and bottom sides of the device are united. In the top side is a four-pole connector to which you connect the measuring cable. On the bottom, you can see a slide switch that you use to turn the device on and off and a USB-C connector for charging the battery. Above this connector is a very small red LED that lights up when the battery is charging and goes out when the battery is full. A charging cable is not included, by the way.
 |
| The top and bottom of the device. (© 2023 Jos Verstraten) |
Technical specifications
According to the manufacturer, this high voltage generator has the following specs:
- Housing material: ABS
- Output voltage: adjustable 110 Vdc ~ 2,700 Vdc
- Output current: adjustable 0.2 mA ~ 3.8 mA
- Power supply: 3.7 V lithium battery, 660 mAh
- Charging battery: from 5 Vdc power supply via USB-C connector
The electronics inside the device
The front of the PCB
After unscrewing the housing, you will notice that the PCB is fixed in the housing with just two screws. A three-wire cable with a PCB connector connects the PCB to the display. After disconnecting this connector and removing the two buttons, you can remove the PCB from the housing. The front of the PCB is shown in the figure below.
A device that makes a DC voltage of 2,700 V from a DC voltage of 3.7 V cannot, in our humble opinion, do without at least one high-voltage smoothing capacitor. We wondered where such a bulky component would be hidden in this small box. Nowhere, that is! There is not a high-voltage capacitor in sight on this little PCB! So how this circuit works is a mystery to us....
We discover a quadruple op-amp of type LM324. An SMD chip bears the code 57b5. This turns out to be a lithium battery charger and therefore does not contribute to the circuit that generates the high DC voltage. We do discover a heavy NPN power transistor D882 with a small transformer next to it. Near these components is a second chip, whose code has been made unreadable. To the left of the transformer, we discover a number of diodes and capacitors that could form a voltage multiplier. Below these components are another four diodes (a bridge rectifier?) and a capacitor insulated with a dot of some stuff. Is this supposed to be the output voltage smoothing capacitor?
 |
| The front side of the PCB. (© 2023 Jos Verstraten) |
The back of the PCB
On the back of the PCB, only the battery is attached. Here, too, we see no trace of the high-voltage capacitor which, according to our knowledge of high-voltage generators, should be present in such a device.
 |
| The back side of the PCB. (© 2023 Jos Verstraten) |
Working with the EMECO breakdown voltage meter
Connect, push the button, turn the knob, read!
Set both voltage and current to minimum. Press the red button and with the other hand, increase the voltage until it settles to a certain value. This voltage is the breakdown voltage of the component.
 |
| Measuring the Vceo of a transistor. (© Banggood) |
Testing the EMECO breakdown voltage meter
Minimum and maximum voltage
The one supplied to us allows us to set the voltage between 134 V and 2,678 V.

Testing the accuracy of the voltmeter
 |
| The accuracy of the voltmeter. (© 2023 Jos Verstraten) |
Testing the accuracy of the current setting
We connected the output of the meter to our ET3255, measuring mA, and set the current knob as accurately as possible to a number of values printed on the front. The results are summarised in the table below.
 |
| The accuracy of the current setting. (© 2023 Jos Verstraten) |
The output voltage at 600 V
We connected our oscilloscope via a 1/10 probe to the outputs of the tester set at about 600 V and pressed the button. You can see the result on the oscillogram below. The output voltage does indeed go to 600 V, but there is a very low-frequency ripple of almost 80 V on it! Not very promising!
 |
The output voltage at 600 V. (© 2023 Jos Verstraten) |
The output voltage at 2,500 V
We made a 1/100 voltage divider with some resistors and connected our oscilloscope to this divider. After setting the output voltage of the EMECO to about 2,500 V and pressing the button, the oscilloscope shows the result below. The ripple is now barely visible, the device delivers a rather nice 2,500 Vdc voltage.
 |
| The output voltage at 2,500 V. (© 2023 Jos Verstraten) |
The ripple on the output voltage
With four good-sized 630 V capacitors connected in series, we dare to connect the 2,500 V output voltage directly to our oscilloscope and zoom in on the ripple. You can see the result in the oscillogram below. On the 2,500 Vdc voltage there is a ripple of about 50 V, which thus equals 2 %.
 |
| The ripple on the 2,500 V output voltage. (© 2023 Jos Verstraten) |
Our verdict on the EMECO breakdown voltage meter
If you google the term 'breakdown voltage meter', you will find that although there is equipment that can measure this voltage, you have to pay hundreds to over a thousand euros for it. If you only occasionally feel the need to measure the breakdown voltage of a component, this small and inexpensive device offers a useful alternative to its much more expensive counterparts.
That there is such a large ripple on the output voltage of 600 V may not be as it should be, but that probably has very little impact on measuring the breakdown voltage of a component.

EMECO Breakdown-voltage tester