|
When we were looking for a digital microscope for our lab we found the G600 from Mustool. A nice device with an excellent price/performance ratio. |
Introduction to the G600 LCD microscope
Two versions for various prices
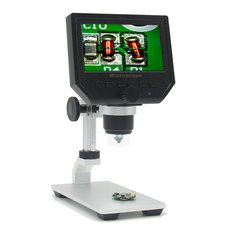
The G600 from Mustool is offered in two versions. The first version has a primitive foot with suction cup and costs about € 45.00. The second version comes with an aluminium column with height adjustment and a rather large object table and costs about € 60.00. It will be clear that the version we ordered is the version with column.
 |
| The two versions of the G600 microscope. (© 2018 Jos Verstraten) |
The microscope with column is delivered well packed in a beautiful gift box. You have to assemble the parts yourself, which is not very difficult and for which an imbusskey is included. There is an English manual available, but this is not very clear and you will need to discover a lot of functions of the microscope while you work with it.
 |
| The parts of the G600 microscope with column. (© 2018 Jos Verstraten) |
You can use this microscope in real time, but you can also use it to store photos and videos on a memory card for later use. You can send the images to the screen of your PC via a USB data cable. Thanks to the built-in battery, the G600 can be taken anywhere. According to the manufacturer, you can work six hours on one battery charge. However, there is also a mini-USB connector available with which you can power the device from every 5 V USB adapter and with which you can charge the battery again.
The menus allow you to set up a time-lapse function: the microscope takes pictures fully automatically at an adjustable time interval. You can even activate a motion detection function after which the microscope automatically starts a video sequence after detecting a motion in the recorded image. Of course, there are a number of white LEDs around the lens, which illuminate the object well.
The specifications of the G600
According to the manufacturer, this LCD microscope has the following specifications:
- Screen: 4.3 inch LCD display
- Image sensor: 3.6 megapixel CCD
- Video resolution: adjustable to 1080P, 720P, VGA
- Photo resolution: adjustable to 5, 2 and 1.3 megapixels and VGA
- Magnification: 1 x to 600 x
- Distance to object table: 1.5 cm to 13.0 cm
- Object illumination: eight LEDs with adjustable intensity
- Image storage: micro-SD card up to 64 GB
- Power supply: Li-ion battery
- Battery charging time: 4 hours
- Battery life: 6 hours
- Automatic switch-off: after adjustable time
Working with the G600
Starting up
To activate the microscope, briefly press the left, round button below the display. After an introduction screen that remains on the screen for a few seconds, you can start working with the device. The smallest magnification is obtained when you turn the microscope to the highest position on the column. If you then place a ruler on the object table and focus on it, one centimetre is displayed on the screen as 5.4 cm. If you turn the microscope all the way to the other extreme position, 1.5 cm above the object table, one millimetre of the ruler will be displayed as 3.5 cm on the screen. You will notice that the maximum optical magnification is only 35 times and not 600 times, as the manufacturer claims. This number undoubtedly refers to the digital magnification that becomes possible with the zoom function and if you take a picture in the highest resolution and display it on the large screen of a PC.
The controls of the microscope
On the right side you see, from bottom to top:
- The mini-USB connector for connecting to the power supply, charger or PC.
- A slot for inserting a micro-SD card.
- A dial with which you can control the intensity of the LED lighting.
More interesting are the six buttons below the display, because you can use them to set and control all functions of the microscope.
- On/Off switch.
One press of this button switches the microscope on, a second press switches it off. - Menu button.
After the first press, select the picture/video menu and after the second press, select the setting menu. - Picture/video switch.
Switches between picture and video mode. In addition, display the photos and videos saved on the memory card. - Next menu option.
Activates the following menu option. Activates the zoom function. - Previous menu option.
Activates the previous menu option. Deactivates the zoom function. - OK button.
Confirms the selection of a menu option. Takes a picture or starts and stops a video.
 |
| The control buttons of the G600. (© 2018 Jos Verstraten) |
These options are of course only possible after you have inserted a micro-SD card (maximum 64 GB) into the slot. A memory card icon appears on the display. The microscope start up in video mode, and you see a video camera icon in the top left of the display. To take pictures, briefly press the photo/video switch, the icon changes to that of a photo camera. If you want to take a picture of the screen, just press the OK-button. The handy thing is that the microscope waits half a second before taking the picture. This reduces the motion blur caused by pressing the button. The photos are stored in .JPG format and can therefore be displayed on any device.
Do you want to make a video? Briefly press the photo/video switch again and the device enters the video mode. You start a video by pressing the OK-button. A red circle flashes in the display and the recording time is displayed in hours-minutes-seconds. The recording stops after a second press on the OK button. The videos are recorded in the .AVI format and can therefore played back on any device.
The photos and videos are recorded in a folder 'RECORD' on the card under the names PICxxx.JPG and RECxxx.AVI, where xxx of course stands for the serial number.

The resolution of photos and videos
As an example we have photographed in the highest resolution of 2560 x 1440 pixels a SMD-diode soldered on a PCB. Unfortunately we can't insert pictures with a size of 332 kB on this blog. The picture has been reduced to a width of 800 pixels, you just have to assume that the original quality is excellent.
Videos are recorded with a maximum resolution of 1280 x 720 pixels and with 30 frames per second. This quality is also excellent.
 |
| An SMD diode on a PCB enlarged with the G600. (© 2018 Jos Verstraten) |
With the Previous and Next buttons you can zoom in 2x or 4x and zoom out again. This is a software-based operation, which causes the image on the screen to show a lot of noise.
The menu options of the G600
The Video/Photo menu
After the first press of the Menu button, the Video or Photo menu appears in the picture. Which menu you see depends on the mode you set with the photo/video switch. The two menus have slightly different selections.
- Resolution (Video and Photo).
In Photo mode, you can select the resolution between 5 megapixels, 2 megapixels, 1.3 megapixels and VGA. The latter corresponds to a resolution of 640 by 480 pixels. In Video mode, you can set the resolution to 1080p, 720p or VGA. - Fast View (Photo).
Indicates a delay between pressing the OK button and taking the picture, which can be set to 0, 2 or 5 seconds. - Date Tag (Video and Photo).
Put the date and time on the screen. - Timed Photos (Photo).
Option for taking pictures automatically. The interval time can be set to 3 or 5 seconds. - Motion Detection (Video).
Automatically starts a video sequence when the system has detected a motion in the image. - Cyclic Record (Video).
Sets the length of video sequences to 3, 5, or 10 minutes. Each sequence is written to the card under its own file name. If the card is full, the oldest recording is automatically overwritten.
 |
| The options of the Video/Photo menu. (© 2018 Jos Verstraten) |
This menu appears on the screen after the second press of the Menu button. This menu consists of three pages, which appear automatically when you scroll through the options using the Next and Previous buttons.
- Format.
This option allows you to format the micro-SD card. - Language Setting.
Setting the menu texts in a lot of languages, including English, French and German. - Auto Power-Off.
Turn off the device after 1 or 3 minutes. You can turn this option off (0). - Screen Savers.
Only turns off the screen after 1, 3 or 5 minutes. You can turn this option off (0). - Reset System.
All menu options return to the factory settings. - Frequency.
Sets, according to the manual, the frequency of the light source to 50 Hz or 60 Hz. Unfortunately, this option is not explained, the function is not clear. It doesn't seem to us that the LEDs are powered by AC voltage! - Time Setting.
You can set the current date and time, which are stored in the device. - Video Rotate.
The image rotates 180 degrees. - Fill Light.
Turns the LEDs on or off. - Version.
Display the version number of the firmware.
 |
| The three pages of the Setting menu. (© 2018 Jos Verstraten) |
The images to your PC
An extremely handy option of the G600 is that you can send the images that the microscope takes directly to the large screen of your laptop or desktop PC. At first we determined that this is not possible. And it is indeed not possible if you use the supplied USB cable. Apparently in this cable only the ground and the +5 V power supply are connected and not the two data cores. A thoughtful reader pointed out to us, however, that it does work if you use a data cable. At the moment you connect the G600 with such a cable to a USB port of your Windows 7 PC, the familiar USB symbol appears on the screen of the G600 and Windows starts looking for a suitable driver. The G600 is recognized as a TIGA device and the necessary driver is installed automatically. Afterwards it is a question of installing a program on your PC that supports the display of the images of TIGA devices, such as the freeware program 'AMCap'. The result is shown in the picture below.
If you work with Windows 10, the image appears in the camera application of the operating system itself and you do not need to do anything extra.
 |
| The image that the G600 displays in the AMCap window under Windows 7. (© 2018 Jos Verstraten) |
Our opinion
We are extremely satisfied with this G600 microscope and can highly recommend it if you are looking for such a handy tool. It is an ideal instrument to check the soldering of SMD parts on your PCBs and to get the codes on such parts clearly legible.

4.3 inch HD LCD-display Microscope