|
With the GD-SC02 you get a security camera for less than twenty euros. You can integrate the camera into your wireless WiFi network or connect it to your wired Ethernet. With the 'Guudgo' app, you can rotate the camera in any direction, view the HD images directly or save them in the cloud via the Amazon web services (AWS). |
Introduction to the GD-SC02 WiFi camera
The hardware
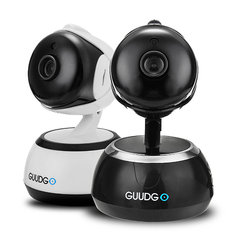
The GD-SC02 from the Chinese company GUUDGO comes in a neat box and looks nice. The camera, with its diameter of nine centimeters, fits easily in the palm of your hand and weighs only 200 grams. At the back you will find a connector for connecting the camera to an Ethernet network, a micro-USB connector for powering the device and a reset button. At the bottom is a twist and click system. This allows the camera to be suspended from the ceiling using the mounting plate supplied. The software has a feature that allows you to rotate the image 180°, the images are not upside down. In the base is the speaker and microphone, you can communicate two-way with the person in front of the camera. To the right of the camera is a slot where you can install a micro SD memory card up to 64 GB for local storage of the images.
 |
| The appearance and packaging of the GD-SC02 security camera. (© 2018 Jos Verstraten) |
If you want to use the GD-SC02 wireless over your WiFi network, you should note that the camera can only communicate with your router at 2.4 GHz. Of course, the camera has sound and motion detection and, if desired, sends a notification to your smartphone or tablet if either is detected. If desired, the camera automatically records short video fragments after detecting a sound or movement. These fragments are called events. Through the microphone in your smartphone or tablet you can talk through the speaker in the camera and you can listen to what is happening in the monitored area. The camera can be rotated in four directions via buttons on the app. The recorded images and events are saved as videos that you can play, save or share via your social media.
The camera comes with a temporary free account on the Amazon web services (AWS). After this period you must pay. But a 64 GB memory card, which you can insert into the camera, can also store a lot of videos. The advantage of storing videos in the cloud is of course that you can see the videos recorded by the camera anywhere in the world in your Internet browser.

Technical data of the GD-SC02
- Network: wireless via WiFi (2.4 GHz only) or wired via Ethernet
- Apps: Adroid and iOS version available
- Image Sensor: 1/4 inch progressive CMOS Sensor
- Resolution: HD 720p
- Image frequency: up to 25 frames per second, depending on Internet speed
- Lens: 3.6 mm wide angle
- Up and down (pan): 90 degrees max.
- Left and right (tilt): 355 degrees max.
- Internal memory: storage on micro SD card up to 64 GB
- Storage in the cloud: Amazon web services AWS
- Digital zoom: four times via app or browser
- Audio: two-way
- Night vision: can be switched on automatically or via the app
- Night vision illumination: 10 infrared LED chips around the lens
- Night vision range: about 10 meters
- Automatic sound detection: with notification or email
- Automatic motion detection: with notification or email
- Power supply: 5 Vdc via micro USB cable and power adapter (included)
Working with the Guudgo app
Installing the app
After installing the app, you will need to log in with your email address and a password. After clicking on 'Sign Up' you will receive an email with a link that you have to open to confirm your registration.
 |
| Login to the Guudgo app. (© 2018 Jos Verstraten) |
Logging the camera into the app is very fast and only takes a few actions.
- Open the app and click on 'Add a new device' at the top of the screen.
- In the first screen of the registration procedure, select the option 'WiFi SmartConnection'.
- In the next screen, choose the name of your WiFi network and type the password to access the network.
- Then wait a while: the software searches the camera in your network, which may take a few minutes.
In the same easy way you can integrate the camera into a wired network.
 |
| The three steps to installing the camera. (© 2018 Jos Verstraten) |
After the software has found the camera, the image below appears on your smartphone or tablet. In the upper half, the image recorded by the camera is displayed. What you will immediately notice is the high quality of the images.
This window gives access to:
- Name of the camera:
At this moment the camera still has the standard name PTZ, abbreviation of 'Pan, Tilt and Zoom'. In the Preferences menu (see later) you can give the camera its own name, like in this case 'Living room'. - Time and date recording:
At this moment the time zone is still on 'Beijing', in the Preferences menu you can set it to 'Amsterdam, Berlin'. - Full screen video:
The image of the camera is displayed in the highest resolution full-screen. - Go to menu:
If you click on this icon, the Preferences menu appears on the screen. - Live recording indicator:
The word LIVE appears here when you see the current images from the camera. This is useful because you can also view recorded events and favorites on an almost identical screen and then you will see PLAYBACK instead of LIVE. - Open favorite videos:
You can save videos recorded by the camera as favorites under a selected name. This option opens the screen where all those favorites are collected. - Overview of recorded events:
An event is a short video that the camera automatically records after a sound or motion detection. Clicking this icon opens a screen where all those events are neatly collected with date and time. - Pan and tilt setting:
Opens the screen where you can rotate the camera in four directions. - Scroll through the recordings:
You can view all the recordings and events that the camera has recorded by scrolling through this bar. The indication LIVE changes to PLAYBACK. The bar has various colours. Orange means an event following a motion detection, blue means an event following a sound detection. - Mutes the sound:
This prevents everything that is said near the camera from being paraphrased by the speaker in your smartphone or tablet. - Press when speaking:
Only if you press this button, the speaker in the GD-SC02 reproduces your voice. This deliberate action prevents the camera from accidentally reproducing calls near your tablet or smartphone. - Take a picture of the camera image:
A click on this button takes a snapshot of the current camera image. You can save this photo in the usual way.
 |
| The live video screen with all available options explained. (© 2018 Jos Verstraten) |
This screen shows the current image of the camera. The four arrow buttons allow you to move the camera in four directions. Moving up and down is called panning and you can rotate the camera by up to 90°. Moving from left to right is called tilting and you can rotate the camera almost completely around its axis, up to 355°.
 |
| This screen allows you to move the camera in four directions. (© 2018 Jos Verstraten) |
To give you an impression of the quality of this camera, the picture below shows the image as it is displayed full-screen. However, there is a delay of about one second between the events and the display on the screen. As is usually the case with such cameras equipped with a wide-angle lens, you can detect some distortion in the image.
 |
| The image of the camera in the full screen mode on a tablet. (© 2018 Jos Verstraten) |
In this menu you can define a number of preferences:
- Name and time zone:
Next to the image of the camera you will see the name and time zone, you can now change it by clicking on it and entering the desired name and selecting the time zone. - Services:
Clicking on 'GUUDGO plan' will take you to a screen where you can make a paid subscription to Amazon's cloud services (AWS). - Device storage:
In this tab you can choose to store images in the cloud or on a micro SD memory card. The camera supports cards up to 64 GB. - Notification settings:
Opens a new page, where you can set whether or not you want to see notifications appear on your screen when the camera registers a sound or motion detection. - HD video:
If you have a slow WiFi connection, you can turn off the High Definition picture mode. - Device microphone:
Turning the microphone in the camera on or off. - Night vision:
The camera measures the intensity of the light and automatically switches to infrared lighting and night vision. With this option, you can disable this automatism and manually set whether you want to take night or day shots. - Rotate the video feed 180°:
Necessary if you hang the GD-SC02 upside down from the ceiling using the supplied mounting plate.
 |
| The options in the Preferences menu. (© 2018 Jos Verstraten) |
Hopefully we've already convinced you of the excellent images this camera produces in daylight. Night vision is also more than excellent. The ten small infrared LEDs around the lens are barely visible, but do their job very well. In the picture below you can see our living room with normal lighting and in complete darkness.
 |
| The quality of the infrared night shots is excellent. (© 2018 Jos Verstraten) |
In this screen you can set up that you receive a notification on your smartphone or tablet when the camera hears something and/or detects a movement. Because there are circumstances where the camera constantly detects motion in the image and the number of notifications sent becomes cluttered, you can limit the number of notifications you want to receive. You can also set an email address where the alarms will be received.
In the notification you see the name of the camera, the date and time of the event and whether it is a sound or motion detection.
 |
| Setting alarms to notifications and/or emails. (© 2018 Jos Verstraten) |
An event is a video clip automatically recorded by the camera if the device has detected a sound or motion. In this screen you get an overview of all events and you can open and play them in a screen that is very similar to the screen in which you see the live images. Each event is characterized by a small icon, which shows whether the event was recorded after the detection of a sound or after the detection of a movement.
 |
| An overview of all events recorded by the camera. (© 2018 Jos Verstraten) |
With a click on the button you can share the videos recorded by the camera on your favorite social media such as email, Twitter, Facebook and YouTube.
 |
| In this screen you can share events and favorites through your social media. (© 2018 Jos Verstraten) |
Store and view images in the cloud
Subscribe to Amazon cloud services
You can save the recorded videos on Amazon's cloud servers. The DG-SC02 comes with free 15-day access to Amazon AWS cloud services. After this period, you can stop this service or switch to a paid subscription. The cheapest subscription '7 Day Recording Plan' costs $60.00 per year and allows you to store video in the cloud for the past seven days. You can also save a total of one hour of favorites. Payment is not possible via iDeal, but only via credit card or PayPal.
Real-time access to the cloud through your Internet browser
To view the data stored in the cloud, go to https://www.eyeplusiot.com and log in with your email address and the password you also entered in the app. However, it is necessary that your Internet browser supports Adobe's Flash Player. You will now immediately see the current image that your camera is recording. In this screen you can also rotate the camera and zoom in four times to the center of the image.
 |
| The cloud allows you to view the current image your camera is recording. (© 2018 Jos Verstraten) |
Selecting the option 'events' or 'favorites' in the browser window gives you an overview of all events that the camera has recorded or of all favorites that you have saved. You can select an event or a favorite and the video recorded by the camera will be played back.
 |
| An overview of all events your camera has recorded. (© 2018 Jos Verstraten) |
Our conclusion
Together with the Guudgo app, the GD-SC02 is a security camera that leaves little to be desired. The quality of the images is excellent and the possibilities the software offers are overwhelming.
If you want to secure your home, we highly recommend buying a few of these cameras.

GUUDGO GD-SC02 720p Pan&Tilt Wifi-IP-Camera