
|
With this kit, you can play MP3s from a memory card and USB stick or via Bluetooth from your PC. You can also use it to receive the FM band from 87.0 MHz to 108.0 MHz. |
Introduction to the GY20924
The end result
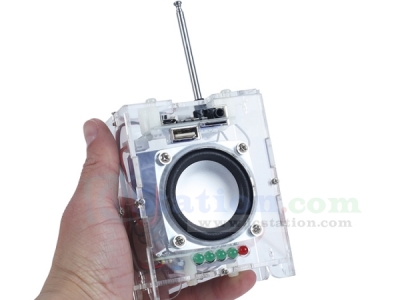
The photo below shows the end result of this kit. A transparent box measuring 10.0 cm by 7.7 cm by 4.8 cm with an antenna of approximately 25 cm. On the front, you see a small speaker with a cone diameter of 46 mm. Below that is a primitive VU meter with five LEDs. The actual player circuit board, which you can operate with four extremely small push buttons, is mounted on the top. The back has space for a 3.7 V polymer lithium battery, which is not included. Such components are not allowed in the cargo hold of an aeroplane. A battery like this costs about € 10.00 at Reichelt. The back also features the ON/OFF switch and a power plug, which you can use to connect the device to a 5 V USB power supply to charge the battery and power the audio player if you have 230 V nearby.
 |
| The end result of this kit. (© 2026 Jos Verstraten) |
Supplier and price
The kit was designed by the Chinese company ICStation and, to the best of our knowledge, is sold exclusively by this company via its own website and via AliExpress by the 'e_goto Processor Store'. The price, including shipping, is approximately € 25.00.
Delivery of the kit
In keeping with bad Chinese tradition, the kit is delivered in a black plastic bag, in which the items listed below are carelessly packed. One bag contains the housing panels, a second contains all the parts for the VU meter, a third contains the actual player circuit board, and the fourth bag contains all the parts for the mechanical assembly of the whole unit. Two USB leads, an antenna and a meter of very thin black assembly wire are included separately.
 |
| The packaging of the kit. (© 2026 Jos Verstraten) |
The parts supplied
The photo below shows all the parts of the kit neatly arranged. As you can see, there is very little soldering to be done. The player circuit PCB is supplied fully assembled. The only soldering required is for the small VU meter circuit board and the wiring between the various parts of the circuit.
The six transparent panels of the housing are still in their protective brown paper sleeves.
 |
| All components of this audio player kit. (© 2026 Jos Verstraten) |
The manual
The kit is supplied without a manual, but a very comprehensive and detailed English-language manual is available on the internet, comprising no less than 21 pages. You can download this manual via the link below:
The player circuit board
The photo below shows both sides of the player circuit board. This PCB measures just 5.0 cm by 3.5 cm and has components on both sides. On the bottom, you can see a DIL-8 chip, which probably contains a small bridge amplifier for feeding the loudspeaker. Below that chip are two connectors for connecting a USB-A stick and a memory card. On the right-hand side is the connector for the loudspeaker wires.
At the top of the circuit board, you see the antenna for bluetooth communication and the solder connection for an external antenna for FM reception (top right corner). Below the antenna, you can see a 4 MHz crystal with the MP3 chip to its left. It is from JieLi (JL), but the type number has been made completely illegible. At the bottom of the circuit board, there is a connector for headphones on the right and a micro-USB connector on the left. Between the two connectors, you can see four extremely small push buttons that control the circuit board. From left to right:
- Set Play Mode:
This allows you to select where the sound you want to hear comes from: bluetooth, FM, USB stick or memory card. Each press of this button also generates a Chinese text, audible through the speaker. - Play/FM Radio Search:
A short press of the button starts audio playback. A longer press starts the automatic station search mode, which scans the entire FM band from 87.0 MHz to 108.0 MHz for stations with sufficient signal strength. A short press of this button selects the station. - Next/VOL++:
A short press selects the next MP3 file on the USB stick or memory card. Pressing and holding increases the volume. - Prev/VOL--:
A short press selects the previous MP3 file. Pressing and holding decreases the volume.
 |
| The two sides of the player PCB. (© 2026 Jos Verstraten) |
The VU meter circuit board
The simple PCB of the VU meter is shown in the figure below. The presence of the two connectors indicates that this circuit board was not designed specifically for this kit, as those connectors are not used. This PCB is probably part of another kit that is used in this audio player kit.
 |
| The two sides of the VU meter circuit board. (© 2026 Jos Verstraten) |
Building the audio player GY20924
Soldering the VU circuit board
These steps are clearly described on pages 5 to 8 of the manual. However, there is an error. Resistor R2 is assigned a value of 10 kΩ, while the photos clearly show that this resistor is 470 Ω. This value is also supplied, so that must be correct. Pay close attention to the position of the five LEDs and the single in-line chip!
 |
| The fully assembled VU meter circuit board. (© ICStation) |
Applying the wiring
The next step is to solder a total of nine wires between the two circuit boards, the battery, the speaker and the components you have mounted on the back panel of the housing. The photo below shows what this will look like. The switch you see on the back panel was not included in our package. Fortunately, we had an identical one in stock....
 |
| The complete wiring of this audio player. (© ICStation) |
The construction of the housing
Finally, you must assemble the various interconnected parts on the front and bottom of the housing. Here too, there is an error in the manual. On page 17, it states that you must attach the VU meter circuit board to the base panel with four nylon spacers. However, that circuit board only has two mounting holes. When assembling, please note that the hole in the plastic panel is intended for adjusting the potentiometer on the circuit board. The battery is attached to the rear with two strips of double-sided adhesive tape.
Everything ready? Now comes the difficult task of attaching the six transparent panels that make up the housing. Difficult? Indeed, because an awkward but clever and inexpensive solution has been chosen. Small slots have been milled into the panels of the housing to accommodate M2 nuts. The other panels have small holes that fit M2 bolts. The idea is to position these bolts precisely so that they fit into the nuts. This construction is shown in the figure below.
 |
| This is how the six panels of the housing are attached to each other. (© 2026 Jos Verstraten) |
You actually need three hands for this, because the wiring between the various components is in the way and makes assembly a very difficult job. What doesn't help either is that not all the panels fit exactly. For example, the top panel, on which you have mounted the player circuit board, is 2 mm longer on one side than on the other. To be precise: 40 mm and 42 mm. This serves no purpose whatsoever and can only be a clear manufacturing error in the milling data of the plastic plate from which the six panels are cut.
We first temporarily attached the plates together with pieces of adhesive tape and then used small tweezers to hold the nuts in the correct position in the slots. Using a magnetic screwdriver with a bolt inserted in advance, it is then possible to manipulate the bolt with the other hand so that it fits exactly into the nut.
The end result
The photo below shows the end result of the assembly work: a transparent box with two circuit boards and some rather sloppy wiring. This photo clearly shows the narrow gaps in the housing caused by the error in the top panel.
 |
| The audio player box without antenna. (© 2026 Jos Verstraten) |
The GY20924 Audio Player in practice
Very disappointing performance
Indeed, we are anything but satisfied with the performance of this audio player.
Selecting the source with the left push button is difficult because you cannot see which position you are in and you cannot understand the Chinese voice. A few LEDs would do wonders! The LED that should flash in bluetooth mode always working on our specimen.
Connecting to a PC via bluetooth is quick and easy. The player's bluetooth name is 'BT_Audio'. The range is more than ten meters.
In our flat on the second floor of a Maastricht apartment building, we can receive only three FM stations, and the quality is not particularly good.

No response to a USB stick
The biggest problem with this kit is that we are unable to get the device to read the MP3 files on a USB stick. We have tried everything: old and new sticks, saving the files in the root directory, creating a separate directory, playing around with the names (lowercase letters, uppercase letters, numbers only) and file extensions. The device does not respond to anything. When we put the files on a USB stick with a built-in LED, this LED does respond by flashing when we set the device to the (apparently) correct mode. But nothing more happens.
Terrible sound quality
Another point of criticism is the quality of the sound when played through the speaker. This is very poor! Only when you set the volume very low, there is no audible distortion in the sound. However, when listening with headphones, this distortion disappears and the sound is excellent to our old, not audiophile-trained ears. The volume can then be turned up considerably!
Our opinion about the GY20924 audio player
We have built and tested a number of ICStation kits in the past and we were very satisfied with them. However, you will understand that we are not happy with this audio player. In fact, this device can only be used if you play MP3 files from your PC via bluetooth and listen with headphones.

(ICStation sponsor ad)
Audio Player Kit
Audio Player Kit