|
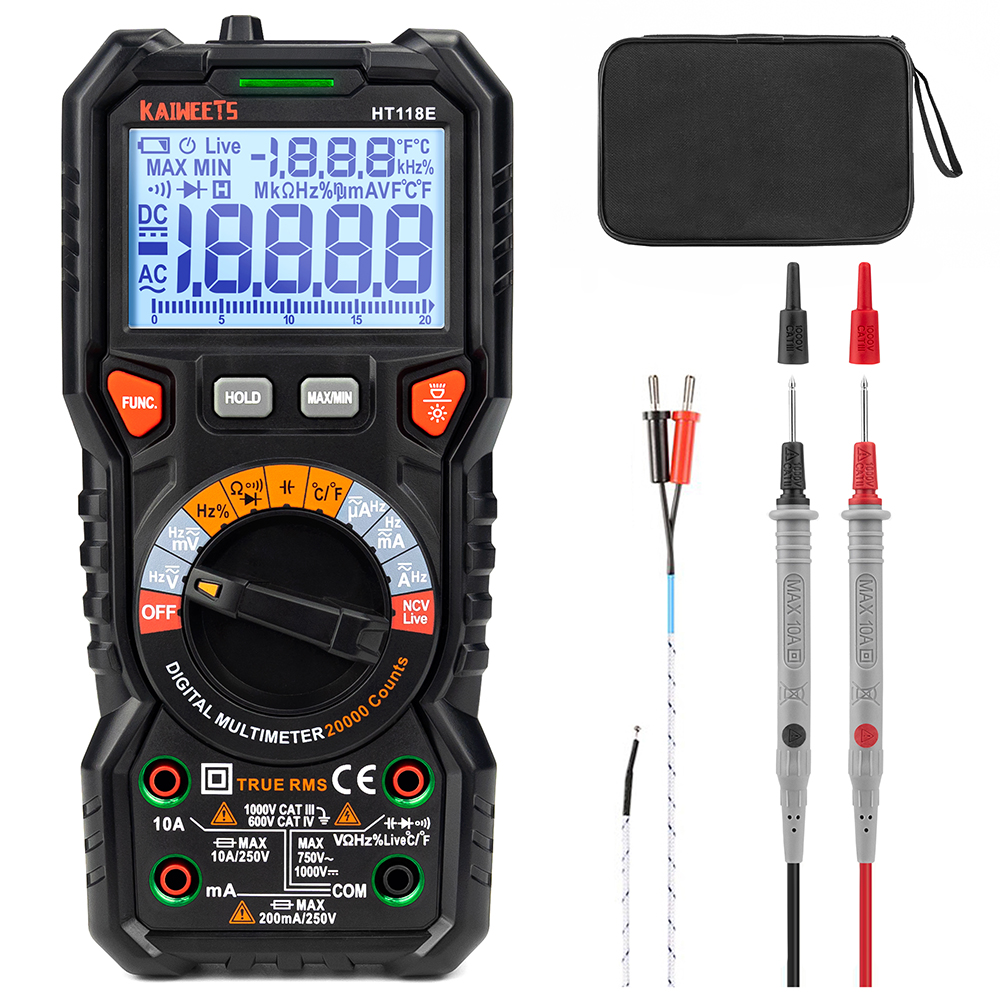
A few months ago we received a multimeter from the brand Kaiweets, unknown to us. Did we feel like testing it? We did and here are the results of this test: the HT118E is an excellent multimeter! |
Introduction to the HT118E from Kaiweets
Manufacturer, type, suppliers and prices
There can be no misunderstanding about who is selling this multimeter. The cardboard box and manual actually list, almost uniquely for such products, both the type number HT118E and the manufacturer Kaiweets. Kaiweets is based in Hong Kong and founded in 2018. Kaiweets has a website www.kaiweets.com with its own technical service department, accessible at service@kaiweets.com. Some questions that come in through this address are answered on the website. So this is a very open approach to the market, very different from a lot of Chinese brands that want as little public exposure as possible and can only be approached with something as vague as an 'Official Store' on AliExpress. This is how it should always be!
By the way, we find this multimeter, though as HT118E, also offered under brand names such as MAYILON and HaboTest.
The meter is apparently very popular, because you can find dozens of vendors via Google. The price is around forty euros. At AliExpress we found an offer for € 38.09, at Banggood you will pay € 40.65 for it.
Manufacturer's offer
After publishing this article, we received an email from the manufacturer Kaiweets announcing that, especially for readers of this blog, a special promotional code has been created. By entering the discount code CEP15, you will receive a 15% discount when purchasing this multimeter directly from Kaiweets:
➡ Buy HT118E from Kaiweets
Please note, however, that you will not be able to pay with iDEAL, but only with PayPal, G-Pay or a credit card.
➡ Buy HT118E from Kaiweets
Please note, however, that you will not be able to pay with iDEAL, but only with PayPal, G-Pay or a credit card.
CAUTION!
In addition to the HT118E, there is also a HT118A from the same manufacturer in circulation. This one looks exactly the same, but has a readout to only 6000 counts instead of 19999. Of course, this one is offered cheaper than the HT118E. So be careful what you order!
Scope of delivery
The HT118E is delivered in a cardboard box containing:
- The meter itself.
- A very good manual in five languages.
- A protective sheathing made of flexible silicone.
- The standard test leads supplied with every Chinese multimeter.
- A thermocouple with two banana plugs.
- A set of batteries.
- A handy carrying case.
 |
| The scope of delivery of the HT118E. (© 2023 Jos Verstraten) |
The test leads
These are the standard test leads supplied with virtually every Chinese multimeter. The 90° angled 4 mm banana jacks are fully insulated. The 16 mm long tips of the test pins are uninsulated. However, caps are included that you can slide over the pins, leaving only 2 mm of uninsulated tip.
The thermocouple lead
This really is the very cheapest thermocouple cable you can find! The wires are not screwed or soldered into the banana plugs, but are inserted into a hole that is afterwards squeezed shut. A strain relief in not present. Over the actual thermocouple is a piece of ordinary shrink tubing.
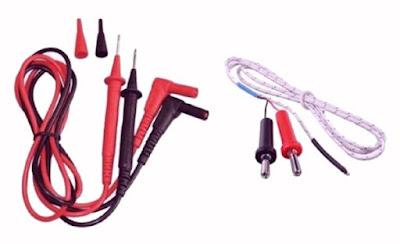 |
| The supplied measurement leads. (© 2023 Jos Verstraten) |
The carrying case
The black carrying case made of flexible material provides sufficient space for the meter, the test leads and the manual.
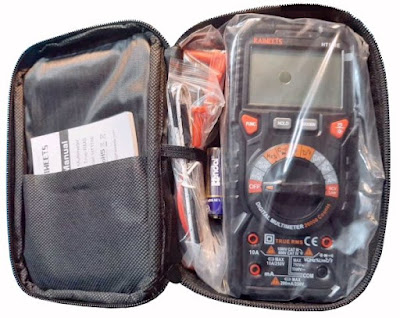 |
The carrying case with contents. (© 2023 Jos Verstraten) |
The silicone sheathing
The meter comes in a protective and flexible silicone sheathing, which should protect the housing from damage due to fall. On the back of this are two mounting brackets into which you can clamp the two measuring probes. Also on the back a hole, which you can use to hang the meter on a hook in the wall.
By the way, if you need to replace the fuses, you have to remove this sheathing, something that is not very easy.
 |
| The silicone protective sheathing. (© Kaiweets) |
The manual
The manual of the HT118E is an excellently produced booklet of 86 pages explaining the operation and specifications of the multimeter in English, German, Spanish, French and Italian. Again, an example for a lot of Chinese competitors, who barely pay attention to the manual. We extracted the English part from the manual and saved it to our account on archive.org:
The appearance of the meter
In the photo below, you can see the HT118E multimeter in full view. Measuring 185 mm by 88 mm by 53 mm, the multimeter is quite hefty and weighs 325 grams. The meter works semi-automatic. With the large rotary switch you set the measuring function, the meter itself determines the best measuring range. The rotary switch clearly clicks into one of its eleven positions, accidentally turning a position too far will not occur.
Above this rotary switch are only four pushbuttons:
- FUNC
In some measurement functions, this pushbutton allows you to make additional selections, such as choosing between DC and AC or choosing between measuring resistors and capacitors. - HOLD
The reading is 'frozen'. - MAX/MIN
This button allows you to select whether the HT118E measures the instantaneous value or the minimum or maximum measured value after enabling this function. - Illumination
A short press turns the display backlight on and off. With a longer press you can switch on or off the white LED on the back of the housing.

Above the brand and type names, you will see a long narrow slot. Behind it is a red/green LED that comes on when you put the meter into 'NCV' mode and start detecting electromagnetic fields in walls. That LED also works in 'CONTINUITY' mode. It lights up green when you measure resistances smaller than 30 Ω and red for measurements between 30 Ω and 60 Ω.
The readout consists of a monochrome LCD measuring 60 mm by 38 mm. The digits of the primary numeric display have a height of 17 mm, those of the secondary numeric display 8 mm. A thermometer scale with twenty steps is also present at the bottom of the display.
On the back is a fold-out support. Attention has been paid to such a detail as well. This support is very solidly made and much better than the thin sheet of plastic present on many competitors. This back support is incorporated into the cover behind which the two 1.5 V batteries are located.
 |
| The appearance of the HT118E. (© Kaiweets) |
Specifications of the HT118E
According to the manufacturer, this multimeter has the following specifications:
- Display range: 19999 counts
- Sampling rate: three measurements per second
- DC voltage ranges: 200 mV ~ 2 V ~ 20 V ~ 200 V ~ 1000 V
- DC voltage accuracy: ±(0.08 % + 5)
- AC voltage ranges: 200 mV ~ 2 V ~ 20 V ~ 200 V ~ 750 V
- AC accuracy: ±(0.5 % + 25)
- AC frequency range: 40 Hz ~ 1 kHz
- Input resistance voltage measurements: 1 MΩ
- DC current ranges: 200 μA ~ 2000 μA ~ 20 mA ~ 200 mA ~ 10 A
- DC current accuracy: ±(0.5 % + 5) ~ ±(0.8 % + 15)
- AC current ranges: 200 μA ~ 2000 μA ~ 20 mA ~ 200 mA ~ 10 A
- AC current accuracy: ±(0.8 % + 25) ~ ±(1.0 % + 25)
- Resistance ranges: 200 Ω ~ 2 kΩ ~ 20 kΩ ~ 200 kΩ ~ 2 MΩ ~ 20 MΩ ~ 100 MΩ
- Resistance accuracy: ±(1.0 % + 15) ~ ±(3.0 % + 25)
- Capacitor ranges: 2 nF ~ 20 nF ~ 200 nF ~ 2 μF ~ 20 μF ~ 200 μF ~ 2 mF ~ 20 mF
- Capacitor accuracy: ±(4.0 % + 50)
- Frequency ranges: 200 Hz ~ 2 kHz ~ 20 kHz ~ 200 kHz ~ 2 MHz ~ 10 MHz
- Frequency accuracy: ±(1.0 % + 30) ~ ±(3.0 % + 30)
- Frequency sensitivity: 100 mV ~ 0.8 V
- Duty-cycle range: 1 % ~ 99 %
- Duty-cycle accuracy: ±(3.0 % + 30)
- Temperature range: -40 °C to +1,000 °C
- Temperature accuracy: ±[1.0 % + 2 °C].
- Diode range: 3.0 V max. with 1.2 mA measuring current
- Continuity range: 30 Ω max.
- True RMS value measurement: yes
- Data-hold: yes
- Screen illumination: yes
- Low battery voltage alarm: yes
- Automatic shutdown: yes
- Min/max indication: yes
- Relative measurements: no
- Automatic range switching: yes
- Non-contact AC voltage detection (NCV): yes
- Overvoltage protection: 250 Vdc
- Fuses: 200 mA / 10 A
- Power supply: 2 x 1.5 V battery, type AA
- Dimensions: 185 mm x 88 mm x 53 mm
- Weight: 325 g (with batteries)
What strikes us immediately about the HT118E
- Surprise! There are green LEDs in the four measurement sockets. When selecting one of the measurement functions with the rotary switch, the LEDs in the sockets to be used flash five times. Thus, it is virtually impossible to accidentally measure the mains voltage while the test leads are still in the '10A' and 'COM' inputs. By flashing these LEDs, you can immediately see that a test lead is in the wrong sockets.
- The two fuses protecting the current ranges are not 5 mm x 20 mm ones, as in most cheap multimeters, but hefty 5 mm x 30 mm types with a specified voltage of 500 Vac.
- Never seen either: if you measure a voltage greater than 80 V or a current greater than 1 A, the entire display lights up soft red.
- Negative surprise. This multimeter has no 'REL' function, pretty much standard on multimeters these days. When measuring very low resistances, you must therefore subtract the parasitic resistance of the test leads and terminals themselves from the measurement result. This is also a shortcoming if you want to measure the long-term stability of a voltage.
- Second negative surprise. We discover no possibility to manually set the measuring range.
- Strange decision by the designers: when measuring temperatures, the temperature always appears on the large primary display in °F and on the small secondary display in °C. This cannot be switched with the push of a button, as with almost all meters we have tested. It can be done, but it is a difficult procedure, read on.
 |
| The display lights up soft-red at 'dangerous' readings! (© Kaiweets) |
Deactivating the automatic shutdown
The other side of the PCB

Determining the input resistance
By default, the meter switches to sleep mode after fifteen minutes. If you do not want this, press and hold the 'FUNC' key when turning the meter on.
Switching to °C in the primary display
The HT118E measures temperatures in °F in the large primary display and in °C in the smaller secondary display. You can change this by following a rather cumbersome procedure:
- Turn off the meter.
- With one hand, press the two red pushbuttons.
- With the other hand, turn the rotary switch to the Ω position.
- Release the push buttons, the display will show 'CAL'.
- Press the red pushbutton 'FUNC' three times.
- Turn the rotary switch to the '°C/°F' position.
- Press the 'MAX/MIN' button.
The meter now remembers that you want to see °C in the primary display. Even now when turning off the multimeter, this setting remains active.
The electronics in the HT118E from Kaiweets
Opening the housing
After laboriously removing the flexible protective sheathing, it turns out that the two parts of the housing are connected by only four small screws. After removing these screws, you can open the multimeter like the two half shells of an oyster. One shell contains the two batteries, and the other shell is completely filled with the circuit board. The contact between the battery compartment and the circuit board is established via two small springs pressed onto rectangular pads on the circuit board.
The printed circuit board
In the picture below, you can see the printed circuit board that fits precisely into the housing. What immediately catches the eye are the two large, ceramic-filled fuses that directly protect the two current inputs. Strangely, the often used high-power shunt under the form of a bare metal resistor cannot be detected. It is resistor R7 (R010) that performs this function. It cannot take much power, which is why the manual states that current measurements over 1 A should not exceed thirty seconds.
It is clear than the designers of the HT118E paid a lot of attention to the circuit's protection circuits. We recognize two PTCs (the green parts above the 'V/Ω/Hz' input socket), the diode bridge D1 through D5, and the transistors Q1 and Q2 that are probably also in the protection circuit. The next point in which the HT118E clearly stands out from competitors in the same price range is that the entire voltage divider R1 through R6 consists of MELF resistors. The shunt resistor R7 also goes to the measurement circuit via two MELF resistors. MELF resistors are more resistant to overvoltage than the tiny SMD resistors.
The chip above the two battery contacts is a TM1621B from Titan Micro Electronics. That is an LCD driver that controls the display. The coding of the multimeter chip has been removed, so we cannot determine which ADC this multimeter works with. What is recognizable is a 24C02 EEPROM that undoubtedly contains the configuration and calibration parameters of the DMM chip.
 |
| The circuit board fills the housing. (© 2023 Jos Verstraten) |
The other side of the PCB
Not much can be seen on the other side of the PCB. This one contains the circular segment traces for the rotary switch and the standard PCB contacts for the four pushbuttons. Above these contacts you can see the long row of pads that make contact with the LCD. Two small holes in the PCB fix the display in place.
What is interesting is the way the four inputs are illuminated. On the PCB, between the holes for the input sockets, are four SMD LEDs. On the back of the shell of the case are four small light guides that transport the light from those LEDs to the input sockets.
 |
| The other side of the circuit board. (© 2023 Jos Verstraten) |
Testing Kaiweets HT118E
Introductory remark
The following tables list values of a voltage, current, resistance or capacitor in the leftmost column. You should not regard these as absolutely accurate and thus not use them to judge the accuracy of the HT118E. Hence the little symbol '≈' in front of these values. For judging accuracy, the right-hand columns with comparative measurements with our much better laboratory equipment are intended.

Determining the input resistance
To check this quantity, we measure a DC voltage of about 10 V with and without an accurate series resistor of 1 MΩ. Without this resistor, the HT118E measures a voltage of 9.976 V. With the resistor in series, the measured value drops to 9.073 V. A few simple calculations with these results show an input resistance when measuring DC voltages of 10.04 MΩ. The standard value, in other words.
Measuring DC voltages
Here we use various DC voltage sources and resistor dividers to cover a range from 10 mV to 1,000 V. We employ our Fluke 8842A as a reference and calculate the percentage deviation from the HT118E's measurement results. Neatly, the meter stays below the specified deviation of ±0.08 % for all measurements of voltages you encounter in practice.
 |
| Accuracy in measuring DC voltages. (© 2023 Jos Verstraten) |
Measuring DC currents
We build a series circuit of a DC power supply, some resistors, the HT118E and our 8842A, which we again use as a reference. The measurement results are summarized in the table below. All measured deviations remain neatly below the specified value of ±0.5 %.
 |
| Accuracy in measuring DC currents. (© 2023 Jos Verstraten) |
The burden voltage when measuring DC currents
The frequency range when measuring AC voltages
Measuring resistors
Measuring capacitors
Measuring temperatures
Testing the 'NCV' function
The burden voltage is the voltage that falls across the meter when you measure a current with it. The smaller this voltage, the less influence measuring a current has on the circuit in which you are measuring. For a current of 5 A, a voltage of 0.23302 V falls across the HT118E.
Measuring 50 Hz AC voltages
We use our function generator DG1022 and a variac to generate 50 Hz sine wave voltages between 10 mV and 250 V. Now our ET3255 multimeter from East Tester is used as a reference. The results are summarized in a table and again it appears that the HT118E almost always measures much more accurately than the specified ±0.5%.
 |
| Accuracy when measuring 50 Hz AC voltages. (© 2023 Jos Verstraten) |
The frequency range when measuring AC voltages
This is not very good with most digital multimeters, and the HT119E is no exception. We measure with a sine voltage of 1 Vrms and find that you can only measure accurately up to 2 kHz. However, that is more than the specified 1 kHz. At 3 kHz, the reading has already fallen back to 71% of what it should be.
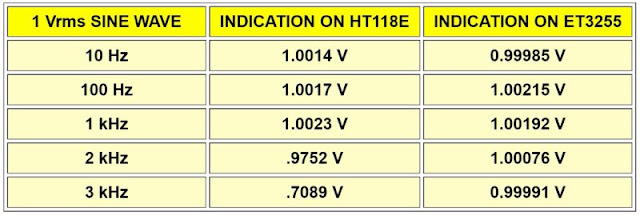 |
| The frequency range when measuring AC voltages. (© 2023 Jos Verstraten) |
Measuring resistors
For this test we have at our disposal a set of resistors with a tolerance of ±0.1 %. As a reference meter we obviously use our 8842A from Fluke and again calculate the percentage error on the readout of the HT118E. The 8842A uses a four-wire kelvin probe, which is not possible with the HT118E. The results are again summarized in a table. Since the meter unfortunately has no 'REL' function, we have to subtract the parasitic resistance of the test leads themselves from the measurement result for the lowest resistance values. Even when measuring resistances, the percentage error remains below the specified value of ±1 % for most measurements.
 |
| The accuracy when measuring resistors. (© 2023 Jos Verstraten) |
Measuring capacitors
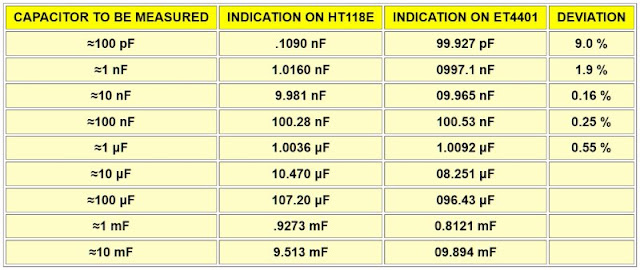
Thanks to a set of five accurate capacitors with a tolerance of ±1 %, we can also measure the performance of the HT118E when measuring such components. Above 1 μF we measure ordinary electrolytic capacitors from our stock. As a reference meter, we use East Tester's ET4401 with an accuracy of ±0.2 % for non-electrolytic capacitors. When measuring these components, the HT118E performs superbly, much better than the specifications promise.
As might be expected, however, large errors arise when measuring electrolytic capacitors. This is a consequence of the fact that when measuring a capacitor with a digital multimeter, a constant current is passed through the capacitor and measured how long it takes until the discharged capacitor is charged to a certain voltage. That charging time is directly proportional to the capacitance of the component. However, this method does not take into account the leakage current of an electrolytic capacitor which consumes a part of the charging current. As a result, the component takes longer to charge and the meter measures a larger capacitance than intended. Some electrolytics have a large leakage current and the capacitance of such an electrolytic is measured with an error that can be tens of percent.
A true RLC meter, such as East Tester's ET4401, measures the capacitance of the electrolytic capacitor by putting a small 120 Hz sine wave superimposed on a DC voltage across the capacitor and measuring the AC current through the part. However, since the accuracy of the ET4401 when measuring electrolytics is not very good anyway, we have taken this meter as a reference only for capacitors up to 1 μF.
 |
| Accuracy in measuring capacitors. (© 2023 Jos Verstraten) |
Measuring frequencies
As a source, we use Rigol's DG1022 function generator, set to sinusoidal output. We measure also the sensitivity, the voltage at which the HT118E indicates a stable frequency. We read this as an RMS value on the display of the function generator. Of course, the frequency is displayed very accurately, all meters do that nowadays. Interestingly, the sensitivity is much better than the specified value of 100 mV to 200 kHz.
 |
The sensitivity when measuring frequencies. (© 2023 Jos Verstraten) |
Measuring temperatures
We have a UT320A thermometer from UNI-T with its own thermocouple. The accuracy of this meter is specified as ±(0.5 %+1), that of the supplied thermocouple ± 2 °C. Since this is similar to the accuracy of the HT118E, please use the measurement results in the table below for comparison purposes only.
To ensure that both thermocouples measure the same temperature, we proceed as follows. We drill a 3.0 mm hole in the side of a large heatsink type SK0850. We fill this hole with heat-conducting paste. Then we push the tips of both thermocouples into this hole. On the heatsink we mount a 100 W wire-wound resistor which we connect to an adjustable DC power supply. We cool the heatsink with compressed air from a spray can until the UT320A indicates a temperature of -10 °C. The heatsink is then slowly warmed up by heating the resistor. We note the readout on the HT118E at the time the UT320A indicates an easily readable temperature. The results are summarized in the table below, and again we must conclude that the HT118E performs excellently.
 |
| Measuring temperatures. (© 2023 Jos Verstraten) |
Testing the 'NCV' function
This function should make it possible to detect the electromagnetic field around voltage- and current-carrying power lines. The red/green LED in the top of the meter should illuminate green when the field is small and red when the field is large. This feature does not work well on the model supplied to us. If we hold the 'antenna' at the top of the meter near the keyboard of our laptop, the LED lights up red. There is really no strong electromagnetic field around. Even the power wire of an LED light powered by 12 Vdc lights up the red LED. Mains lines in the wall that carry power sometimes give a red and sometimes a green indication.
Therefore, we do not recommend relying on this feature!
Testing the 'LIVE' function.
This function allows you to detect the live wire in a wall outlet. Unlike the 'NCV' function, it works flawlessly. We checked fifteen wall outlets in our house with a neon tester and the HT118E. This one did not make any errors.
Our opinion of the HT118E from Kaiweets
The HT118E from Kaiweets is a multimeter that we are very satisfied with. The accuracy of the measurement functions is better than the specifications promise which, as we know, is an exception for a Chinese product. There is also nothing to criticize about the construction of the meter, the control buttons and the back support, it all looks very solid.
The meter has a few unexpected features, such as the illumination of the input sockets and the red discolouration of the display when measuring 'dangerous' voltages and currents.
The meter has a few unexpected features, such as the illumination of the input sockets and the red discolouration of the display when measuring 'dangerous' voltages and currents.
Things that we miss are, as already written, the handy 'REL' function and the possibility of selecting the measuring range by hand. That it is not possible to use the 'FUNC' key to switch between measuring temperatures in °C and °F is rather bizarre.

