|
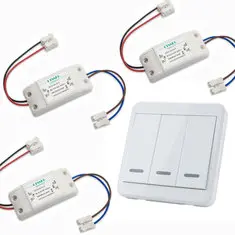
If you are satisfied with a very basic operation, this set offers the cheapest solution for wireless control of three loads up to 2 kW. For about € 15,00 you get one battery-powered wall-mounted transmitter and three mains-powered receivers with relay switches. |
Introduction to the KTNNKG wireless switch set
The delivery
The wall transmitter is delivered in a cardboard box, the receivers are packed separately in plastic bags. Each receiver is supplied with two terminal block connectors. A manual is missing.
 |
| The delivery of the KTNNKG wireless switch set. (© 2019 Jos Verstraten) |
The operation of the system
The system works on 433 MHz using the protocol supported by the eV1527 chip. This protocol transmits a 20 bit wide address word, making 220 equal to 1,048,576 different addresses available. The chance that your neighbors have an identical system with identical address is thus negligible. The relay in the receivers is capable of handling currents up to 10 A, allowing you to switch loads up to 2.3 kW. The advantage of using relays in the receivers is that you can easily switch on and off all possible loads, including a 3 W LED.
In the introduction we already mentioned that this system has a basic operation. You can only switch the loads on and off, dimming is not an issue. You can also forget modern features such as operating with your smartphone via WiFi or the Internet. The receivers can only be switched on and off with the supplied wall-mounted transmitter with three switches, or with extra wall-mounted transmitters purchased separately. However, this is good enough for many applications.
Expansion of the system
You can expand this basic set with a three-channel wall-mounted transmitter and three receivers by purchasing individual switches and receivers.
A separate receiver: Click here
A wall-mounted transmitter with one, two or three channels: Click here
The three-channel wall-mounted transmitter type 86
Introduction
Type 86 of KTNNKG is supplied without any reference to a manufacturer or type number. Under the search term 'type 86 switch' you can find all kinds of almost identical switches from various suppliers, such as Sonoff, Ou Fei and TEP. This model is also available with one, two and three channels and with various versions of the push buttons. However, it is clear that the type offered under the brand name 'KTNNKG' is cheaper than identical switches of other brands.
At the bottom of the frame is a compartment for the necessary battery, which is not included. A 12 V type 27A alkaline battery must be placed in the transmitter.
Although it looks like the switch has three transparent windows under which LEDs are located, this is not the case. There is one red LED on the PCB, but it is located under the middle switch and its lighting can only be seen from the outside in absolute darkness. These three windows are completely opaque and therefore only installed for the show.
You can screw the switch to the wall with two screws or use the two supplied pieces of adhesive foam to glue it to a tiled wall.
 |
| The appearance of the wall-mounted transmitter type 86. (© 2019 Jos Verstraten) |
Wall transmitter specifications
- Power supply: 12 Vdc via A27 alkaline battery
- Supply current at rest: 0 μA
- Supply current on transmission: 25 mA
- Transmission frequency: 433 MHz
- Code protocol: eV1527
- Number of available addresses: 1,048,576
- Number of channels: 3
- Range: 10 m ~ 30 m, depending on number of walls
- Dimensions: 88 mm x 88 mm x 11 mm
- Distance fixing holes: 59 mm
The electronics in the switch
As you can see from the picture below, there is an amazingly small amount of electronics on the PCB. Strangely enough, this KTNNKG switch contains exactly the same PCB as a Sonoff switch.
Of course, this single-channel Sonoff switch has only one push button on the PCB, while all three switches are present here.
The heart of the circuit is the OTP encoder eV1527. OTP is the acronym of 'One Time Programmable'. This SOP-8 chip has a built-in register with a width of 20 address bits. These are configured during the production of the chips in such a way that the chance that two chips with the same address are produced is minimal. This is easy, because with 20 address bits you have the possibility to set 1,048,576 different addresses and thus produce as many IC's with a unique address. In addition to these 20 address bits, the eV1527 also has four data bits that are used to switch four transmission channels on and off. Only three addresses are used with this transmitter. When connecting one of the data inputs to the +12 V, the chip is activated and sends a telegram to the TXD output (pin 4). This telegram consists of:
- A high start bit followed by 30 low bits.
- The twenty address bits.
- The four data bits.
A low data bit is emitted as a narrow positive pulse with a width of one clock-pulse, a high data bit as a wide positive pulse with a width of three clock-pulses.
This telegram is emitted four times, so that the receiver receives the code correctly.
What is striking is that the transmitter does not consume any current at rest. Only when you press one of the three push buttons, the plus of the battery is connected to the circuit via a diode and the transmitter draws power from the battery.
 |
| The PCB in the three-channel transmitter. (© 2019 Jos Verstraten) |
Compatible with Sonoff
The information that this switch contains exactly the same PCB as a Sonoff wall switch means that this inexpensive system from KTNNKG is fully compatible with the much more extensive but more expensive system that Sonoff brings to the market. A fact that can save you a lot of money!
The receivers KG2201-D
Introduction
These receivers are housed in a small plastic housing measuring 9.0 cm by 4.0 cm with two wires on each side. This is not very handy, but undoubtedly contributes to the extremely low price of € 3.71 per receiver (individual price). After all, that saves print surface! However, terminal block connectors are supplied separately.
By the way, the housing only has Chinese characters, so you can't see which side is the input and which side is the output. After unscrewing the enclosure this becomes clear. The red and black wires must be connected to the mains voltage, the blue and brown wires go to the load to be switched. The black wire and the blue wire on the PCB are connected to each other. It is therefore logical to treat this as the neutral wire.
At the top there is a small push button with which you can program the receiver on one of the three channels of the wall transmitter.
 |
| The receivers KG2201-D. (© 2019 Jos Verstraten) |
Receiver specifications
- Power supply: 85 Vac ~ 260 Vac
- Quiescent current: 7.8 mA
- Switch-on status: ON
- Load current: 10 Aac max.
- Dimensions: 90 mm x 40 mm x 20 mm
The electronics in the receiver
In the receiver is a small PCB of 6.5 cm by 3.3 cm. At right angles to this PCB is an even smaller PCB, which contains the antenna and the receiver/decoder.
The base PCB contains a PIC12F629 microcontroller that takes care of the programming of the receiver. In the memory of this microcontroller is of course stored on which address code you have programmed the receiver.
A PN8015 is used to generate the 12 Vdc supply voltage from the mains voltage. This is a well-known and very cheap buck-converter. The 230 V voltage is rectified and smoothed by means of one diode and one electrolytic capacitor. The 12 Vdc supplies the processor and relay. Remarkable on the PCB is a small electrolytic capacitor with a value of 4.7 μF and a working voltage of no less than 450 V.
There are two LEDs on the PCB. A red LED lights up when the relay is energized, a blue LED is used when programming the module. However, you will hardly see these LEDs when the PCB is built into the housing. So, before programming the receiver, you have to take it out of its housing and connect the 'naked' PCB to the mains voltage.
 |
| The electronics in the KG2201-D receiver. (© 2019 Jos Verstraten) |
The KTNNKG wireless switch set tested
Connecting to the external wiring
The idea is to connect the external wiring to the four wires that come out of the module. The supplied terminal blocks do not have screws, but work with a clamping system. This is much more convenient than a screw system and it works very well. You only pull the external wiring out of the terminal blocks with a lot of force.

ON as startup condition
When you connect a receiver to the mains voltage, it automatically switches to the ON position. The relay therefore switches on and the load is connected to the mains voltage. We do not find this very handy. Suppose you install an extensive system with about ten receivers and ditto wall transmitters in your home. Suppose that the mains voltage suddenly fails due to a malfunction. If it is present again afterwards, all the loads connected to your receivers will automatically switch on. It would have been more convenient if the start-up condition had been OFF.
Manual operation
You can switch the receivers on and off with the push button. However, the receivers do not respond to the push of the button, but to the release of the button.
Programming a receiver on a transmitter channel
Connect the receiver to be programmed with its red and black wires to the mains voltage. You will hear the relay switch on and the red LED on the PCB lights up. Then press the push button of the receiver twice. The blue LED will now flash slowly. During this flashing, press the button of the wall transmitter on which you want to program the receiver. The blue LED will now flash three times quickly as proof that the receiver has stored the code of the transmitter in its memory.
Programming the ON/OFF ALL function
In a comprehensive system, where you have multiple receivers in use, you can program all receivers so that they are all switched on when operating one transmitter or switched off when operating another transmitter.
To do this, press the receiver's push button three times. The blue LED will blink slowly again. Now press the button of the transmitter with which you want to switch off all receivers. The blue LED will now flash three times quickly as proof that the receiver has stored the address code of this push button in its memory. Then press the transmitter's button with which you want to switch on all receivers. The blue LED will blink quickly again as proof that this address programming has also been successful.
Deleting the programming
Press the receiver's button eight times. The blue LED will flash three times and then the red LED will light up. All programmed codes have now been removed from the memory and you can reprogram the receiver if you wish.
The outreach
We have tested the outreach of the supplied wall transmitter in our house. There are not many walls in our house, a legacy of the fact that this was once our business environment. It was no problem at all to cover a distance of 20 meters between the wall transmitter and the receivers.
Our opinion on the KTNNKG wireless switch
In itself, this low-cost wireless switching system works very well. The low price of course means that some concessions have been made to the ease of installation and use.
For example, we find it unfortunate that the designers have equipped the wall switch with fake LED windows. As a result, people who do not know this product will often press the switches several times because they expect to see light behind these windows when they operate the switches.
Furthermore, it is a pity that the receivers are too large to be built into the normal flush-mounted box that you will find behind switches, lamps and wall sockets. The electronics in the receiver could easily have been placed on a round PCB that would then fit in such a box.
The receivers are ideal for suspended ceiling mounting to control the spotlights that you have installed into these ceilings. The fact that the wiring of the switches is loose on the ceiling is no problem.

KTNNKG wireless switch set