|
This handheld multimeter and oscilloscope from Mustool with a measuring range of up to 6,000 counts, an analogue bandwidth of 40 MHz and a price of less than 100.00 euros could well define a new standard for this type of portable meter. This article gives an extensive test of this remarkable measuring instrument. |
Introduction to the MDS8207 of Mustool
The combimeter: multimeter and oscilloscope
Of course, there have been affordable portable meters for some time that combine a multimeter and a digital oscilloscope. There was little to be said about the performance of the multimeter, but all the more about the operations as oscilloscope. When switched to this function, these devices were not much more than toys, quite useless in measurement practice. With the MDS8207, however, Mustool provides a combimeter where the oscilloscope is also given the necessary attention. With an analogue bandwidth of 40 MHz, a sampling rate of 200 Ms/s and a sensitivity of 500 mV/div you can consider this a very useful device.
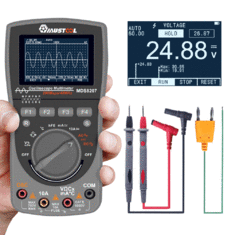
With its dimensions of 83 mm x 160 mm x 32 mm and a weight of 245 grams (including three batteries), this combimeter fits well in the hand thanks to its ergonomic design. At the back there is a foldable support, so you can place the meter at an angle of fifty degrees on your table. Beneath this support is the battery compartment, which can hold three 1.5 V type AA cells.
 |
| The MDS8207 fits well in the hand and has an excellent readable display. (© 2019 Jos Verstraten) |
The scope of delivery
For a price of just over € 90.00 (price level September 2019) you get an extensive package, consisting of:
- The MSD8207 meter itself.
- A carrying bag.
- An English manual with 50 pages.
- A set of test leads with a length of 83 cm.
- A type-K thermocouple with a length of 92 cm.
 |
| The scope of delivery of the MDS8207. (© 2019 Jos Verstraten) |
The specifications as an oscilloscope
According to the manufacturer, the MDS8207, switched as oscilloscope, has the following specifications:
- Screen resolution: 240 x 160 pixels
- Number of screen divisions: 12 x 24
- Vertical resolution: 8 bit
- Analogue bandwidth: 40 MHz
- Sampling rate: 200 Ms/s real-time
- Signal coupling: AC or DC
- Vertical sensitivity: 500 mV/div ~ 200 V/div
- Input impedance: 100 MΩ
- Time base: 10 s/div ~ 12.5 ns/div
- Trigger mode: auto ~ normal ~ single
- Trigger start: positive edge ~ negative edge
- Auto function: best sensitivity and time base for 5 to 6 periods
- Measurement functions: Vpeak-to-peak ~ Vrms ~ Vaverage ~ frequency
- Cursor functions: ∆V ~ ∆t (read note in article)
- Memory capacity: 50 screens
The specifications as a multimeter
Here too, the MDS8207 leaves little to be desired:
- Input resistance voltage measurements: 10 MΩ
- DC voltage measuring ranges: 600.0 mV ~ 6.000 V ~ 60.00 V ~ 600.0 V ~ 1.000 V
- DC voltage accuracy: ±(1.0 % + 10 counts)
- AC voltage measuring ranges: 600.0 mV ~ 6.000 V ~ 60.00 V ~ 600.0 V ~ 750 V
- AC voltage accuracy: ±(2.0 % + 10 counts)
- AC voltage frequency range: 50 Hz ~ 1 kHz
- DC current measuring ranges: 60.00 mA ~ 600.0 mA ~ 6.000 A ~ 10.00 A
- DC current accuracy: ±(1.2 % + 10 counts)
- AC current measuring ranges: 60.00 mA ~ 600.0 mA ~ 6.000 A ~ 10.00 A
- AC current accuracy: ±(1.5 % + 10 counts)
- AC current frequency range: 50 Hz ~ 1 kHz
- Measuring system AC voltage and current: Vrms ~ Irms
- Resistance measuring ranges: 600.0 Ω ~ 6.000 kΩ ~ 60.00 kΩ
- Resistance measuring ranges: 600.0 kΩ ~ 6.000 MΩ ~ 60.00 MΩ
- Resistance accuracy: ±(1.2/3.0 % + 5 counts)
- Capacitor measuring ranges: 9.999 nF ~ 99.99 nF ~ 999.9 nF ~ 9.999 μF
- Capacitor measuring ranges: 99.99 μF ~ 999.9 μF ~ 9.999 mF ~ 99.99 mF
- Capacitor accuracy: ±(3.0/5.0 % + 10 counts)
- Temperature measuring range: 0 °C ~ 600 °C
- Temperature accuracy: ±(2.0 % + 10 counts)
- Current gain (hFE) measuring range: 1 ~ 1,999
- Frequency measurement range: 9.999 Hz ~ 9.999 MHz
- Frequency accuracy: ±(1.0 % + 5 counts)
- Duty-cycle measuring range: 0.01 % ~ 99.99 % (500 mVpeak-to-peak input voltage)
- Diode test: 3.0 V test voltage ~ 2.0 mA test current
- Conductivity test: 50 Ω max.
- Memory capacity: 100 measurements
- Automatic range selector: can be switched off
- Measuring speed: 2.5 measurements/second
- Fuses: 500 mA ~ 10 A
The supplied test leads
These are of excellent quality. The thermocouple has a connector that fits into the meter's V/Ω and COM inputs. Please note that this connector is polarized, so it has a plus and a minus. The minus must of course be plugged into the COM input. The actual thermocouple consists of a welding of only 1 mm diameter between the two wires of the joint. An ideal system to quickly measure the temperature of small components on a PCB, without much loss of temperature.
The two test leads have, in case you care, a 'CAT III 1000V 10A' indication. But here too, as so often, this is not in accordance with the guidelines. With a CAT III probe, a maximum of 4 mm from the metal tip can be felt. With the supplied probes, 17 mm can be felt.
 |
| The three test leads supplied with the MDS8207. (© 2019 Jos Verstraten) |
The operation of the MDS8207
In the picture below we have summarized the function of all controls. The four keys F1, F2, F3 and F4 have a function that depends on the mode in which you measure. The actual function is shown on the bottom line of the screen.
The R button has several functions. If you use the MDS8207 as oscilloscope, you can switch to the automatic measuring mode with one press of this button. The software calculates the correct settings of the vertical sensitivity and the time base to display five to six periods of the signal to be measured. If you use the device as multimeter, you can use this button to switch on or off the automatic range switching and in the latter case set the range manually. You can do this by pressing this button several times.
The S key is the HOLD key that allows you to cancel the sampling of the input signal and freeze the display to the last measured value or image. It also gives you access to the CURS menu, which allows you to set horizontal and vertical cursors and measure times and voltages. However, read the note further in this article. If you press this button for more than two seconds, you will enter the menu where you can store the measured value or image in the memory and scroll through the stored data and delete memory locations.
Use the large rotary switch to set the measuring function. The oscilloscope becomes active in the two red positions. One position switches a capacitor in the input circuit, thus blocking DC voltages.
Two positions of this switch have four functions, which can be selected with the F3 key. Of course you can see on the display which measuring function is active. With one position you can measure DC voltage, AC voltage, frequency and duty-cycle. With the other position you measure resistors, capacitors, diodes and conductivity.
Note that the MDS8207 has a separate OSC input for the scope.
 |
| The function of the control keys and switches. (© 2019 Jos Verstraten) |
The 'AUTO POWER' function
Turning the meter on by turning the rotary switch out of the OFF position will automatically bring the meter into the 'AUTO POWER OFF' mode. This means that the meter will automatically turn itself off after fifteen minutes. This is often annoying. You can deactivate this function by pressing and holding the F1 key during start-up.

The MDS8207 internal
The picture below gives an impression of the internal construction of this combimeter. It all looks very neat and well cared for. Further dismantling is only possible if you use the hot soldering iron and we have not done this with this fairly expensive purchase. On the main PCB is a smaller PCB that is connected to the main PCB via two connector terminals, but that is also connected to the main PCB by a few soldering connections.
On the smaller PCB is a connector, which can be used to program an internal FPGA (Field Programmable Gate Array). In the middle of this PCB is a metal spring that makes contact with an aluminum foil that is glued on the inside of the backside of the case.
 |
| The interior of the MDS8207 is neatly finished. (© 2019 Jos Verstraten) |
The MDS8207 in use as a multimeter
The indications on the display
The meter automatically switches to the multimeter mode when you turn the rotary switch to one of the six corresponding positions. By default, the AUTO measuring function is switched on, by pressing the R button this function is switched off and you can manually set a range. Pressing this button for two seconds switches AUTO on again. The figure below shows, for example, how the MDS8207 represents the 230 V mains voltage.
 |
| Measuring the mains voltage with the MDS8207. (© 2019 Jos Verstraten) |
Additional functions when measuring voltages
This picture immediately shows the additional functions of the three keys F1, F2 and F3:
- F1 (REL):
The current measurement is stored in memory and subtracted from all subsequent measurements. - F2 (P-H):
In this function, the MDS8207 stores the maximum and minimum values of the measured variable and displays them on the display. - F3 (SEL):
Selects between DC, AC, frequency and duty-cycle.
 |
| The additional functions that you can access are summarized in one display. (© 2019 Jos Verstraten) |
Storing measurement data in memory
If you want to store a measured value in the memory, first press the S key. The MDS8207 then enters the HOLD mode and the current measured value is frozen on the screen. Then press the S key for more than two seconds. You will then see the screen below on the display and you can use the F keys to select a free memory location and save the HOLD reading in it. To exit this function, press the S key again for two seconds.
 |
| The screen with the measured values stored in the memory. (© 2019 Jos Verstraten) |
Testing the multimeter functions of the MDS8207
Accuracy when measuring DC voltages (good)
In the table below we have summarized the results of our test. We have measured both a few very low voltages and high voltages. The four light blue colored rows are the results of measuring the four output voltages of our very accurate voltage reference. The remaining voltages have been generated via a digitally adjustable power supply and checked on our reference meter. The results are more excellent!
 |
| The accuracy when measuring DC voltages. (© 2019 Jos Verstraten) |
Accuracy when measuring DC current (good)
In order to investigate the accuracy of current measurements, we have build a series connection of a digitally adjustable current source, our reference meter and the MDS8207. We examined both the mA and A ranges, see the thick black line in the table below. When measuring currents in the mA range, there was a constant deviation of about 3 mA over the entire measuring range. The accuracy in measuring currents in the A-range is excellent.
 |
| Accuracy in the measurement of DC current. (© 2019 Jos Verstraten) |
Accuracy when measuring AC voltages (good)
This parameter is also accurately measured, see the table below. The measurement results were collected with pure sinusoidal AC voltages at a frequency of 50 Hz. The bottom row shows the measured value of the mains voltage.
 |
| Accuracy in measuring AC voltages. (© 2019 Jos Verstraten) |
Interesting is of course the frequency range. According to the specifications this can be up to 1 kHz, but it is not specified what the signal loss is at this frequency. We measured that, see the table below, which clearly shows that the MDS8207 is doing better than the specifications predict.
 |
| Measurement of 5.000 V at various frequencies. (© 2019 Jos Verstraten) |
Like all modern multimeters, the MDS8207 measures the RMS value of an AC voltage. This is the value of the AC voltage that generates as much thermal power in a resistor as a DC voltage of the same value. As the table below shows, the MDS8207 is doing perfectly in this respect.
 |
| Measurement of the RMS value of various signal shapes. (© 2019 Jos Verstraten) |
Accuracy when measuring frequencies (poor)
We measured the frequency of sinusoidal signals with an RMS value of 1 V. That went well between 10 Hz and 40 kHz, afterwards large deviations were noted. So little of the 9.999 MHz mentioned in the specifications was found in practice! The use of a TTL-compatible square wave signal didn't really improve. At 60 kHz the MDS8207 stopped working.
Accuracy when measuring duty-cycles (good)
The duty-cycle defines the ON/OFF ratio of a pulse in percent. A pulse with a duty-cycle of 10% is 'H' for 10% of its period and 'L' for 90%. There are not many multimeters that can measure the duty-cycle of a pulse. Although the usefulness of this option is doubtful, we were of course curious what this combimeter has to offer in this respect. We connected a pulse of 5 V and 1 kHz to the meter and digitally set the duty-cycle of this pulse between 10% and 90%. The results are summarized in the table below. By the way, the measurement error quickly worsens when you increase the frequency of the signal. With a signal with a frequency of 30 kHz and a duty cycle of 40%, the MDS8207 claimed that this signal had a duty-cycle of only 21.59%!
 |
| Measurement of the duty-cycle of a 5 V ~ 1 kHz pulse. (© 2019 Jos Verstraten) |
The accuracy when measuring resistors (good)
For this test, our 0.1% resistor bank was used. It consists of six resistors with a guaranteed tolerance of ±0.1%. The results of this test are summarized in the table below and are, again, impressive.
 |
| Measurement of resistors with a tolerance of ±0.1%. (© 2019 Jos Verstraten) |
The accuracy when measuring capacitors (good)
Most of the universal meters that we have tested show a fairly large error when measuring our ±1.0% reference capacitors. The MDS8207 is an exception, as the measurement results in the table below prove. The large deviation when measuring 470 pF is strange, but not an accidental error of the test capacitor. We have five and for all five the MDS8207 measures a value around 520 pF.
 |
| Measurement of capacitors with a tolerance of ±1.0%. (© 2019 Jos Verstraten) |
Accuracy when measuring temperatures (poor)
You can switch between °C and °F by pressing F1 and F2. Remember that the thermocouple probe is polarized and therefore has a plus and a minus connection. Testing the accuracy of a temperature meter obviously requires a reference meter with an accuracy that is at least a factor ten better than the meter being tested. Unfortunately, we do not have such a device. We must therefore use two universal physical values: the melting point and the boiling point of purified water, 0.0 °C and +100.0 °C respectively. Our MDS8207 is particularly poor at these temperature readings:
- Melting point: +8.3 °C ~ +46.94 °F
- Temperature of the writer of this blog: +44.2 °C ~ +111.56 °F (and still very much alive!)
- Boiling point: +107.3 °C ~ +225.14 °F
The meter that is delivered to us measures temperatures 7 to 8 °C too high! Replacing the thermocouple with another, identical type-K thermocouple did not lead to any improvement. The measurement error is really in the meter.
The MDS8207 in use as an oscilloscope
The indications in the display
Don't forget that you have to change the red measuring cable to the OSC input! After switching on one of the two oscilloscope positions and pressing the R-button, the image below appears on the display. In the top line the trigger settings are shown, underneath the settings of the vertical and horizontal axis. Below the oscillogram, the MDS8207 displays the values calculated by the software:
- The peak-to-peak value Vp-p of the signal.
- The average value Vavg of the signal.
- The rms value Vrms of the signal.
- The frequency of the signal.
The bottom line of the display shows the function of the four keys F1 to F4. In this start screen, F4 has no function. To the left and right of the oscillogram two small triangles show the GND level and the trigger level.
 |
| The oscilloscope screen with the automatic settings. (© 2019 Jos Verstraten) |
Manual settings
In almost all cases, the automatic setting and triggering provides an easily interpretable image. If you want to set the vertical sensitivity and/or the time base by hand, you can do this by pressing the F1 or F2 keys. You can then use the F2 and F3 keys to manually change the sensitivity and the time base. With the F4 key you can move the horizontal and vertical position of the oscillogram. Similarly, from the main menu, F3 allows you to manually set the trigger conditions: rising or falling edge and automatic, normal or single trigger. In this case, the F4 button allows you to manually adjust the trigger level.
The mysterious F4 key
In the manual, the F4 key is called the cursor key. With this key you would have access to the cursor settings of the oscilloscope, with which you can perform ∆U and ∆t measurements. You can read the voltage or the time between two movable horizontal or vertical lines. According to the manual, this is very simple. You press the S key, the oscilloscope enters the HOLD mode and the notation 'CURS' appears above function key F4. Unfortunately, it was absolutely impossible to enable these cursor functions on the sample delivered to us. Not that the key does not respond to a key press, the device produces a beep. The cursor function was apparently not yet implemented in the software version of our MDS8207.
A note from our reader Joerg Graff (11/01/2021)
You write about 'the mysterious F4 key'. This key is not 'mysterious' but the most important key on this device (😁). By pressing and holding the F4 key during start-up you will start with 'quiet mode on'. So you can avoid the extremely annoying beep sound every time you press a key. Unfortunately the device does not remember the quiet mode after shutdown, so you must use the F4 key every time you switch it on.
The MDS8207 tested as oscilloscope
Representation of sine waves (good)
Apart from this strange discrepancy between manual and practice, we are very satisfied with the performance of the MDS8207 as a oscilloscope. In the image below you can see how the combimeter represents a sine wave of 20 MHz at the highest time base speed of 12.5 ns/div. With the two red vertical lines we have indicated where the peaks of the sine waves were at a signal with a frequency of 1 kHz. The device therefore has an almost straight frequency characteristic up to 20 MHz. Unfortunately, we cannot measure higher than 20 MHz.
The measurements calculated by the software are accurate. A sine wave with a peak-to-peak value of 20 V and a frequency of 100 kHz got from the MDS8207 a '20.00Vp-p' and a '100.0kHz' notation on the bottom line.
 |
| The appearance of a sine wave with a frequency of 20 MHz on the display. (© 2019 Jos Verstraten) |
Representation of square waves (good)
The illustration below shows how a square wave with a frequency of 1 MHz and a peak-to-peak value of 10 V is represented by the oscilloscope. You can see that the scale of the picture is also correct. The signal is exactly 10 divisions high, as intended at 10 V.
 |
| The representation of a square wave with a frequency of 1 MHz. (© 2019 Jos Verstraten) |
Saving images
In the same way that you can store the multimeter's measurement results in memory, you can also store fifty screenshots of the oscilloscope in that memory and retrieve them afterwards.
Our opinion on Mustool's MDS8207
It will be clear to you that we are quite enthusiastic about the MDS8207. For the first time we were confronted with a combimeter costing less than a hundred euros, of which we did not have to judge the oscilloscope function as an unusable toy. Leaving aside the poor measurement results of the temperature and frequency functions, the MDS8207 is a reliable companion that provides you with accurate measurement results. It is a pity that the cursor functions were not yet implemented in the specimen supplied to us. But even without these functions, the MDS8207 is worth the money as a oscilloscope.

Mustool MDS8207