(Published on 15/11/2021, supplemented on 05/05/2025)

|
With this kit you can give your (grand)children something different than more of the same. Perhaps this experiment kit will be the start of an exciting hobby or technical career!
|
Introducing the 'Science Action Lab Kit'
A personal statement....
My interest in electricity and everything related to it has been in my genes since I was a child, but it was given a huge boost when, for a birthday or a good school report, I received a large box called 'Der Kleine Elektriker' from the German company Kosmos. The box contained a number of strange objects that, when linked together, suddenly formed an electromagnet, an electric motor, a transformer or a bell. I still remember how astonished I was that I had fiddled something together that just started to run by itself. That was the beginning of a lifelong hobby and career: electronics.
I sincerely hope that part of today's youth will also be so enthusiastic and inspired by carrying out such fun experiments. And that is possible, because something similar to 'Der Kleine Elektriker' comes from China: 'Science Action Lab Kit'.
What is the 'Science Action Lab Kit'?
This kit contains about forty modules and components that you can use to build dozens of simple electrical, electromagnetic and magnetic experiments. All modules of this kit are made of sturdy plastic and the quality is such that a rough treatment will not cause any damage. What's more, you can reorder most of the modules separately at very low cost via AliExpress, should something break.
With these forty parts, you can explain almost all basic laws and phenomena of electricity, magnetism and electromagnetism in a playful manner with the help of simple experiments. In this way, the young child learns the basics of current and voltage, Ohm's law and series and parallel circuits. More complicated experiments show how an electric bell, a transformer and an electric motor work and how electricity is generated with a generator.
An overview of the components supplied
In the picture below, almost all components of the system are shown. You will certainly recognise the parts that you learned about in your first physics class: battery holders, switches, lamps, magnets, a woollen cloth, electrostatic rods, a compass, iron filings, a coil, a bell, a rheostat, a voltmeter and an ammeter. The modules have connections in the form of spring or screw connectors. You can connect these using the supplied leads with fork contacts.
 |
Almost all parts of the system united in one picture. (© 2021 Jos Verstraten) |
Where to buy?
It is a well-known fact that Chinese products are often marketed under various names. This 'Science Action Lab Kit' takes the cake. We have found at least eight names under which this kit or its components are offered for sale:
- Lerbor
- United Scientific Supplies
- Elesoc
- Xingou
- EUDAX
- SntieEcr
- Teenii
- Yarkor
We wrote 'or its components' because the composition and therefore the prices of the kits also vary. In the picture below, we have made a far from exhaustive summary of kits that we have found via AliExpress. The prices of these kits vary from a few tens to over eighty euros. You should always take a good look at the photos accompanying the offer to find out how many of the approximately forty parts are included in the kit!
 |
| The available parts are offered in various kits. (© 2021 Jos Verstraten) |
Where to order the replacement parts
On this blog, we do not like to link to suppliers of products. The link may be dead a month later. As an exception, we do it here. The only supplier who offers a lot of loose parts of the system is EUDAX, which you can reach via:
Go to 'Products', to 'Physical Experiments' and then to 'Accessories'. These 'Accessories' also include a number of modules that we have not found in any kit, such as:
- A module with three LEDs in the primary colours and a glass ball in which these colours are mixed (€ 4.60).
- A module with a relay (€ 3.61).
- A module emitting three parallel laser beams (€ 4.59).
- A module with a light-sensitive resistor and a LED (€ 2.30).
What you can do with it
We found a nice video that gives a good insight into what you can do with the system on the Teenii website.
A good manual is essential
Even more than with a construction kit of a printed circuit board, a good manual is indispensable with this kind of experimental kits. Some kits come with a very brief English manual and some even with a Chinese manual! In the scan below, you can see two pages from the manual that was in our kit. That unbranded kit was supplied through AliExpress by 'Enlightenment Education Store'. It is a pity that this manual is not in English, because in this 34 pages thick booklet, a lot of experiments are described. Since all experiments are explained with photos, you might still find this manual useful. That is why we have scanned it and put it on our personal cloud in Google Drive for download:
➡ Science_Action_Lab_Kit_Manual_01.pdf
 |
| One of the Chinese manuals. (© 2021 Jos Verstraten) |
In this excellent English manual of 44 pages a number of experiments are clearly described in 18 chapters. But unfortunately, also this manual is not complete. The most extensive kit contains parts, such as a reed contact, an electroscope, a solar cell, a buzzer and a LED module that are not discussed in this manual at all.
Moreover, the section '
Electrostatics' is completely missing in this manual. So no experiments with the woollen cloths, the electrostatically charged rods and the electroscope that are included in most kits. A pity but you, as an experienced electronics hobbyist, can find a way around that. You can think up and carry out such experiments yourself!
From a visitor to this page, Mr Riadh Ben Othman, we received an English translation of a Chinese manual, which is also very useful and which we are making public with the author's permission:
The supplied components in detail
The power supplyAll experiments are supposed to be powered by three 1.5 V type AA batteries. For this purpose, three battery holders are included, which click together to provide a series connection. The battery holders have screw connectors. You unscrew the red or black cap, push the forked contact of the leads against the screw thread and screw the cap back on. Is one broken? No problem, for € 1.97 you can order a new one.
 |
| One of the three battery holders. (© EUDAX) |
The measuring instruments
All kits come with two large analogue meters with a 90 mm scale. These parts also have screw connectors. Strangely enough, both meters have the zero point not in the left-hand corner of the scale, but a bit more to the right. They can therefore also measure small negative values.
The voltmeter has two ranges:
-1.0 V ~ +3.0 V
-5.0 V ~ +15.0 V
That second scale is obviously a bit strange for a kit where the supply voltage is only 4.5 V. The accuracy of our meter:
- Indication +3.0 V ➡ +2.93 V
- Indication -1.0 V ➡ -0.95 V
- Indication +15.0 V ➡ +14.70 V
- Indication -5.0 V ➡ -4.78 V
The internal resistance of the voltmeter is 3.94 kΩ in the most sensitive range and 19.47 kΩ in the other range.

The ammeter also has two ranges:
-0.2 A ~ +0.6 A
-1.0 A ~ +3.0 A
We checked the accuracy:
- Indication +0.6 A ➡ +0.59 A
- Indication -0.2 A ➡ -0.21 A
- Indication +3.0 A ➡ +2.98 A
- Indication -1.0 A ➡ -1.09 A
We measured the internal resistance as 1.12 Ω in the most sensitive range and 0.24 Ω in the other range.
These analogue meters can of course break down quite easily. All it takes is connecting a new battery to the ammeter by mistake and the coil inside the meter will burn out. Fortunately, these meters are very cheap. They cost € 2.99 each!
 |
| The two analogue meters of the system. (© EUDAX) |
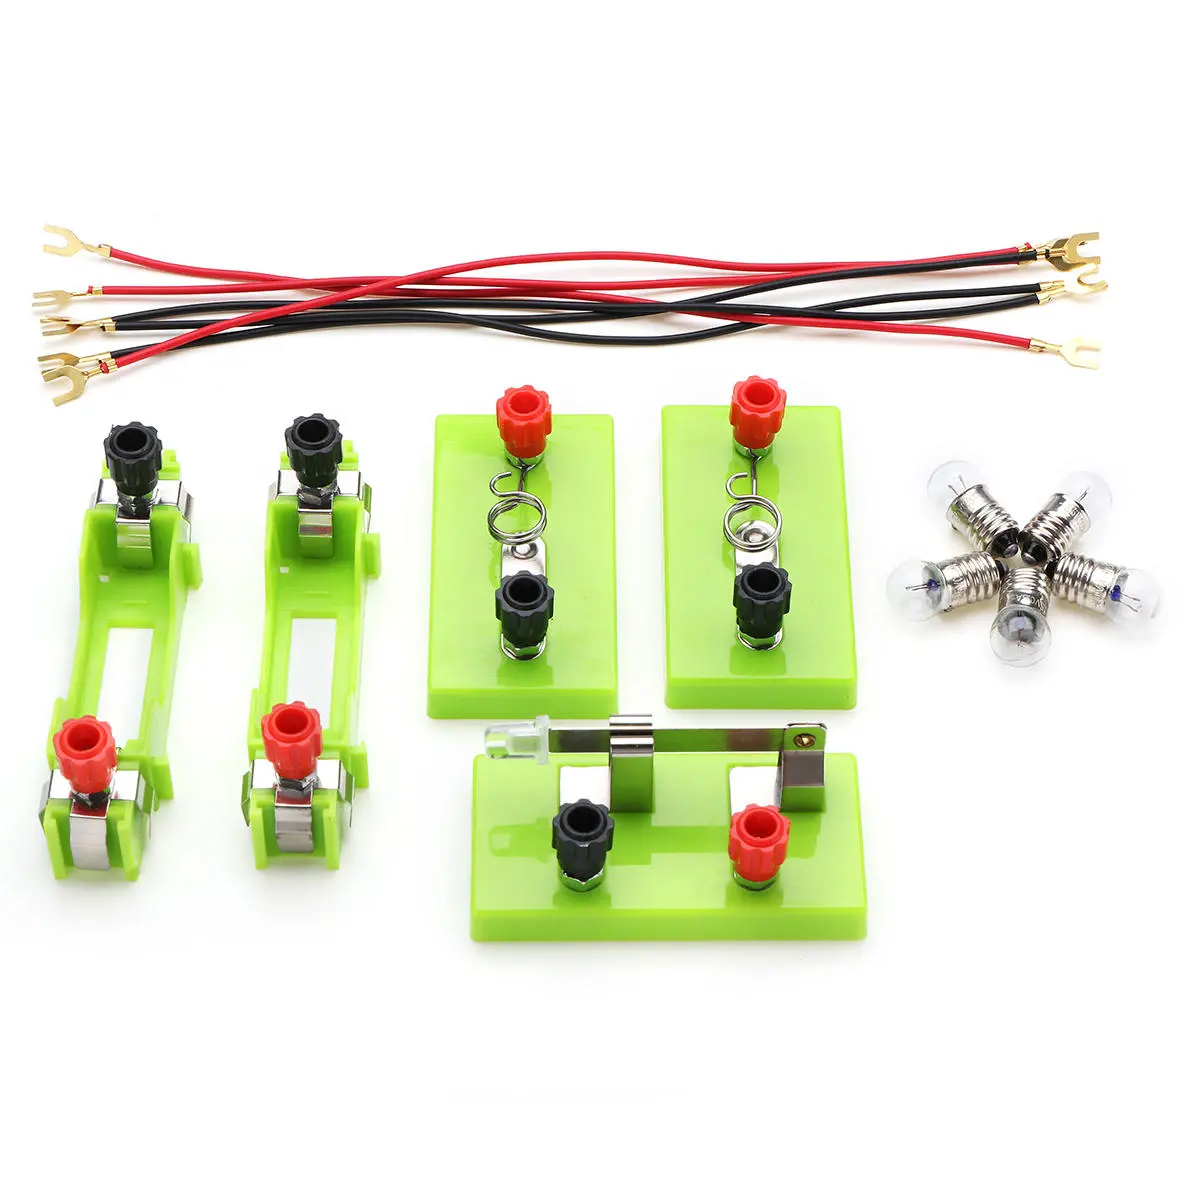
The components for the electrical experiments
By this we mean the components needed to investigate the fundamental laws of electricity, Ohm's law and series and parallel connection. These are the leads, the switches, the bulbs, the resistors and the rheostat (slide potentiometer). These parts are united in the photo below. Some modules do not have screw connectors, but springs as contacts. The idea is to use your left hand to push a spring aside and use your right hand to push the forked contact of a lead between two open windings of the spring. When you release the spring, it jumps back to its original position and the fork contact is clamped between the windings. The ten leads supplied (five red, five black) are flexible and 23 cm long.
The rheostat has a value of 20 Ω and can handle 2 A of current. Our example has a resistance of 18.97 Ω and a slider that doesn't slide smoothly over the conductor rod. The part with the three fixed resistors is good for 15 Ω, 10 Ω and 5 Ω.
 |
| The basic components for the electrical experiments. (© 2021 Jos Verstraten) |
With these simple modules, you can perform many experiments and, for example, measure the value of an resistor with the volt- and ammeters. The photo below shows the set-up for demonstrating Ohm's law.
 |
The set-up for the demonstration of Ohm's law. (© Lerbor) |
The components for the magnetic experiments
To perform magnetic experiments, the kit contains three bar magnets, a horseshoe magnet, a round magnet and a bar magnet on wheels. This last one can be used to demonstrate how a magnetic field is able to move objects.
 |
| The components for the magnetism experiments. (© 2021 Jos Verstraten) |
Naturally, the little compass and the iron filings are not missing. Unfortunately, very little iron filings are provided, so it is not possible to visualise the field lines around a horseshoe magnet as beautifully as in the figure below. A missed chance!
 |
| The magnetic field lines around the horseshoe magnet. (© Lerbor) |
The components for the electromagnetic experiments
Here are the more spectacular experiments! You have access to an electromagnet, a motor, a doorbell and a generator. For the motor you also need the horseshoe magnet. This magnet also comes in handy with the 'double rail' module, which you can use to demonstrate the effect of the magnetic force. The generator consists of a lever, a gearbox and the actual dynamo. Your hand movement is converted into a considerable speed by means of four gear pairs. This module supplies a maximum of approximately 6.0 V and has a short-circuit current of 0.6 A. So you can use it to light up the lights of the set.
 |
| The parts for electromagnetic experiments. (© 2021 Jos Verstraten) |
The following experiment allows you to demonstrate the force that a magnetic field applies to a current-carrying conductor. This force is called the 'Lorentz force'. To do this, you need to equip the 'double rail' module with the horseshoe magnet and place the copper rod on the two 'rails' of the module. If you increase the current in the circuit, the copper rod will at some point start to roll over the rails. You can now measure at which current this happens and how the direction of the current affects the direction of the force vector.
The 'railguns' now being experimented with by a number of armies work according to this principle. Then, instead of a copper rod, a shell is shot away over the rails with great force and therefore speed (and energy).
With this experiment you can also demonstrate the famous 'right hand rule'. This trick is used to find out the direction of magnetic field lines around a current wire. If you point the thumb of your right hand in the direction of the current, your bent fingers point in the direction of the magnetic field that is present around the wire.
 |
Demonstrating the force that a magnetic field exerts on a current-carrying conductor.
(© 2021 Jos Verstraten) |
The components for the electrostatic experiments
For carrying out static electricity experiments, the kit contains a cotton cloth, a wool cloth, a glass rod, an ebonite rod and a polymethyl methacrylate (Perspex) rod. With these attributes, you can generate positive and negative charges through friction. You can demonstrate this by means of an extremely primitive but effective electroscope.
 |
The attributes for the electrostatic experiments.
(© 2021 Jos Verstraten) |
Undocumented modules
The system contain a number of modules that are not covered in the manuals and kits we are aware of.
'Specific resistance' moduleFirst, we will briefly discuss the module below. It contains three seemingly identical wires of different metals and can be used to demonstrate the phenomenon of 'specific resistance' of a conductor. The three wires in our module have resistances of 1.78 Ω, 2.19 Ω and 7.05 Ω and these differences are large enough to detect with the volt- and ammeter.
 |
This module allows you to demonstrate the concept of
'specific resistance'. (© EUDAX) |
The solar cell and the motor
With the solar cell module shown in the photo below you can run a small motor. The solar cell in our kit delivers a voltage of 1.17 V at maximum exposure with a 5 W LED lamp. The motor starts running at a voltage of 0.56 V. However, the current drawn by the motor is too great for the solar cell and the voltage collapses. You can only get the motor running if you push the solar cell against the balloon of a light bulb. Not really suitable for a convincing demonstration!
 |
| Solar cell module powering a small motor. (© EUDAX) |

The fruit and vegetable battery Of course, such a well-known experiment cannot be missing from such a kit! Each kit comes with a number of copper and zinc electrodes that you can push into lemons, for example, and which then form a battery that you can use to light a LED. Unfortunately, our kit only contains one copper and one zinc electrode, so the voltage is too low to light the LED (which is present in our kit).
 |
| The fruit battery is not missing! (© Lerbor) |
The buzzer moduleThis module contains a small piezoceramic buzzer that already starts buzzing at a voltage of 1.20 V.
 |
| The buzzer module. (© EUDAX) |
The electromagnetic force module
This module contains a small permanent magnet at the bottom and two metal supports. You must wind a coil from one metre of the enclosed winding wire. Scrape off the insulation from both ends with a razor blade. Then place this coil on the two metal supports of the module as shown in the photo below. If you then connect the module to the power supply via the rheostat, you will see that the coil starts to turn half a turn. The principle on which an electric motor is based!
 |
| The electromagnetic force module. (© EUDAX) |
Joule's law moduleThis module contains three wirewound resistors that are in good thermal contact with two thermometers that measure up to +100°C. This module allows you to demonstrate Joule's law. This law shows the relationship between the amount of heat generated in a resistor when an electrical current flows through it and the electrical power in watts.
 |
| Joule's law module. (© EUDAX) |

(Banggood sponsor ad)
Starter kit 'Science Action Lab Kit'