|
With this barely € 4.50 costing device you can switch on and off any mains operated device with a power of up to 2.3 kW via the internet. Thanks to the new 'Enable LAN' option, you can use the system also only with your WiFi network, without having to use the cloud. |
Introduction to the Sonoff WiFi Smart Switch
The Sonoff WiFi Smart Switch
This 230 V switch is supplied under the name Sonoff, a brand name of the Chinese Itead Intelligent Systems Co. The device is essentially nothing more than an electronic 10 A switch that you can open en close via the Internet or via your WiFi network. Of course, you need software to do this. Itead provides the free app eWeLink. You can install it via Google Play or via the App Store. However, you can also switch on and off manually by pressing a button on the housing.
How it is delivered
There are dozens of internet stores that offer this WiFi switch. It makes sense to search a little further than the first screen with search results from Google. The cheapest provider we found was of course in China and offered the switch for € 4.35 with free shipping. The device comes in a nice box with a short manual in neat English.
 |
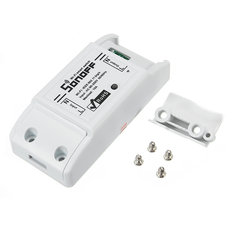
| The WiFi switch next to the box in which it is delivered. (© 2018 Jos Verstraten) |
The module is 8.8 cm long, 3.8 cm wide and 2.4 cm high. On the left side there is a screw terminal for connecting the 230 V mains voltage, on the right side there is a screw terminal for connecting the lamp or other device. The two terminal blocks are covered with plastic caps with strain relief for the cables. The module has a relay as switch. The maximum current is specified as 10 A, the maximum power you can switch is 2,300 W. You may think a bit negative about using an old-fashioned relay instead of an electronic switch such as a triac. The big advantage of using a relay, however, is that you can connect any kind of lamp to this Smart Switch without any problems, i.e. either a 400 W halogen rod, a 20 W energy saving lamp or a 3 W LED lamp. This is the question for switches that work with a triac.
The electronics in the Sonoff WiFi Smart Switch
The plastic housing contains a small double-sided PCB. The +5 V and +3.3 V electronics are soldered at the bottom with as main component an ESP8266 microcontroller chip. This chip is, for anyone who knows how, easy to reprogram. On the PCB there are even five extra programming holes next to the PN25F07 flash memory. This chip uses the standard Serial Peripheral Interface (SPI). Via a flat-cable you can connect the five holes to a programmer. The handy thing here is that Itead has put the complete diagram of this WiFi Smart Switch on the internet, see https://www.itead.cc/wiki/images/f/f8/Sonoff-Schmatic.pdf.
At the top is the power supply that converts the 230 V mains voltage to the necessary 5 Vdc voltage. This voltage is galvanically isolated from the mains so that your programming devices are not connected to the mains.
Above the power supply you will see the relay. This contains a single-pole switch whose contacts are directly connected, without fuse, to one wire of the mains voltage and one wire of the load. To make things a little safer, a number of slots in the PCB have been milled between the PCB tracks that carry the mains voltage and the rest. However, if you accidentally cause a short circuit in the device connected to the PCB, the most annoying things can happen. Fire cannot be ruled out! We therefore strongly recommend that you take a suitable fuse in series with the load.
Next to the power supply transformer you will see a push button and a bi-color LED that can light up red and green.
 |
| The top of the PCB of the WiFi Smart Switch. (© 2018 Jos Verstraten) |
Two small holes in two corners of the housing allow you to mount the WiFi switch anywhere. If you really want to do it professionally, you buy the extra housing offered by Itead, in which you can neatly hide the switch and the wiring. This housing is also waterproof, you can install the WiFi switch in your garden. The dimensions are 132 mm x 68 mm x 50 mm. You can buy this housing for about € 3.50.
 |
| The extra waterproof housing offered by Itead. (© 2018 Jos Verstraten) |
The app eWeLink
What can it do?
To use the WiFi Smart Switch you need to download the free app eWeLink. This app is available for Android and iOS. Thanks to the 'Share' option, all members of your family, each with their own smartphone or tablet, can control the Smart Switches.
All switches appear clearly in one screen, with the names you have assigned. In addition to switching Smart Switches on and off manually via this screen, eWeLink also allows you to have all devices switch on automatically via the built-in timer functions 'Scheduled Timing', 'Countdown Timer' and 'Loop Timer'. Furthermore, you can compose so-called 'Scenes', in which you can record various switches and which you can then operate simultaneously with one click on the button.
Through push notifications, any status change made by one of the share members is immediately visible in your app. The app also keeps an overview of all status changes of the logged on switches (History).
The risks of the system
It is of course very nice to impress your visit by switching on and off the fountain in your garden pond with your smartphone. However, you need to realize what you are giving away.
The system can only work via the cloud of the Internet. Itead has outsourced this to Amazon's AWS servers. These servers need access to your WiFi network, so you need to hand over the access code for this network. How secure are these Amazon servers? We don't know, you don't know.
A second problem is that the operation of the electrical appliances in your home will partly depend on the accessibility of those AWS servers. If they fail for some reason, you will no longer be able to operate your appliances. Although you can use the push button on the Smart Switch to operate the switch manually, this is not very convenient.
Luckily, Itead has come up with a (partial) solution for this in the latest versions of software and hardware: Enable LAN.
 |
| The operation of the system. (© 2018 Jos Verstraten) |
When installing eWeLink it is reported that this app needs access to:
- Your device history.
- Your app history.
- Your location.
- Your photos and media files.
- Your camera.
- Your microphone.
- Your WiFi connection.
Why Itead wants to access all this data is a mystery. Are these data sold to the most bidding? We don't know, you don't know.
Your registration with EWeLink
Logging in to the system is very easy.
- Open the eWeLink app on your smartphone or tablet.
- You must enter your country, your email address and a password.
- Click on 'Register'.
- You will receive a four-digit code by e-mail.
- You must enter this code in the next screen.
That's all.
 |
| Registering with eWeLink. (© 2018 Jos Verstraten) |
That is also very simple.
- Connect the Smart Switch to the mains and a lamp.
- The green LED will blink.
- Click on the + symbol on the opening page of the app.
- Press the button on the switch for five seconds.
- The LED first lights up constantly and then flashes quickly.
- In the next screen, enter the name and password of your network.
The system will now look up and register the Smart Switch in your WiFi network. This may take a few minutes. On the next page, which appears automatically on your screen, you can give your Smart Switch its own name.

The Device List
Once you have registered the Smart Switch to eWeLink in this simple way, the 'Device List' will automatically appear on your screen. This list shows all registered devices neatly arranged in boxes with the message whether they are switched on, off or are off-line. This screen also shows the WiFi signal strength per device. Of course, only your Smart Switch is currently in this list.
 |
| The Device List currently contains only one Smart Switch that is logged in. (© 2018 Jos Verstraten) |
You can turn the WiFi switch on and off by clicking the round switch on the left side of the frame.
More possibilities
If you click on the frame on the right, a follow-up screen will appear, giving you access to the extra options:
- Share.
- Schedule.
- Timer.
- Loop Timer.
 |
| The extra options you can apply to your Smart Switch. (© 2018 Jos Verstraten) |
Thanks to the 'Share' option, you can have the Smart Switch operated by all members of your family, each from their own smartphone. The prerequisite is that everyone has installed the eWeLink app and is connected to the same WiFi network. Click on the 'Share' button. In the new screen you can then enter the phone number and email address of the person who is allowed to share the selected device. This person receives an invitation to share the device and clicks 'Accept'. From that moment on, this person can use his or her phone to operate the Smart Switch. Via the same screen you can also revoke or temporarily block the authorisation.
The 'Timer' options
You can choose from three timers:
- The Scheduled Timer.
With this timer you can set a date and time when your Smart Switch should switch on or off. You can also use the 'Repeat' option to program this action for all days of the week. - The Countdown Timer.
With this timer you can set a duration after which the Smart Switch must be switched on or off. - The Loop Timer.
In this screen you can set a self repeating timing cycle, for example thirty minutes on and then five minutes off.
This is a very useful extension to the eWeLink app, which is only supported by the very latest production series of Smart Switches. The device must have firmware version 1.8.0 or higher. We already wrote that a disadvantage of the system is that you are completely dependent on the availability of Amazon's AWS servers. If these fail, you will no longer be able to operate the equipment. Thanks to this new option you can continue to operate your Smart Switches with limited possibilities. To enter this mode, open the menu in the 'Device List' in the upper right corner and click on the 'Enabe LAN' option. A yellow box indicates that the action has been successful and that you can control your Smart Switch directly via your WiFi network. However, you cannot use the timers in this mode. Moreover, it will be clear that this mode only works as long as your phone or tablet is within the range of your WiFi network.
 |
| With the 'Enable LAN' option, eWeLink works directly over your WiFi network. (© 2018 Jos Verstraten) |
If you have multiple Smart Switches installed in your home, you can record them in one scene. For example, you can program a 'Leave house' scene so that you can switch off all the lights in your home that are controlled by Smart Switches with a single click on your smartphone screen, but switch on the light at your front door.
Our conclusion
This WiFi Smart Switch from Sonoff is a good working and inexpensive way to transform the devices in your home into The Internet of Things. The Enable LAN option guarantees that your data will remain within the range of your WiFi network.
Thanks to the 'old-fashioned' way of switching with a mechanical relay, you can switch all the electrical appliances in your home, from LED lamps of 2 W to heaters of 2 kW, on and off without any problem with these small boxes.

Sonoff WiFi Smart Switch