|
With a price of less than twenty euros, the TEMPer2 is one of the cheapest temperature loggers you can buy. A unique feature is that you can log without installing additional software. You can read the measurements directly into a text file. |
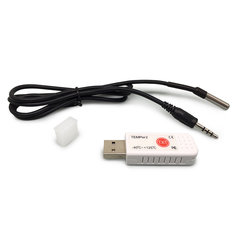
Introduction to the TEMPer2
The shipment
This USB logger from PC Sensor, a trade name of the Chinese company RDing Technology Limited Company, is supplied in a neat box together with a nearly one meter long cable with the external temperature logger. The TEMPer2 indeed has two temperature sensors. One is at the end of this cable, the other is built into the logger. Finally, the box contains a mini CDROM with the software TEMPer version 26.2.
 |
| The delivery of the TEMPer2 temperature logger. (© Banggood) |
The logger is contained in a USB stick that is not much larger than a modern memory stick. In the picture below we have presented the three sides of the logger with the dimensions of the device. On one side of the housing is a 3.5 mm connector where you can plug the cable with the external temperature sensor. Through the holes on the right side of the logger, the internal sensor is provided with fresh air, it can measure the temperature of the environment.
 |
| The external properties of the TEMPer2 temperature logger. (© 2018 Jos Verstraten) |
The 88 cm long cable of the waterproof external sensor does not have a standard connector, but one with four contact rings, see picture below. Unfortunately this cable cannot be extended with a standard 3.5 mm stereo cable, as is possible with a lot of external temperature sensors with an NTC or PTC sensor. However, some cable manufacturers still supply a cable that you can use as an extension. If you search on Google for '3.5 mm 4 position TRRS Headset Extension Cable' you will find what you are looking for. A good available type is the MUHSMF1M from StarTech.
 |
| The special connector on the cable of the external sensor. (© 2018 Jos Verstraten) |
In the picture below we present the two sides of the small PCB in the TEMPer2. The three chips have been carefully stripped of any identification code. According to people who claim they have inside information, the microcontroller is one of the type TMU3101 with built-in USB interface and there is an I2C EEPROM on the PCB. The third chip is an FM75 two-wire temperature sensor.
 |
| The two sides of the PCB in the TEMPer2. (© polarnight.co.uk) |
- Measuring range: -40 °C to 125 °C
- Readout resolution: 0.01 °C
- Maximum inaccuracy: ±2 °C
- Temperature sensor: FM75
- Supply voltage: 5 Vdc
- Current consumption: less than 10 mA
- Operating system: from Windows NT onwards
- Dimensions: 44 mm x 18.5 mm x 11 mm
- Weight: 8 mm
- Cable length: 88 cm
Working with the TEMPer2 without software
A unique feature of the TEMPer2
One of the unique features of this logger, which we have not found (so far) with any other USB logger, is the ability to log directly without the need to install special software.
Working with the CapsLock and NumLock keys
Plug the TEMPer2 into a USB port on your Windows PC. The necessary USB driver is automatically searched and installed by Windows. Then open Notepad, Word or Excel. Press the CapsLock key on your keyboard for three seconds. The data that the two sensors measure are now automatically entered in the empty window of the opened application. The figure below shows, for example, the data as they are displayed in Notepad. You see three columns containing respectively the measured temperature of the internal sensor, the measured temperature of the external sensor and the sample interval.
You can reduce or increase this interval by briefly pressing the CapsLock (increase) or the NumLock (decrease). Remember, however, that you must leave the mouse in rest when reading the data. Even moving the mouse for a moment will completely confuse your PC and all sorts of strange things will happen. When you have finished recording the temperatures, you can stop the process by pressing the NumLock key for three seconds. Finally, you can save the data on your hard disk.
 |
| The measured data appear in Notepad. (© 2018 Jos Verstraten) |
On the USB stick there is a push button with the notation 'TXT'. With this button you can also record the measurement data in an empty window of Notepad, Word or Excel. The first click starts the display of the data, the second click stops this process. The annoying thing is that the interval is set to one second and cannot be changed.
Connecting to tablets and smartphones
In the same way, at least according to the manufacturer, you can read data directly into your tablet or smartphone. The only extra you need is a so-called OTG cable from USB-A female to micro-USB. To be honest, we have not checked this option, because we do not have such a cable in our testing lab.
 |
| Reading the data into an Android smartphone via an OTG adapter cable. (© Banggood) |
Working with the TEMPer software version 26.2
Installation
The mini CDROM only contains one file, TEMPer_V26.2.msi. This is an installation file for Windows and double-clicking the icon starts the 'Setup Wizard' for this software. The installation is completely trouble-free and a shortcut is included on your worksheet.

Starting up TEMPer V26.2
Double-clicking this shortcut opens the main window on your monitor. In the top bar are six different loggers that apparently work with this software. The strange thing is that the icon of the logger TEMPerX is colored red, while the icon of the logger TEMPer2 does not light up. Strange, because we really have connected a TEMPer2! The TEMPerX turns out to be a logger that not only logs temperatures, but also the relative humidity. Therefore, in the 'Log' window not only two columns 'Inner Temp' and 'Outer Temp' are shown for registering the two temperatures, but also two columns 'Inner Hum' and 'Outer Hum' for registering the relative humidity of the two sensors. It is not possible to manually select the correct sensor.
In response to an email with this complaint the manufacturer replied within the hour (excellent service!) with: 'The software has been upgraded and all the products are shown as TEMPerX'. Strange, but true!
 |
| The main window of TEMPer V26.2. (© 2018 Jos Verstraten) |
After clicking on this menu option, the window below will appear. Here you can set the following parameters of the software:
- Read Interval
The time in seconds between two measurements, set from 1 second to 300 seconds. - Language
Language of presentation of the software, English or Chinese only. - Temp Unit
Of course a selection between °C and °F. - Software Shutdown Mode
You can choose between closing or minimizing the program when closing the window. In the latter case, the software will remain active in the background and a small icon will appear in the Windows taskbar. - File
The measurement results are saved as a .CSV or .TXT file. Here you can enter the folder on your hard disk where the data files will be saved. You can also define the maximum number of samples to be recorded in one file. The maximum value is 50,000. - Voice
Here you can select a .WAV file to be played when an alarm condition is exceeded.
 |
| The windows of the menu option 'General settings'. (© 2018 Jos Verstraten) |
In this window you can set two email addresses that will receive a message when an alarm condition is exceeded or after a certain time has elapsed. Of course, the software must be able to access your mail program. In the window below you have to fill in your account details, the SMTP and the communication port of your email software in the left frame 'Send email'.
If you mail with Outlook, they are respectively:
- SMTP: smtp-mail.outlook.com
- Port: 587
- SSL: checkbox
Afterwards, you must ensure that the program has POP access. In Outlook, do this as follows:
- Select 'Settings'
- Select the option 'Show all Outlook settings'.
- In the next window, select 'Sync e-mail'.
- Under POP and IMAP, select 'Yes' under 'Let devices and apps use POP'.
- Choose Save.
Now return to the 'Alarm mail' window. In the right frame 'Receive email' you enter the data of the two recipients of the messages. In the box 'Send content' you enter a message title and the message.
 |
| The window of the menu option 'Alarm mail'. (© 2018 Jos Verstraten) |
At first we could not imagine what the purpose of this option is. It only became clear to us after a email to the manufacturer, which was answered within one hour. The intention of this option is that you send the file with the logged temperatures to another PC within your network. Of course, the same software must run on this PC. The registration of this service is done via the window below. After filling in the form you will receive the message 'The user name has been registered'. Afterwards you can use the same option to log in again and upload the data of the logger.
Then you start the software on the second PC and go to the option 'Data remote'. In the window, enter the account name and password that you also entered on the first computer. In the next window click on 'Search'. Your network is searched until your first PC is found and the file with the data is downloaded to the second PC. The data is displayed in the 'Log' window.
 |
| The registration window of the menu selection 'Data remote'. (© 2018 Jos Verstraten) |
In the main window you will see the icon of a church bell in the boxes 'Inner temp' and 'Outer temp'. If you click on it, the window below will appear. In this window you can set three data:
- Calib
You can enter a correction temperature that is added or subtracted from the displayed temperature. This way you can calibrate the two sensors. - Upper
The temperature threshold for the high alarm. - Lower
The temperature threshold for the low alarm.
 |
| The window 'Inner temp'. (© 2018 Jos Verstraten) |
In the main window, you have two methods to view the measured samples. The default method is 'Log'. You will see a table with:
- No
The number of the sample. - Time
The date and time of the registration of the sample. - Inner Temp
The temperature measured with the internal sensor. - Outer Temp
The temperature measured with the external sensor.
 |
| The display of the measured temperatures via the 'Curve' option. (© 2018 Jos Verstraten) |
The measured temperatures are automatically stored in the folder you have specified in the 'General settings' window. The name of that file is 'TEMPerX1.txt'. This happens in a rather strange way. The data is renewed after each new sample, but the new data is always stored under the same file name. The old file will be overwritten! The only way to save the data of a session is to either close the program or change the name of the file during the session via Windows Explorer. Afterwards, the software starts registering the data again under the file name 'TEMPerX1.txt'.
Testing the accuracy of the external sensor
Measuring setup
We put a 100 W resistor of 8 Ω in a cup of water and fed it with 75 W from a laboratory power supply. In the cup of water the external sensor was placed, in good contact with the thermocouple of our reference temperature meter. This setup causes the water to warm up slowly, so it is certain that both sensors are at the same temperature. According to the specifications the sensor is accurate within ±2 °C. In the table below the measurement results are summarized. As can be seen, the deviation of the tested TEMPer2 is larger than the specification claims. However, the deviation is quite constant 2.5 °C lower than the real temperature and you can easily compensate this deviation in the window 'Outer temp' by entering a 'Calib' value of +2.5 °C.
 |
| Testing the accuracy of the external sensor. (© 2018 Jos Verstraten) |
Our opinion on the TEMPer2
We cannot complain about the hardware. Although the deviation of the external sensor is greater than the specifications claim, this constant error can easily be compensated by entering an offset. However, we cannot be so enthusiastic about the software. The graphical presentation of the measurement data is quite rudimentary and there are missing basic functions, such as displaying the measured data at the position of the cursor in the graph. Also the impossibility to export or print the graph from the program is a big shortcoming. An even bigger shortcoming is that it is impossible to save the data at any time under any name to a folder of your choice. The lack of a good help function in the software is of course unacceptable. The fact that the software is not able to recognize the type of logger is also extremely strange.

TEMPer2 USB Temperature-Sensor Data-Logger