|
Tesla generators has been appealing to hobbyists for decades. Construction kits of Tesla generators are for sale for ten to hundreds of euros. We tested one of the cheapest kits. For just over ten euros you can buy this mini Tesla generator as a kit. |
Background information
What is a Tesla generator?
A Tesla generator is nothing more than a special transformer, characterized by the following characteristics:
- The primary coil contains only a few turns.
- The secondary coil contains hundreds of turns.
- One connection of the secondary coil ends in a very narrow needle-shaped electrode.
- Between the primary and secondary coils there is only air.
- Both coils are included in a transistor LC-oscillator, which powers the primary coil with a very high current.
- The high-frequency magnetic field that this creates around the primary coil generates a very high voltage in the secondary coil.
- This secondary voltage is so large that it is able to ionize the air molecules around the tip of the needle-shaped electrode, creating a purple glow. This is called the 'ion wind'.
- The electric field that is built up in the space around the needle-shaped electrode is so strong that it is possible to activate the gas discharge in a fluorescent lamp or a neon lamp without these parts being connected to anything. These lamps light up in a miraculous way.
Millions of volts
With professional Tesla generators you can generate voltages of millions of volts, as the picture below shows good enough to generate meter-long sparks. This is the 'Electrum', the largest Tesla generator built as a technical work of art. This generator was designed by the New Zealand artist Leonard Charles Huia Lye and can be admired in the open air sculpture museum Gibbs Farm in Kaipara Harbour, 47 km north of Auckland. This generator has a secondary coil that is 11.5 m high, consumes 130 kW and delivers a voltage of 3,000,000 V.
 |
| The Electrum, the world's largest Tesla generator in New Zealand. (© Joe Decker from Wikimedia Commons) |
Now back to the reality of the ten euro kit. The circuit diagram below shows the simplest circuit of a Tesla generator with a transistor. Officially this circuit is called 'single resonant solid state Tesla coil'. You will probably, just like us, find it a strange kind of circuit. How can this work? You can only understand that if you consider that each object has a certain small parasitic capacitance to the earth. The secondary coil of the transformer has that too and it is this capacitance Cparasit that provides the absolutely necessary feedback from the output to the input.
When you turn on the power supply, a current flows through the resistor R1 into the base of the transistor T1. This semiconductor starts to conduct and the result is that a very high current flows through the few windings of the primary coil. The strong magnetic field around this coil generates a high voltage in the secondary coil. The lower connection of the secondary coil is at the base of the transistor. The feedback loop is closed via the parasitic capacitance of the secondary coil. A negative voltage is induced at the base, which is limited to a safe value via the diode D1.
This is of course only possible if both coils of the transformer are correctly wound. Hence the two black dots at the windings, which indicate that you must wind both coils in the opposite direction. The transistor will block the current and the loss of current in the primary winding will generate another high secondary voltage, now of opposite polarity. The negative voltage that had ended up on the base via Cparasit is now rapidly going to be discharged. The transistor is driven back into conduction and the cycle repeats itself.
Conclusion
The circuit will oscillate at a fairly high frequency. In the secondary coil a high voltage is generated which can escape through the needle-shaped upper connection of the secondary coil while generating gas discharges into the air.
 |
| The circuit diagram of a single resonant solid state Tesla coil. (© 2019 Jos Verstraten) |
Introduction to the delivered kit
The way of delivering
Virtually all well-known Chinese electronics mail order companies deliver this miniature Tesla generator. We ordered our copy from Banggood, who asks € 12,64 for it, but for those few extra euro's they supply a plexiglass housing and that is not the case with all companies. So pay attention to that!
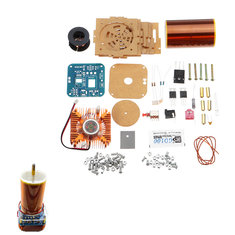
The kit is, as usual, delivered in a small plastic bag with the result that all parts are quite stuffed up and it is a miracle that nothing goes wrong during transport. A manual is completely missing and on the product page of Banggood there is no link to a construction description.
An e-mail to Banggood with the urgent request to return a link to a construction manual provides the answer that there is no construction description, 'after all, it is a do-it-yourself package'. Incomprehensible of course, but that's not the first time we've found such a situation with Chinese kits.
 |
| The delivery of all parts in one plastic bag and the end result after a few hours of tinkering. (© 2019 Jos Verstraten) |
After unpacking the bag it appears that the delivered parts are of excellent quality. The secondary coil is already pre-wired on the coil former and fully sealed with plastic foil. The two ends of this coil protrude unprotected from the former and are therefore very fragile. Be careful not to break these wires! Very nice is a heatsink with integrated 12 V fan, which you apparently have to attach under the PCB. A sachet of heat conducting paste is included, as well as an insulation plate that you can stick under one of the two transistors. For the two windings of the primary coil, a piece of approximately 50 cm winding wire is included.
 |
| The quality of the delivered parts is excellent. (© 2019 Jos Verstraten) |
Fortunately, the double-sided PCB has a component imprint, so it does not take much effort to reconstruct the schematic diagram. That is presented in the figure below and appears to broadly follow the already discussed fundamental schematic of the 'single resonant solid state Tesla coil'. The only difference is that between the 24 V power supply and the circuit a MOSFET T1 is connected. This semiconductor is configured with two resistors to a certain quiescent current that is large enough to get the Tesla oscillator to work. However, you can vary the gate voltage by modulating a (rather large) audio signal on it. As a result, the conductivity and thus the internal resistance of the MOSFET will vary and so will the current available to power the primary coil of the Tesla transformer. In this way, the sparks generated can dance to the beat of the music. Resistor R5 is designed to absorb 12 V, the difference between the 24 V supply voltage and the 12 V fan voltage.
 |
| The complete schematic diagram of this kit. (© 2019 Jos Verstraten) |
The construction of the Tesla generator
Warnings in advance
The Tesla generator must be powered with a stabilized DC voltage of 24 V and draws a maximum of 3 A current. This supply voltage is rather critical. If you use a power supply that has a lower current limit and thus reduces its output voltage, there is a good chance that the oscillator will cut off, transistor T2 will be driven into conduction and breaks down due to too much heat.
If you get the Tesla coil to work, it is absolutely necessary to remove all electronic equipment in the neighbourhood. Laptops, tablets, oscilloscopes, multimeters ... Get rid of them! The generated high-frequency electric field behaves rather unpredictably and can cause damage to the sensitive chips in such equipment. We therefore advise you not to measure in the circuit. Your measuring devices cannot withstand such high HF input voltages.

Preparing the Tesla coil
The kit contains two plexiglass plates that you must free from the protecting paper and that form the top and bottom of the Tesla transformer. The figure below shows how to glue these two plates on either side of the coil. Make sure that one of the wires is led out through the central hole before gluing the lower plate on the coil. The round plate forms the top of the coil. To this you attach with two M3 bolts a copper spacer of 15 mm. Turn the second connection of the coil a few times around the upper nut and let the remainder stick out. Remember that the winding wire is only 0.2 mm thick and therefore breaks off easily. So be extremely careful!
 |
| Preparing the Tesla coil. (© 2019 Jos Verstraten) |
Assembling the PCB
That is the easiest job of the construction. In the picture below we have presented both sides of the completely assembled PCB. Note the position of the blue LED: the cathode (- on the PCB) is on the side of the shortest connection wire. Make sure that the two heat dissipation surfaces of the semiconductors are at the same distance from the PCB and are completely parallel to the PCB. Only then both semiconductors can be brought into good thermal contact with the heatsink. Solder the six connections of the two transistors on both sides of the PCB to the solder islands. Finally, tin the solder island J8 on both sides. Here you have to solder the free wire of the secondary coil to at a later stage.
 |
| The complete assembled PCB. (© 2019 Jos Verstraten) |
In the next step you must bring both semiconductors in good thermal contact with the flat underside of the heatsink. Coat the underside of the two semiconductors with the thermally conductive paste and press the insulation strip in the cooling paste onto the IRFP260. Coat the other side of the insulation strip with the remainder of the cooling paste. In the picture below you can see how you then assemble the heatsink with the PCB. Between the heatsink and the PCB, screw two nuts on the long M3x25 bolts. Finally, cut the fan cable to the correct length and connect the two wires to the two solder islands next to the 100 Ω resistor on the PCB. Pay attention to the polarity!
 |
| Mounting the PCB on the heatsink. (© 2019 Jos Verstraten) |
You can now mount the Tesla coil with the plexiglass disc to the PCB. However, you must first solder the free wire of the secondary coil on solder pad J8 on the PCB. The wire is insulated with lacquer that will not burn away with your hot soldering iron. So, very carefully, you must remove the lacquer from the wire with a piece of sandpaper and tinned the copper wire. This assembly step is emphasized in the picture below by drawing the wire a bit thicker. Then you can mount the coil on the four copper spacers with M3x6 bolts. Make sure that the two holes in the plexiglass plate are above the two solder pads on which you must then solder the wires of the primary coil.
 |
| Mounting the Tesla coil on the PCB. The wire of the secondary coil is emphasized. The primary coil is already present in this picture. (© 2019 Jos Verstraten) |
Finally, you must attach the primary coil around the Tesla transformer. This coil consists of two windings which you must wrap around the cylinder as shown in the picture below. Feed the wires through the two holes in the plexiglass plate and solder them to the PCB.
 |
| The wiring of the primary coil completes the assembly of this kit. (© 2019 Jos Verstraten) |
If you have purchased a kit including the housing, you can finally build this housing around your Tesla generator. You start by unscrewing the four bolts used to screw the Tesla coil onto the PCB. Then carefully slide the top plate of the housing, which has the large round hole, over the cylinder and the primary winding. You can then replace the four bolts so that you have two plexiglass plates on top of each other. Then mount the four side panels on the top plate with four M3x10 bolts and four M3 nuts. In the same way you connect the four side plates together. Finally, mount the bottom plate with the last four M3x10 bolts and M3 nuts.
 |
| Screwing together the six plates of the housing. (© 2019 Jos Verstraten) |
Our opinion on this kit
This kit of a mini Tesla generator is a nice first introduction to the phenomenon 'very high high frequency voltages and their strange behaviour'. It is also a nice object to decorate your bookcase. That you can't draw centimeters long sparks with it will be clear, you can't expect that from a kit of ten euros. The only unfortunate and actually intolerable negligence of the supplier is that such a quite complicated device is delivered without a construction manual.

DIY Music Tesla Coil Module Kit