|
The Chinese company e-Design is known for the beautiful, reliable, innovative but expensive products they develop and sell under the name Miniware. This 12 V mini soldering iron is a typical example. |
Introduction to the TS80P 12 V soldering iron
What is the TS80P?
The TS80P is a miniature soldering iron that can be powered from a 9 Vdc or 12 Vdc power source via a USB-C connector. The device should preferably be powered from adapters that support a 'fast charging protocol'. These are, for example, QC3.0 power supplies that delivers 9 V at 2 A. In addition, you can also use a PD2.0 power supply that provides 12 V at 3 A. Finally, you can also power the soldering iron from an old fashioned power supply or a power bank, which supplies 12 Vdc. When powered by 9 V, the iron has a maximum power of 18 W and the tip reaches a temperature of +300°C within 22 seconds. If you use a 12 V power supply, the TS80P can deliver 30 W and the tip will reach this temperature within eight seconds.
The manufacturer calls the TS80P 'smart'. The device does indeed contain a number of smart options. For example, a motion sensor is built in that detects whether you are working with the iron or whether the iron is at rest. In the latter case, the temperature of the tip goes to a much lower value after an adjustable time, so that the tip is spared from oxidation.
A second smart option is that you can define a large number of parameters yourself via two push buttons or via a configuration text file.
The TS80P is equipped with an 'easy-push' system, allowing you to replace the soldering tip easily. The tips are equipped with a three-pole plug that can be plugged into the handle. The tip locks automatically. To unlock, just push the wider end of the handle to the left, and you can pull the tip out of the handle. The system has five different tips.
 |
Miniware's TS80P soldering iron in use. (© AliExpress) |
Manufacturer, suppliers, price
The TS80P is designed by the Chinese e-Design and is marketed under the name Miniware. No name confusion with this product, one product name and one manufacturer's name. When you think of Chinese products, you immediately assume that Chinese mail order companies such as Banggood and AliExpress are the cheapest source. That is not the case with this soldering iron. At AliExpress you pay € 106.26 for it, at the Dutch company Eleshop only € 99.00.
Banggood does have a temporary offer available for € 90.04 plus € 3.18 shipping, but it comes with an American power supply + mains plug. So, unless you have a suitable power supply lying around, this offer is more expensive.
Delivery of the soldering iron
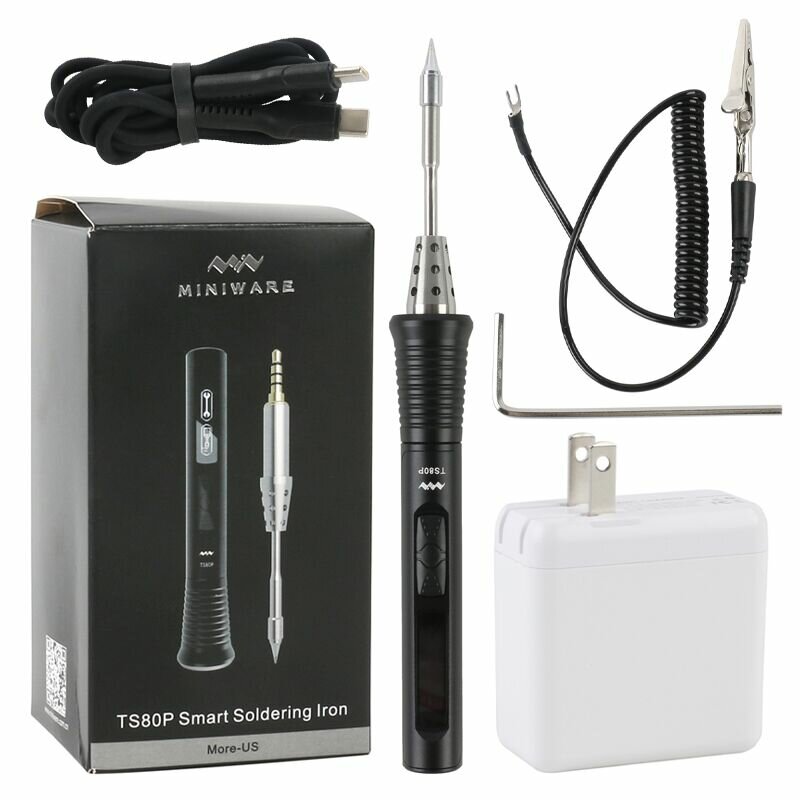
The TS80P is delivered in an attractively printed cardboard box containing the following items:
- The soldering iron TS80P
- A European QC09 mains power supply, 12 V ~ 3 A
- A thin conical soldering tip TS-B02
- A very flexible one-meter USB-C to USB-C cable
- A spiralised earth wire of about half a meter
- A miniature Allen key
- A brief instruction manual
With the Allen key, you can fix the grounding wire under a bolt on the handle and, with some effort, remove the PCB from the handle.
 |
| The scope of delivery of the package. (© AliExpress) |
The manual
The comprehensive manual is not included, but we have looked it up and saved it to our cloud on Google Drive, from where you can download the file:
➡ TS80P_Smart_Soldering_Iron_Manual.pdf
The soldering iron TS80P
The soldering iron consists of a black anodised aluminium handle with a length of 9.6 cm and a maximum diameter of 1.7 cm. This part consists of two halves that are united by one bolt under the buttons to form a stable unit. The soldering tip is inserted into this handle, making the total length of the soldering iron 15.5 cm. The weight is only 36 grams. On the back is the USB-3 connector to which you have to connect the very flexible power cable.
In the handle is a small OLED display and two push buttons to switch on and configure the iron.
 |
| The two parts of the TS80P soldering iron. (© AliExpress) |
The technical data of the TS80P
According to the manufacturer, the soldering iron has the following specifications:
- Temperature range: 100 °C ~ 400 °C
- Temperature stability: ±3 %
- Warm-up time to 300 °C with 12 V supply: 8 s
- Power: 30 W max. at 12 V supply
- Earth resistance from tip to crocodile clip earth wire: 2 Ω max.
- Display: OLED, 96 dpi at 16 dpi
- Power connection: USB 3
The electronics in the TS80P
At first glance, it seems impossible to access the electronics in this soldering iron. However, if you first remove the left part of the handle and then carefully use a small screwdriver to lift the plastic switches, you will find a small bolt hidden underneath. If you unscrew this with the supplied Allen key, you can pull the PCB out of the aluminium housing with some difficulty.
The two sides of the PCB are shown in the figure below. Top right you can see a part of the display that normally lies flat on the board, but for this picture it is carefully folded up. Left you see the connector for the soldering tip, right the USB-3 connector.
 |
| The two sides of the PCB. (© EEVblog) |
Working with the TS80P
Switching on the soldering iron
Plug the soldering tip into the handle and connect the TS80P to the mains power supply via the USB-3 cable. The display then shows the manufacturer's logo and the firmware version for a few seconds. We tested the soldering iron with version 1.23 of the firmware. Afterwards, the three symbols below appear on the display alternately.
 |
| The three symbols that appear on the display. (© e-Design) |
Quickly getting to work with the TS80P
Briefly press the left button on the handle. The soldering iron becomes active and heats up within ten seconds to the factory-set working temperature of 300 °C. The display shows the following information:
A The current temperature of the soldering point.
B Bargraph showing the current power consumed by the tip.
C The power supply of the soldering iron.
D The power supply protocol, P for PD protocol, Q for QC protocol, D for DC voltage.
E Indicates whether the temperature of the tip rises, drops or remains constant.
 |
| Display in active mode. (© e-Design) |
Changing the temperature quickly
If you have a more demanding soldering job and want to increase the tip temperature briefly, press the left-hand button for longer than one second. The current temperature now appears on the display between the < and > signs. With the left and right buttons you can increase or decrease the temperature in 10 °C steps. After five seconds, the temperature set in this way becomes the new working temperature of the iron. However, this value is not stored in the memory.
Changing the presets
The TS80P has eleven parameters that are assigned a specific value at the factory settings. These can be changed in several ways. The first way is to press the right button for longer than one second ('Setting' appears in the display) and then briefly press the same button. The message 'WkTemp 300°C' will then appear on the display. Scroll through all the adjustable parameters by pressing the right-hand button again. Once you have reached the parameter you wish to change, press the left-hand button for longer than one second. The current value of the parameter will reappear between the < and > symbols. You can adjust the value of the parameter with the two buttons. After five seconds, the value entered is accepted by the software.
The available parameters
You can set the following parameters:
- WkTemp
The working temperature of the tip, adjustable between 100 and 400 °C. - StbTemp
The standby temperature of the point, adjustable between 100 and 400 °C. - SlpTime
The idle time after which the bolt goes to standby temperature, adjustable between 60 and 999 seconds. - Power
The maximum power, adjustable between 16 and 24 W. If you are powering with a PD adapter, you cannot change this parameter. - TempStp
The minimum step value by which the temperature can be increased or decreased, adjustable between 1 and 25 °C. - OffVolt
The maximum allowable supply voltage, adjustable between 10.0 and 13.0 V. If the supply voltage exceeds this value the TS80P will switch off. - Temp
Selection of temperature indication in °C or °F. - Hand
Operation of the soldering iron with the right or left hand. The function of the two buttons changes and the display rotates through 180°. - LowCur
When powering the TS80P from a power bank, this allows you to define that the power bank should still be active when the soldering iron is drawing standby power only. - ShwType
The display shows either the voltage or the power when heating up. - ---°C
An option to calibrate the displayed temperature. - Restore DFLT
Restore the factory-set values of all parameters.
Changing the presets with the computer
If you connect the TS80P with a USB-3 to USB-A cable to a USB port of a Windows PC, the soldering iron appears as an external hard disk in the Windows file manager. There is one file present, CONFIG.TXT. You can open this ASCII text file with Notepad. You can change the numerical value of ten parameters. Afterwards, you can save the file to the memory of the soldering iron.
 |
| The contents of the file CONFIG.TXT. (© 2022 Jos Verstraten) |
Your own startup icon
A nice trivia is that you can replace the Miniware factory logo that appears on the display when you start up the TS80P with your own logo. You need to create a BMP file with the dimensions 96 by 16 pixels in a drawing program. Using a Windows PC, copy this file to the 'removable disk' that becomes the TS80P in File Explorer. That's it!
Updating the firmware
At www.minidso.com you can load the software you need to renew or update the soldering iron's firmware. Of course, this is also done via a USB connection to your Windows PC.
Additional soldering tips
You can buy five different tips for this soldering iron. Just like the TS80P itself, these tips are also on the pricey side. You pay € 27,87 for them at AliExpress and € 22,00 at Eleshop.
 |
| The five available tips for the TS80P. (© 2022 Jos Verstraten/Eleshop) |
A few tests of the TS80P
The earth resistance of the tip
When soldering in extremely ESD sensitive circuits, it is recommended to ground the tip of this 12 Vdc soldering iron. You can attach the grounding cable with the supplied Allen key under the bolt that is located above the USB-3 connector. According to the specifications, the resistance between the tip of the soldering iron and the crocodile clip of the cable is maximum 2 Ω. We tested this via Kelvin measurements with our two multimeters and our RLC meter. We found the following values: 0.768 Ω ~ 0.672 Ω ~ 0.828 Ω. Whatever the correct value, it is clear that the earth resistance is much lower than specified.
Measuring temperatures
In the tests below, we tried to measure the temperature of the tip of the soldering iron as accurately as possible. We did this by attaching a type-K thermocouple with a very fine welding point as tight as possible around the thickening behind the tip of the iron by means of a piece of transformer winding wire . The contact point between the tip and the thermocouple was also coated with heat-conducting paste.

The accuracy of the temperature
The temperature of the soldering tip was measured by connecting the thermocouple to our UNI-T thermocouple meter UT320A. This has a specified accuracy of ±[0.5 % + 1 °C]. The thermocouple used has itself a specified accuracy of ±2.0 °C to +260 °C. The results are shown in the table below. Measurement results at temperatures of 300 °C and above should be taken with a margin of error, but they do give an indication of the accuracy of the TS80P.
 |
| The measured temperatures of the TS80P tip. (© 2022 Jos Verstraten) |
The warm-up time
According to the manufacturer, the TD80P heats up from room temperature to the factory set working temperature of 300°C within eight seconds. We tested this by connecting the thermocouple to our Lascar Electronics EL-USB-TC temperature logger. The results are shown in the graph below. Eight seconds appears to be a bit of a exaggeration, but at least you can get started after about twenty seconds. In this graph you can also see how the iron, in this measurement lying quietly on the table, automatically cools down to standby temperature after two minutes.
If you see how nicely the temperature of the tip goes to the set value and you also know something about control technology, you must conclude that the TS80P does not work with a simple and cheap ON/OFF system, but probably with a much more complicated PID controller (Proportional Integral Derivative) that ensures that there is absolutely no overshoot of the temperature.
 |
| The warm-up time of the TS80P. (© 2022 Jos Verstraten) |
Quick soldering of twenty pads
A second important property of any soldering iron is the thermal power present in the tip. The higher this power, the less the tip cools down when doing a number of solderings in quick succession. To test this, we used the TS80P to solder 20 fairly large copper pads (diameter 4.0 mm, borehole 0.7 mm) in quick succession. The results are shown in the graph below. The soldering of the pads starts at second 30 and lasts until second 60. You can see that the temperature of the tip hardly decreases and that the control system is perfectly capable of compensating the heat loss. After soldering, the tip is back at the set working temperature within ten seconds.
 |
| Temperature gradient when soldering twenty pads. (© 2022 Jos Verstraten) |
A heavier soldering job to conclude
Finally, we soldered a thick solid copper installation wire of 2.5 mm² to a fully copper-plated piece of PCB. We did not expect that this job would work with the finest tip in the program, but it did, with some effort. To avoid sticky conditions, the temperature was set to 350 °C.
 |
| Soldering a 2.5 mm² installation wire to a PCB. (© 2022 Jos Verstraten) |
Of course, we also logged the temperature behaviour of this job. You can see the results in the graph below. The soldering starts at second 10 and lasts until second 57. From this graph it follows that the tip of iron cools down a bit more than when soldering the pads, but that the electronics are well able to maintain a usable temperature.
 |
| Temperature gradient when soldering the 2.5 mm² wire. (© 2022 Jos Verstraten) |
Our opinion of Miniware's TS80P
We can only be enthusiastic about this little soldering iron. It looks trendy, feels good in the hand, the flexible power cable is great, the way you change points quickly is beautiful and the way it is operated is well thought out. Even after prolonged use, the handle stays cool. The only pity about this beautiful product by e-Design is that this gem is so expensive!

TS80P AMERICAN adapter