|
The W1209 is a thermostat that closes or opens a relay contact when the temperature exceeds a trigger temperature. By means of three push buttons you can program seven parameters. |
Introduction to the W1209
W1209 temperature controller
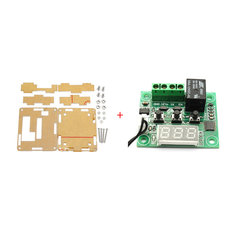
The module costs less than four euros, including an acrylic housing and a temperature probe. For that money you get a fully assembled 48 mm by 40 mm PCB, an acrylic housing kit and a waterproof temperature sensor that works according to the NTC principle. This sensor comes with a 45 cm cable and a connector that you can plug into the PCB. Three seven-segment displays show the current temperature with a resolution of 0.1 °C and are used as an aid in programming the module. Three miniature push buttons are available for this programming. You can connect the 12 Vdc supply voltage and the load via a screw terminal block. The internal relay has one contact that can switch 5 A at maximum 240 Vac or 10 A at maximum 14 Vdc. An LED lights up when the relay is switched on. The programming is stored in a non-volatile memory so that it is retained even if you switch off the power supply.
 |
| The W1209 in its transparent housing and the temperature probe. (© 2018 Jos Verstraten) |
- Manufacturer: Caizhixing Electronic o. Ltd
- Temperature range: -50 °C to +110 °C
- Measuring resolution between 10 °C and 99 °C: 0.1 °C
- Measuring accuracy: ±0.1 °C
- Measuring frequency: 2 Hz
- Sensor: NTC, 10 kΩ
- Sensor cable length: 45 cm
- Power supply voltage: 12 Vdc
- Standby supply current: 35 mA
- Active supply current: 65 mA
- Switching output: relay contact, 10 A max.
- Print dimensions: 48 mm x 40 mm x 14 mm
- Housing dimensions: 59 mm x 52 mm x 17 mm
The wiring diagram of the W1209
The figure below shows the complete wiring diagram of this thermostat. The heart of the circuit is an eight bit micro controller STM8S003F3P6. This controller has an 8 kB flash memory on board, more than enough for the simple program this thermostat needs. The NTC probe is powered by a stabilized voltage of +5 V and is included in a resistor divider with R2. The sensor voltage goes to the analog input number 6 on pin 3. The output PA3 is connected via a resistor divider R7/R1 to the transistor T1 and its relay. The LED is powered from the +5 V power supply of the processor via the resistor R4.
The diode D1 protects the circuit against the wrong connection of the 12 V supply voltage. Via a stabilizer AMS1117, a voltage of 5 V is derived from the 12 V to supply the micro controller, the LED and the sensor.
 |
| The complete wiring diagram of the W1209. (© 2018 Jos Verstraten) |
The only thing you have to build on this 'kit' is to mount the PCB in the housing. As with many cheap Chinese electronics modules, the housing consists of six custom cut acrylic sheets. As we have already observed with this type of construction, it all does not fit together without any problems. The bottom plate is too close to the PCB, the wires of the components cause the bottom plate to bend. First cut off as many of the wires as possible! The relay partly protrudes from the top plate of the housing.
Annoying is the fact that the designers didn't take into account the fact that you have to attach the module to the wall. If the bottom plate had been made two centimetres wider and had been provided with two extra holes, this problem would have been solved.
Through slots in the top plate, you can press the three buttons with a small screwdriver and you can approach the screws of the screw terminal and the connector for the sensor. The fact that you cannot operate the buttons by hand is not a problem. You just have to press these buttons to program the module to your wishes, after that you leave them alone.
 |
| The six acrylic plates that make up the housing. (© 2018 Jos Verstraten) |
In the picture below you can see what the components on the PCB are for. The PCB has a 4-wire programming port in case you feel the need to reprogram the micro controller yourself. If you google on 'programming the W1209' you will find, for example, a page in which the module is purely software converted into a temperature logger.
 |
| The components on the PCB. (© 2018 Jos Verstraten) |
Working with the W1209
Connection of the load, sensor and supply voltage
You can use the relay to directly switch the 230 Vac supply voltage for an electric heater or an air conditioner. You can load the switch to an output of approximately 1,000 W.
After switching on the power supply, the W1209 immediately displays the actual temperature.
Setting the trigger temperature
The first thing you need to set is the trigger temperature at which the thermostat must come into action by switching the relay on or off. This goes as follows:
- Press and release the 'SET' button, the display will blink.
- Increase or decrease the reading per 0.1 °C with the '+' and '-' buttons.
- Confirm the setting by pressing 'SET'.
Programming the thermostat
The thermostat has seven parameters, numbered from 'P0' to 'P6', which you can set. Programming these parameters is very easy in five steps:
- Press the 'SET' button for more than three seconds and release the button again. You will now see 'P0' appear on the display.
- With the two buttons '+' and '-' you can scroll through the seven parameters.
- Confirm your choice by pressing 'SET'.
- Change the parameter with '+' and '-' until the desired value appears on the display.
- Confirm the setting by pressing 'SET'.
P0, Heater or Cooler
This parameter has only two settings, 'H' or 'C'. In the first case, the thermostat works as a heater. This means that the relay remains switched on until the actual temperature equals the trigger temperature. If you use the thermostat as a cooler, the relay first switches on when the actual temperature equals the trigger value.

P1, hysteresis
This parameter is used to insert a threshold between the switching on and off temperature of the relay. You can set this threshold between 0.1 °C and 30.0 °C. The operation of this parameter is shown in the figure below. Suppose you set P0 to 'H', the trigger temperature to 22 °C and the hysteresis to 1 °C. The relay remains switched on until the ambient temperature has risen to 22 °C. At this point, the relay switch opens and your heating device will switch off. However, the room heats up even further to 23 °C as a result of the residual heat in the device. A little later the room starts to cool down again. The relay does not switch on again when the temperature has dropped to 22 °C, but first at a temperature of 21 °C.
The hysteresis ensures that the relay and the equipment it controls do not switch on and off too often, which increases the service life.
 |
| Graphically explained the term hysteresis. (© 2018 Jos Verstraten) |
With P2 you can limit the maximum value of the trigger temperature. You can increase this parameter to a maximum of 110 °C. The use of this is that this programming makes it impossible for anyone to accidentally set a trigger temperature too high.
P3, lowest limit
This parameter defines the minimum value of the trigger temperature you can set. The limit is -50 °C.
P4, calibration factor
With this parameter you can set a correction factor between -7 °C and +7 °C, which is added to or subtracted from the measured temperature. If you have a calibrated thermometer, you can use this parameter to calibrate the supplied sensor. This option is useful if you connect the sensor to the W1209 with a long cable. Remember that measuring the temperature means measuring the resistance of the sensor and that the resistance of the cable to the sensor is also measured.
P5, delay on the switch-on time
Sets a time between zero and ten minutes between reaching the trigger temperature and switching the relay on or off.
 |
| Programming the delay time for switching on the relay. (© 2018 Jos Verstraten) |
This allows you to enter a temperature above which the relay will switch off. If the measured temperature increases, 'HHH' also appears on the display.
The W1209 tested
Accuracy of the temperature
An NTC has no linear resistance progression in function of temperature. In micro controller controlled thermometers, this non-linearity is compensated by entering a table of compensation values into the memory. By adding or subtracting these values from the measured resistance values, the non-linearity is converted into a linear relationship.
Of course we were curious what the accuracy of such an extremely cheap device looks like.
We compared the reading of the NTC sensor with that of a type-K thermocouple coupled to an accurate Lascar thermometer. The thermocouple was in good thermal contact with the sensor. Of course we have set the calibration factor to 0. The results are shown in the graph below. The accuracy of ±0.1 °C claimed by the manufacturer is obviously not achieved. The horizontal axis shows the temperatures measured with the reference meter. The vertical axis shows the results of the W1209. The blue line shows the ideal relationship, the red the measured values. The accuracy and linearity are not that bad. The average error is ±1.43 °C and that is good enough for a thermostat. Around room temperature (+20 °C) the error is the smallest but the deviation increases, both to lower and to higher temperatures. At a reference temperature of -5 °C, the W1209 indicated a temperature of -7.2 °C. At a reference temperature of +100°C, the module claimed it was +102°C.
 |
| The measurement results of the test of accuracy and linearity. (© 2018 Jos Verstraten) |

W1209 DC 12 V, -50 to +110 °C Temperature Control Switch