
|
LED light strips are an inexpensive alternative to the old light garlands with small bulbs. We were looking for the cheapest way to turn your home or shop window into a colourful spectacle with LED light strips. |
Controlling LED light strips via WiFi
The time of the coloured light bulbs is of course years behind us. Nowadays we decorate our house or shop window with LED strips which we control with an app on our smartphone or tablet via our WiFi network. But what to choose from the immense range of light strips and control units? We looked around on the internet and found the combination below which, as far as we could tell, offers the cheapest solution if you want to get started with RGB LED strip lighting of your house or shop:
- Five meter RGB LED strip type SMD-5050, for sale for a price of around five euros at among others Banggood.
- The RGB controller ZJ-MW-RGB, which has no buttons but allows you to control the light strip only via WiFi with your smartphone or tablet. This device costs about eight euros.
- The app Magic Home Pro, of course free of charge, has a lot of possibilities to control your light strip. You can not only control it via a direct WiFi connection, but also via the internet, via Amazon's Alexa or via Google's Assistant.
 |
| The combination we tested: ZJ-MW-RGB, SMD-5050 and Magic Home Pro. (© 2020 Jos Verstraten) |
The RGB LED light strip SMD-5050
Composition of the strip
Produced by Shenzhen Shiji Lighting Co, this light strip is composed of segments exactly 50 mm long, each containing three RGB LEDs plus three series resistors to power the unit from 12 Vdc. There is a cutting line between two segments. You can cut the strip so that you can adjust the size of the light strip to the size of your window frame. The strip has a good adhesive layer of VHB Adhesive of 3M with a protective sheet on the back. After removing the protective sheet, you can attach the strip to any smooth surface without any problems.
Removing this double-sided tape at a later time is unfortunately a little more difficult. You can remove VHB tape with a WD-40 spray can or, as we read on the internet, a mixture of water and lemon oil (not tried).
Note
The SMD-5050 is only suitable for indoor use!
 |
| One segment of the SMD-5050 RGB LED strip. (© 2020 Jos Verstraten) |
As can be seen from the picture above, each segment has four connections on either side that are connected to each other on the strip and thus run through the entire strip. At the upper contact '+12V' is noted and it is therefore not difficult to reconstruct the diagram of one segment. The three LEDs with the same colour are in series and are connected to the +12V via a series resistor. So the system works with 'common anode' control, where the three connections 'G', 'R' and 'B' are pulled to ground to illuminate the LEDs.
If you want to control the intensity of the three colours, you have to work with pulse width modulation, where the three LEDs are not pulled permanently to ground, but switched with for example a very low-ohmic MOSFET. By controlling the ON/OFF ratio of this semiconductor, you can modulate the average current through the LEDs and also the light output.
 |
| The circuit diagram of one segment of the SMD-5050. (© 2020 Jos Verstraten) |
The five meter light strip comes with a four pole connector at each end, a male on one side and a female on the other side. So you can connect several light strips to each other. The only limitation is the maximum current the RGB controller can control and of course the current capacity of your 12 V power supply. But... just read on to the paragraph where we are going to measure the internal resistance of the LED strip!
On the connector there is an arrow at the contact that you must connect to the +12 V.
 |
| Thanks to male and female connectors you can easily connect multiple strips. (© 2020 Jos Verstraten) |
We measured the three currents that the five meter long strip draws from a 12 Vdc power supply:
- Red LEDs: 864 mA
- Blue LEDs: 673 mA
- Green LEDs: 723 mA
The internal resistance
The four voltage lines that run along the full length of the five meters strip are nothing more than thin and narrow copper tracks on a flexible PCB. So we were very curious about the internal resistance of these lines. To measure this, we connected 12 V and ground to the input connector of the light strip and noted the voltage at the output connector of the strip between the same lines. The voltage drop over the five meters divided by the above mentioned currents gives an impression of the resistance of the lines. This is disappointing:
- Red voltage line: 4.3 Ω
- Blue voltage line: 3.8 Ω
- Green voltage line: 3.8 Ω
Be aware that when all the red LEDs are fully lit, only 8.29 V of the 12.0 V input voltage remains at the output of the five meters! It makes little sense to switch several strips in a row, the available supply voltage will decrease quite quickly and the intensity of the last LEDs will be much lower than that of the first LEDs in the total light strip.
The RGB controller ZJ-MW-RGB
A small unit with a lot of possibilities
The ZJ-MW-RGB of Zenge Co. Limited is also offered under type code SL-LC01. The complete electronics are, unbelievably but true, in a housing of only 53 mm x 24 mm x 11 mm. In this box you will find a WiFi transmitter/receiver with microprocessor and three control stages for the three colour LEDs. On the left side is a 10 cm long cable with a female standard power connector of 5.5 mm x 2.1 mm, with the positive pole in the middle contact. You can plug it in the output connector of any standard power supply without any problems. On the right side there are four holes in which you can plug the four-pole male connector of the light strip.
 |
| The ZJ-MW-RGB in its small housing. (© 2020 Jos Verstraten) |
- Operating principle: PWM with constant output voltage
- Input voltage: 5 Vdc ~ 28 Vdc
- Output current: 3 x 4 A max.
- Output power: 144 W max.
- Light strip control: PWM with MOSFETs to ground

The operation of the ZJ-MW-RGB
As expected, the ZJ-MW-RGB works according to the principle of pulse width modulation (PWM). The LEDs are connected to ground at a frequency of 1 kHz via MOSFETs acting as switches. By controlling the ON/OFF ratio of the MOSFETs you can supply more or less average power to the LEDs. In the oscillogram below you see the voltage on two of the three LED chains (red and blue) with respect to the common +12 V connection. The color is set to a mixing color, which controls both LED chains.
 |
| The voltages on the red and blue lines of the light strip. (© 2020 Jos Verstraten) |
In the picture below you can see the two sides of the double-sided printed circuit board in the RGB controller. As a WiFi communicator, the well-known but already slightly outdated ESP-12S module is used. This module works with an ESP8266 microcontroller and supports the WiFi protocols 802.11 b/g/n in the 2.4 GHz band. On the other side of the PCB you can see the controls of the LED-strings with the clearly recognizable SMD-MOSFET's at the output connector.
 |
| The two sides of the PCB in the ZJ-MW-RGB. (© 2020 Jos Verstraten) |
As already written in the introduction, you need a power supply that supplies 12 Vdc and can supply at least 2.5 A current. Attention, this is the maximum power consumption of one SMD-5050 LED strip when all LED's are driven and the strip emits cold white light. If you load the ZJ-MW-RGB to its limit by connecting four LED strips to it, you will need to purchase a power supply that can provide at least 10 Amps of power.
The Chinese mail order companies will not let you down in this area either. For less than thirteen euros you can buy an S-150-12, a 12 Vdc power supply that can deliver a maximum of 12.5 A and that has been tested by us as excellent, see the article 'Tested: S-150-12, 12 V ~ 12.5 A power supply' on this blog.
The drawing below outlines how to connect the 12V power supply, the ZJ-MW-RGB and one or more SMD-5050s.
 |
| Connecting the three components of the LED light strip. ((© 2020 Jos Verstraten) |
The app Magic Home Pro
For Android and iOS
This app is available for Android and for iOS via the 'Google Play Store' and via the 'APP Store'. On the top of the ZJ-MW-RGB there is also a QR code that takes you directly to the relevant internet page.
You can let the Magic Home Pro communicate with the WiFi module in the ZJ-MW-RGB in five different ways:
- 1-to-1 mode
This mode allows your tablet or smartphone to communicate directly via WiFi with the module in the ZJ-MW-RGB. You do not have to log in anywhere, do not create an account and the communication does not go beyond the range of your WiFi network. Disadvantage is that you are temporarily disconnected from the Internet. - WiFi mode
In this mode you must create a Magic Home cloud account and the app will communicate with the ZJ-MW-RGB over the cloud and your existing WiFi network. However, this mode does require you to register and log in each time. - Remote control via the Internet
This is a logical consequence of the first mode. You can then control your LED light strips from the cloud, i.e. wherever you have access to the Internet. - Working via Google Assistant
Even then, of course, you must first create a Magic Home cloud account. - Working via Amazon Alexa
Ditto, first create a Magic Home cloud account.
Working via the 1-to-1 mode
In this article we will only discuss working in the 1-to-1 mode, because we feel it is the safest mode and your data will not end up where it doesn't belong.
Connect the ZJ-MW-RGB to the LED light strip(s) and then to the 12 Vdc power supply. Connect it to the mains. You will see the three color LEDs light up one after the other.
Go to the WiFi settings on your smartphone or tablet. If all goes well you will see the name of the WiFi module in the ZJ-MW-RGB in the list of available WiFi networks: LEDnetxxxxxx. The xxxxxx form a code unique to the WiFi module in your RGB controller.
Then connect to this network. Your tablet retrieves the IP address of the WiFi module and connects to the ZJ-MW-RGB.
 |
| Connecting your tablet to the WiFi module in your ZJ-MW-RGB. (© 2020 Jos Verstraten) |
Click on the name of this controller and you will be taken to the various screens where you can configure your LED light strip(s).
Have you chosen the desired light pattern? Then go back to your WiFi settings and restore the connection to your normal WiFi network.
The configuration of your LED light strip(s) will remain in the ZJ-MW-RGB until you repeat the procedure described and select a different light pattern. Even after switching off the 12 Vdc power supply, the last set pattern will remain in the memory of the ZJ-MW-RGB. When reconnecting to the power supply, the RGB controller drives your light strip(s) according to the pattern stored in the memory.
 |
| In the opening screen of 'Magic Home Pro', you can see the WiFi module in your RGB controller. (© 2020 Jos Verstraten) |
In this screen, which appears automatically when you click on your 'Device', you can manually set the colour of your LED light strip(s). In the large coloured circle there is a cross that you can move with your finger over the surface of the circle. This way you can select a certain color. You can assign 256 different intensities to the red, green and blue LEDs. In total you can thus select 256 ● 256 ● 256 = 16,777,216 colors. These three intensities appear as numbers in the three colored boxes at the top left. Under the five 'DIY' buttons, you can save five settings. The slider potentiometer under these buttons allows you to vary the intensity of the selected color.
 |
| The 'Color' and 'CCT' screens. (© 2020 Jos Verstraten) |
'CCT' is the acronym of 'Correlated Color Temperature'. The color temperature determines the color reproduction of a white LED. The unit of CCT is the kelvin. A warm white LED has a CCT of about 2,700 K, a neutral white LED of about 4,000 K and a cold white LED of about 6,300 K. In the 'CCT' screen you can set the colour temperature of the LEDs from 2,000 K to 9,000 K. This screen has the same options as the 'Color' screen.
The 'Functions' screen
On this screen, you can select from twenty preset lighting patterns. For example, you can choose 'Seven color cross fade', where the RGB controller allows your LED light strip(s) to slowly or quickly pass through all the colors of the rainbow. You can set the speed with the slider potentiometer at the bottom of the screen.
The RGB controller also keeps the preset and speed you selected in its memory. When the power supply is turned off and on again, the light garland will start running again with the selected preset, without the need for a new WiFi connection.
 |
| The 'Functions' screen with twenty presets. (© 2020 Jos Verstraten) |
These are two screens that you cannot use in 1-to-1 mode because continuous data transfer from the app to the RGB controller via your WiFi network is required. With 'Mic' you can control the light strip(s) with the microphone built into your tablet. With 'Music' you select an MP3 file present in your tablet and the light strip 'dances' to the rhythm of the music. You can select four styles: 'Rock', 'Normal', 'Jazz' and 'Classical'. However, both screens do not produce really spectacular light effects and get bored pretty quickly.
The 'Timer' function
If you click on the icon of an alarm clock, at the top right of the four screens discussed, you will be taken to the 'Timer' function. It will be clear that this function only works if the app is able to communicate with the RGB controller via your WiFi network. This option does not work in the 1-to-1 mode. You can set various timers. The basis of each timer is a specific time of day. After selecting this time, you can assign various functions to this time: ON, OFF, RGB, FUNCTION. You can also set the time for one, several or all days of the week. So if you only want your light strip(s) to be lit for a certain period of the day and you want to control this automatically, you need to set two timers: one for turning it on and one for turning it off.
 |
| Setting multiple timers. (© 2020 Jos Verstraten) |
With the app 'Magic Home Pro' you can easily control multiple RGB controllers, each with their own LED light strip(s). Each WiFi module in each ZJ-MW-RGB has a unique name in the LEDnet and you can activate it one after the other via WiFi, set the corresponding RGB controller and deactivate it again. If you do not work in the 1-to-1 mode, but via the cloud, you can access all installed devices anytime and anywhere via the app.
If you have more than one RGB controller installed, you can use the 'Groups' and 'Scenes' app to program more than one light strip.

RGB-Controller For LED-Strip 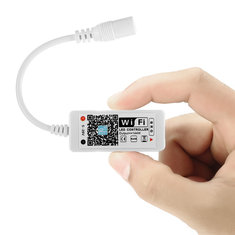
|
Non-Waterproof SMD-5050 LED-Strip .jpg)
|